
Core · Video walkthrough
Create a department record definition and use its published form
Configure a simple department-owned definition, distinguish validation/save/publication, and follow one custom record through draft, attachment and final revision.
Before you begin
- An authorized Core session with Records already usable and existing rights to manage/publish definitions and author/finalize records.
- A fictional practice department and a new unused definition key for any separate replay; this existing published example and finalized record must not be submitted again.
- Only the public242-byte software handout is used. No activation, security/role changes, import or production records are required.
Chapters
- Start with the definition catalog
- Create a distinct blank definition
- Choose a lifecycle and numbering policy
- Review fields, classification and client choices
- Keep validation and saving distinct
- Review publication impact
- Verify the published version and its settings
- Use the actual department form
- Read the saved draft identity
- Edit and reopen the same draft
- Add the handout from the saved record
- Attest and verify the issued number
- Inspect the retained revision and attachment
- Reconcile the record queue
- Find the right form through its catalog row
- Apply the pattern to your department
Watch the walkthrough
Step 1
Start with the definition catalog
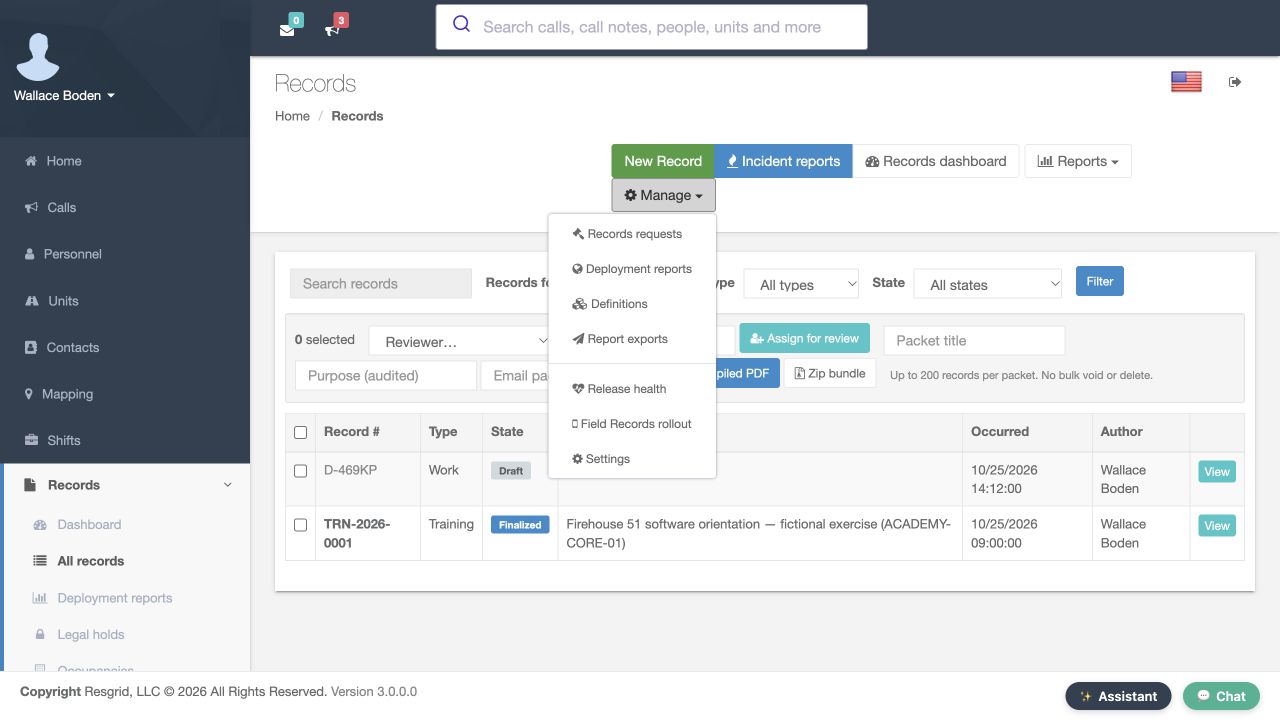
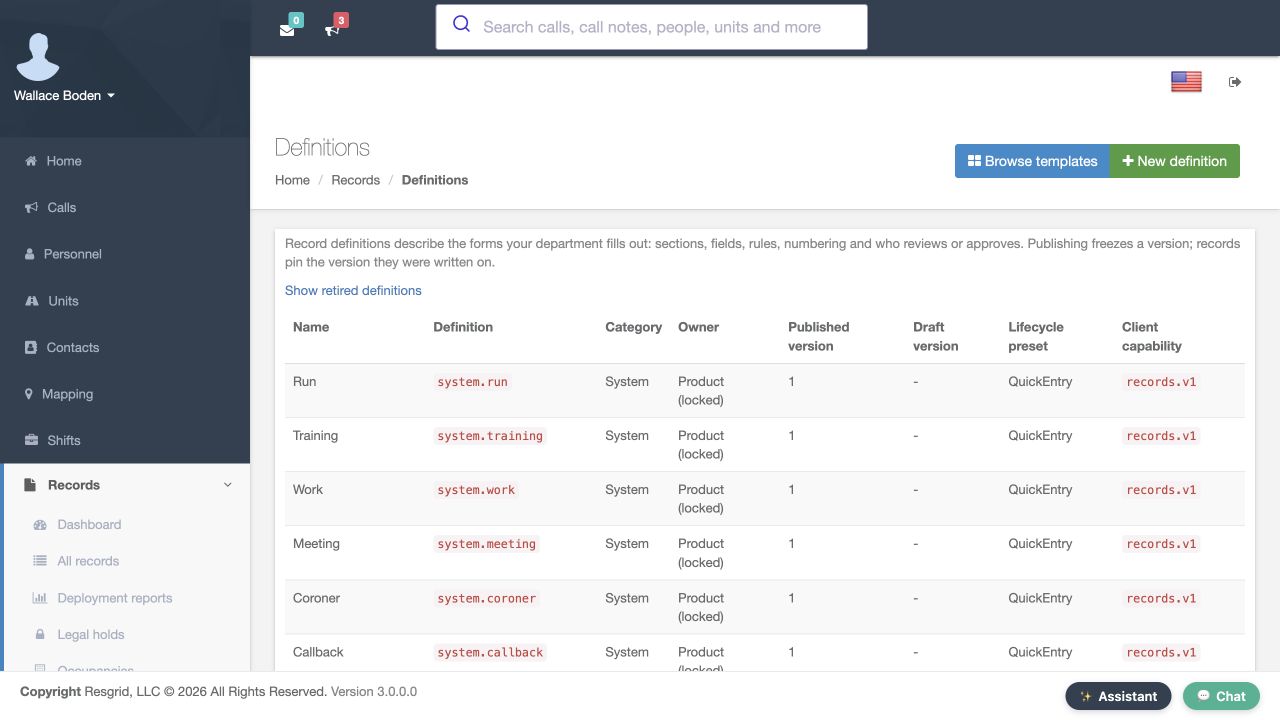
Department administrators use record definitions to give authors a consistent form and lifecycle. In Records, open Manage and choose Definitions. This example builds a department-owned form for a fictional community coordination exercise. The catalog separates published and draft versions. A definition describes the form; an individual record stores one completed entry. Choose New definition for the new exercise, leaving the product-owned forms unchanged.
Practice
Distinguish a form definition from one record, then locate the permitted New definition control.
Step 2
Create a distinct blank definition
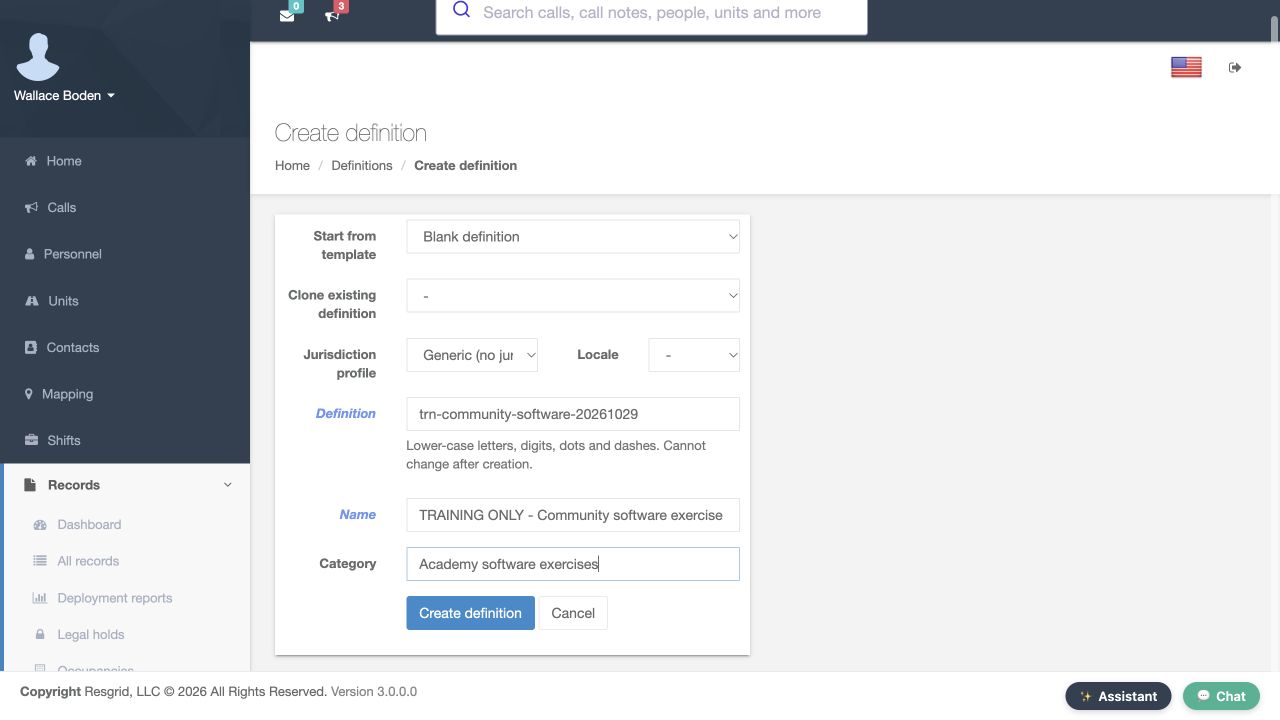
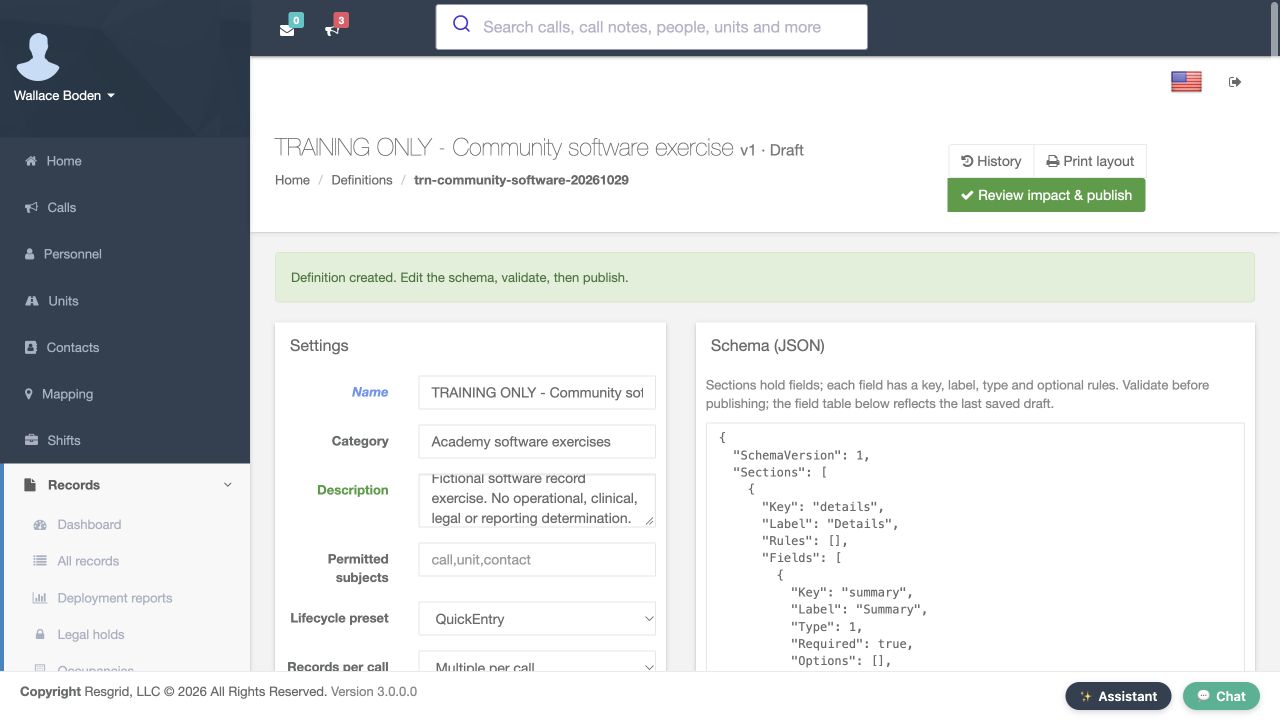
Start from template is set to Blank definition. Give Definition a unique lower-case key, then enter the Name and Category. Here the name is Training Only, Community Software Exercise, and the category is Academy Software Exercises. The key cannot be changed after creation, so review it before choosing Create definition. The returned editor identifies version one as Draft and confirms that the definition was created. It is not yet a published form.
Practice
Plan a distinct training key and descriptive category. Inspect this existing example instead of submitting its key again.
Step 3
Choose a lifecycle and numbering policy
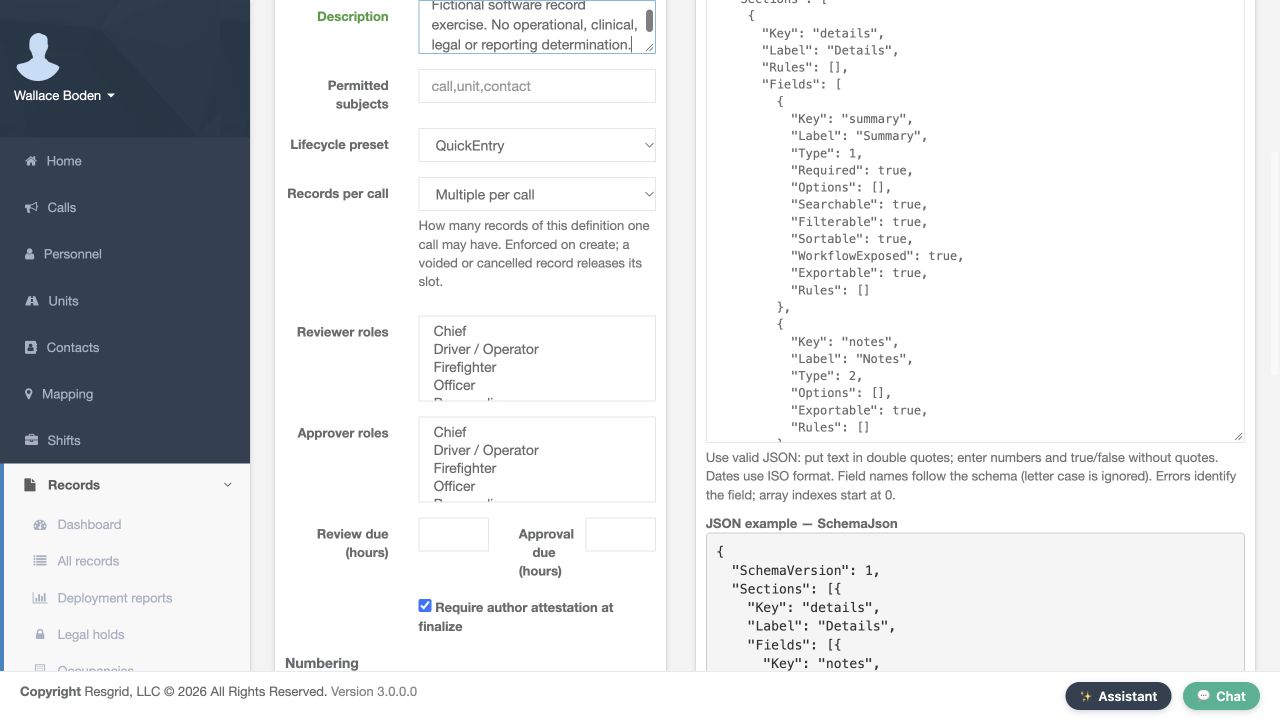
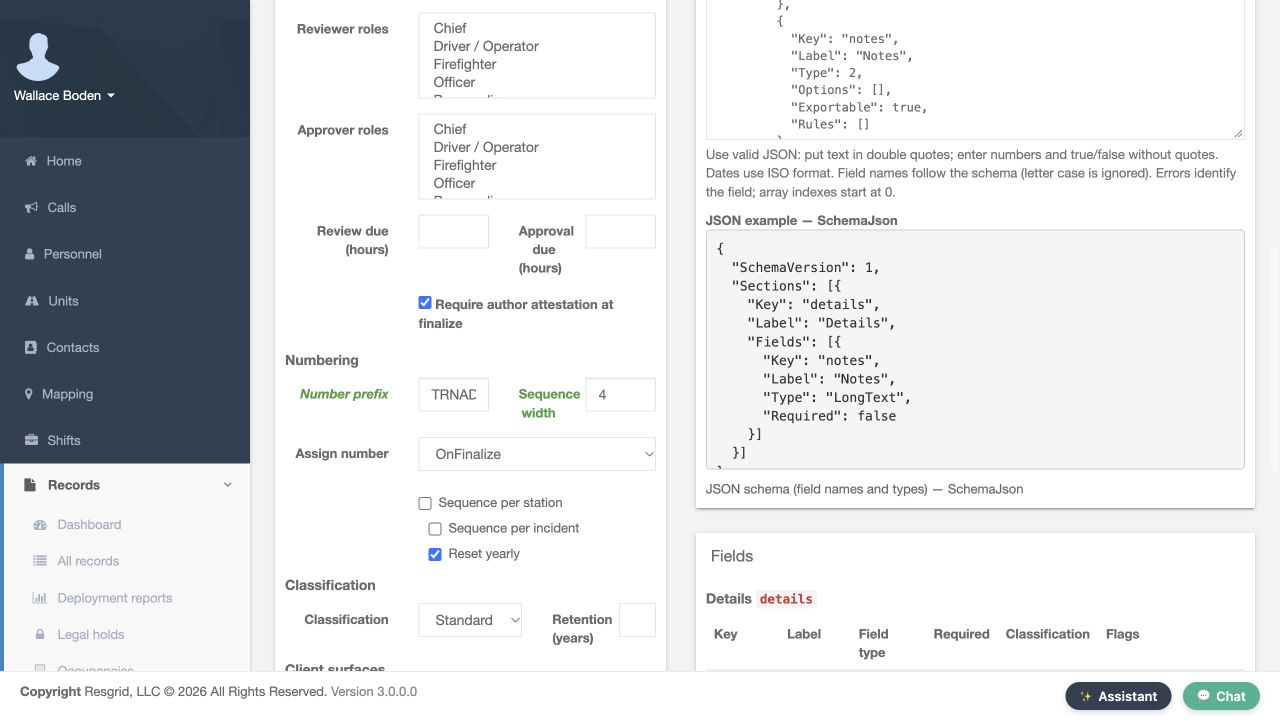
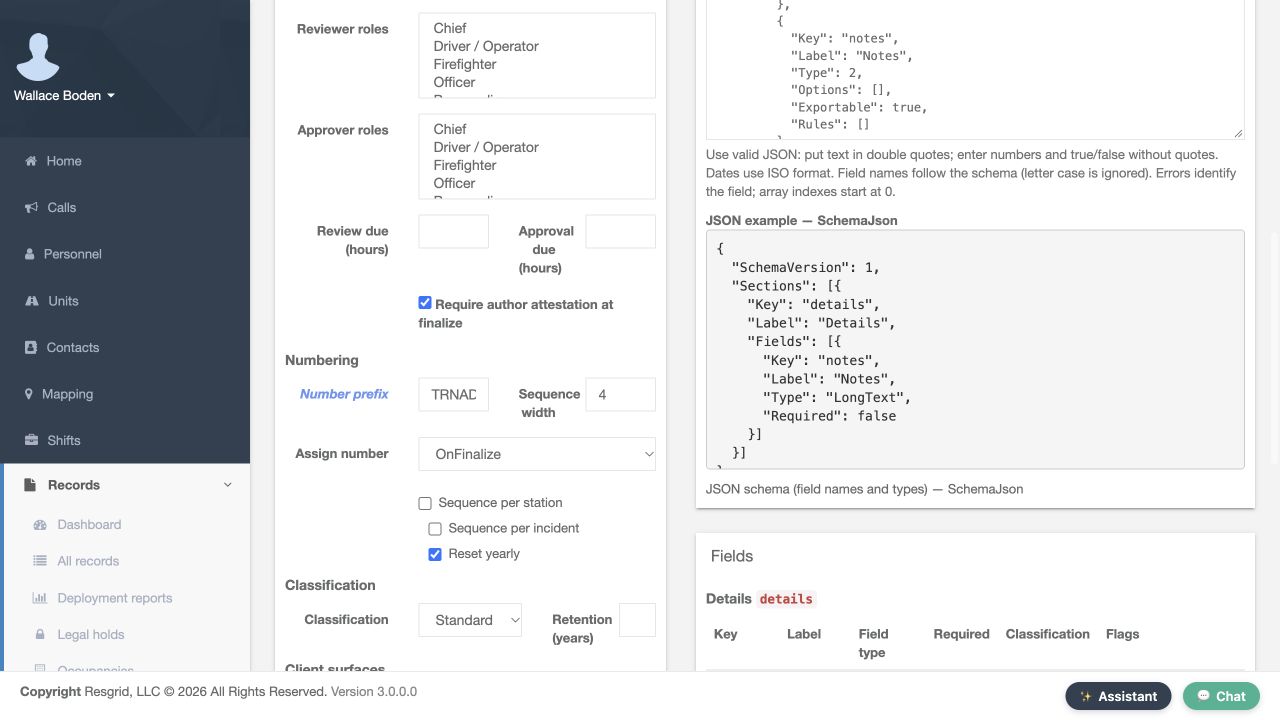
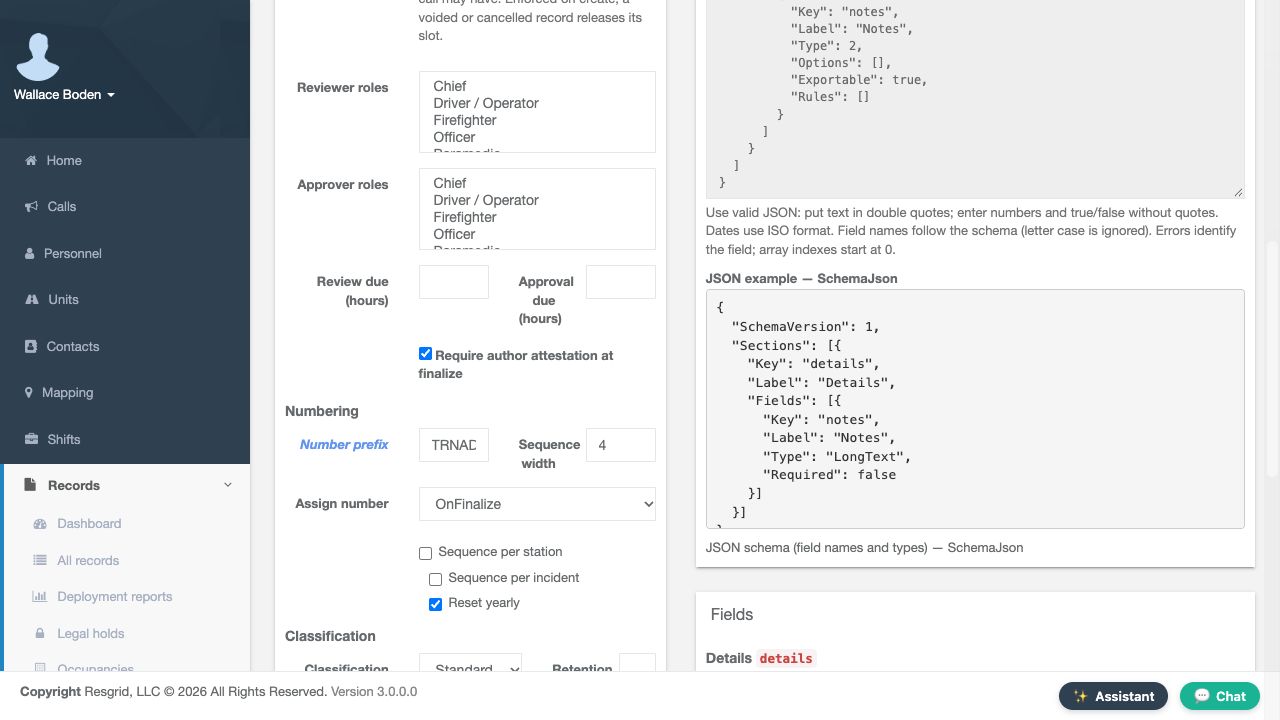
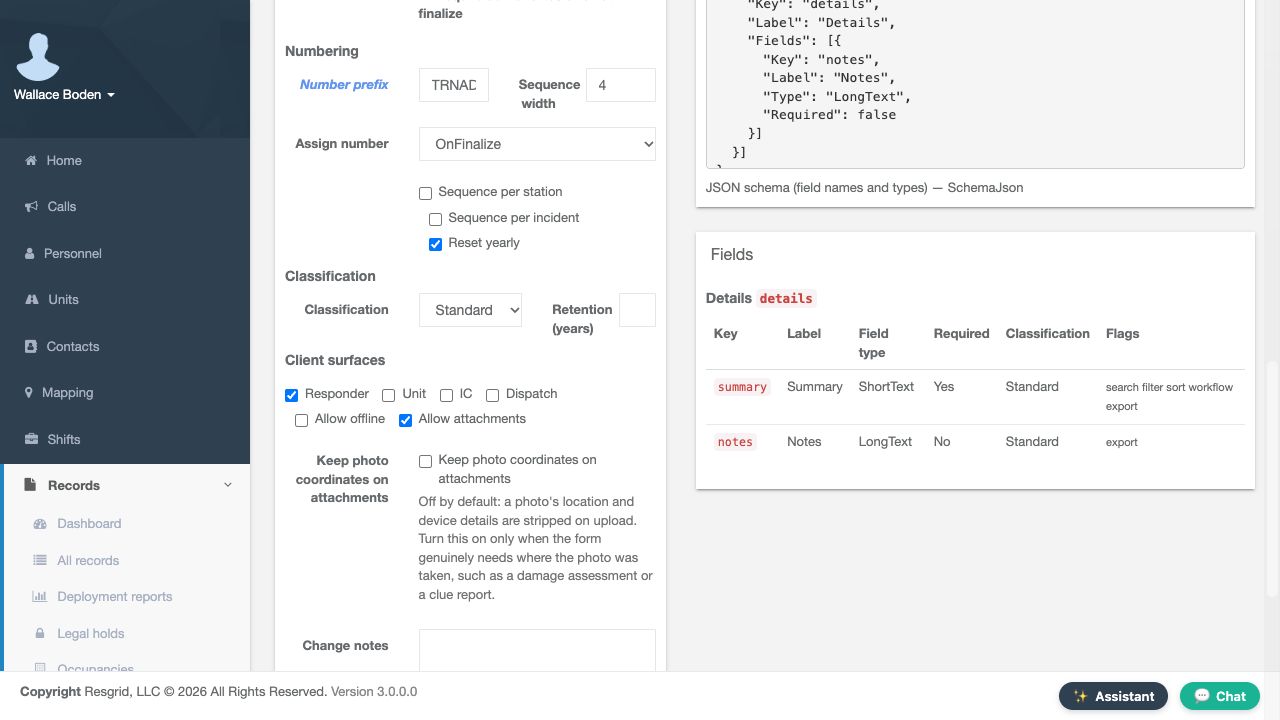
Lifecycle preset is QuickEntry, supporting a draft followed by finalization. Records per call is Multiple per call. Require author attestation at finalize is checked; reviewer and approver roles are not selected for this example. Under Numbering, Number prefix gives record numbers a recognizable label. Sequence width is four and Assign number is OnFinalize. Reset yearly is checked, while the station and incident sequence options are off. These choices provide one annual sequence for this definition and issue the number when the record is finalized, rather than when its draft first appears.
Practice
Explain why the draft has a reference before it receives a final number; identify the actual sequence options.
Step 4
Review fields, classification and client choices
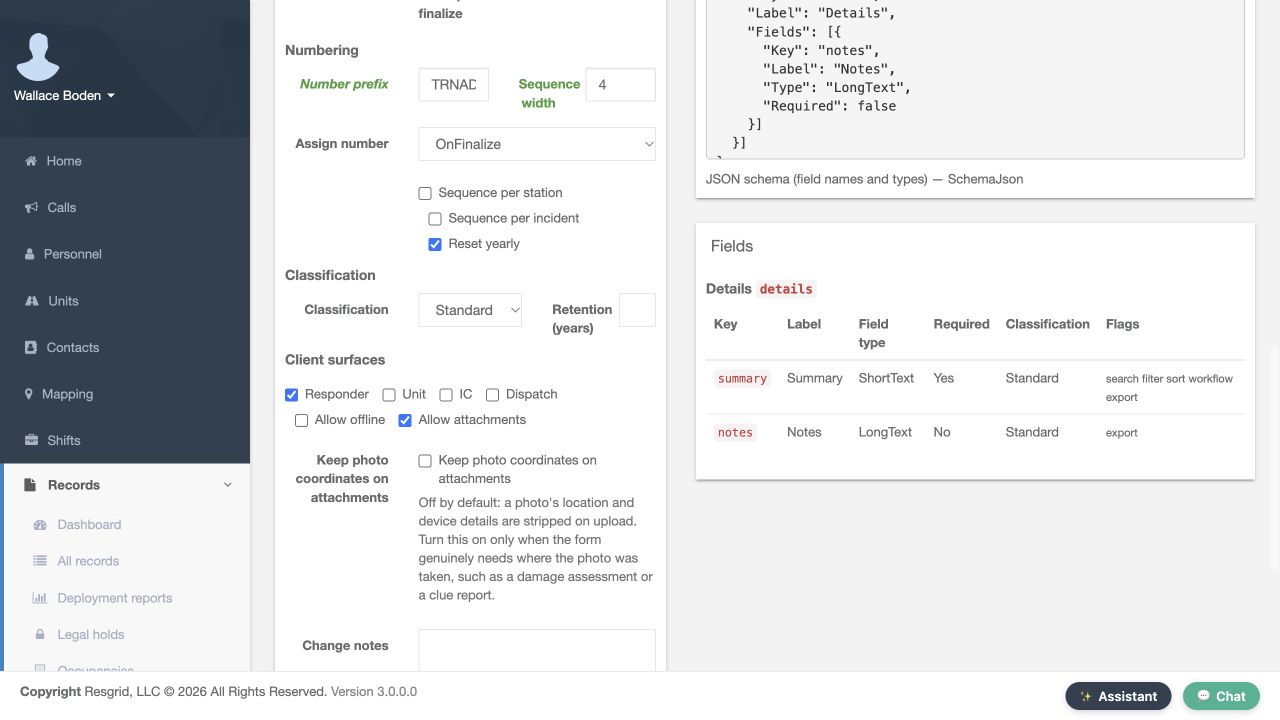
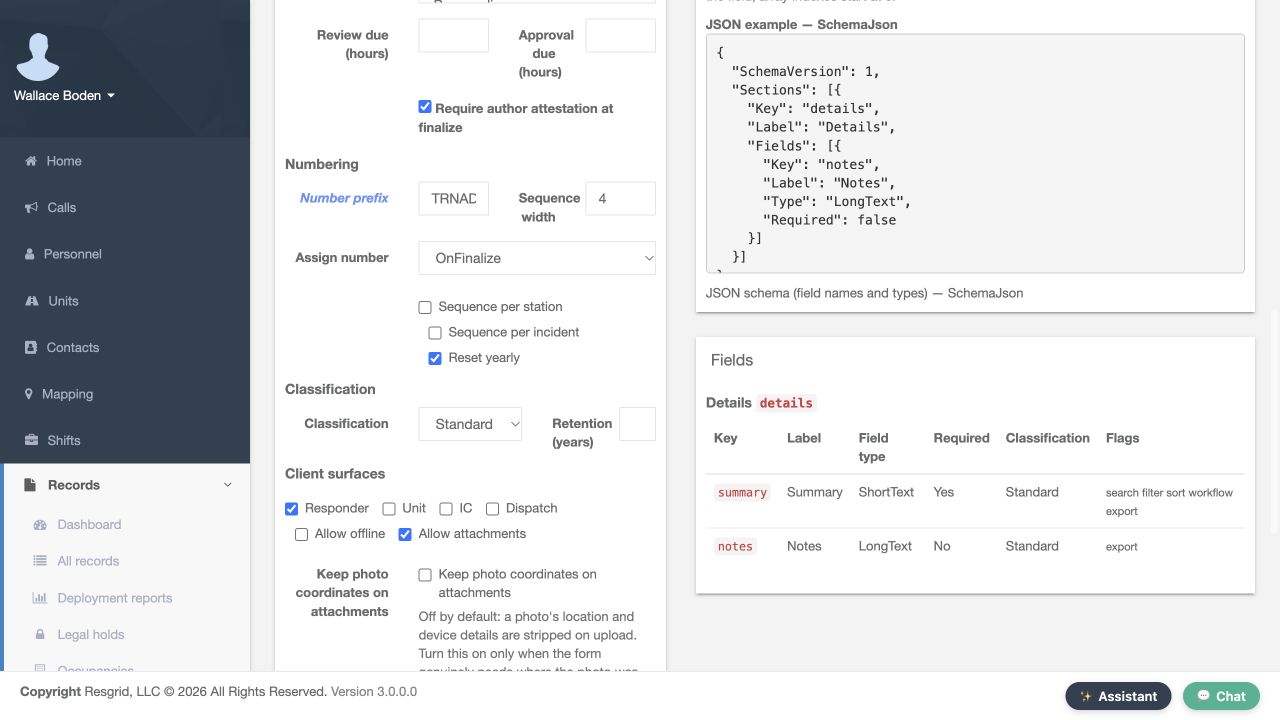
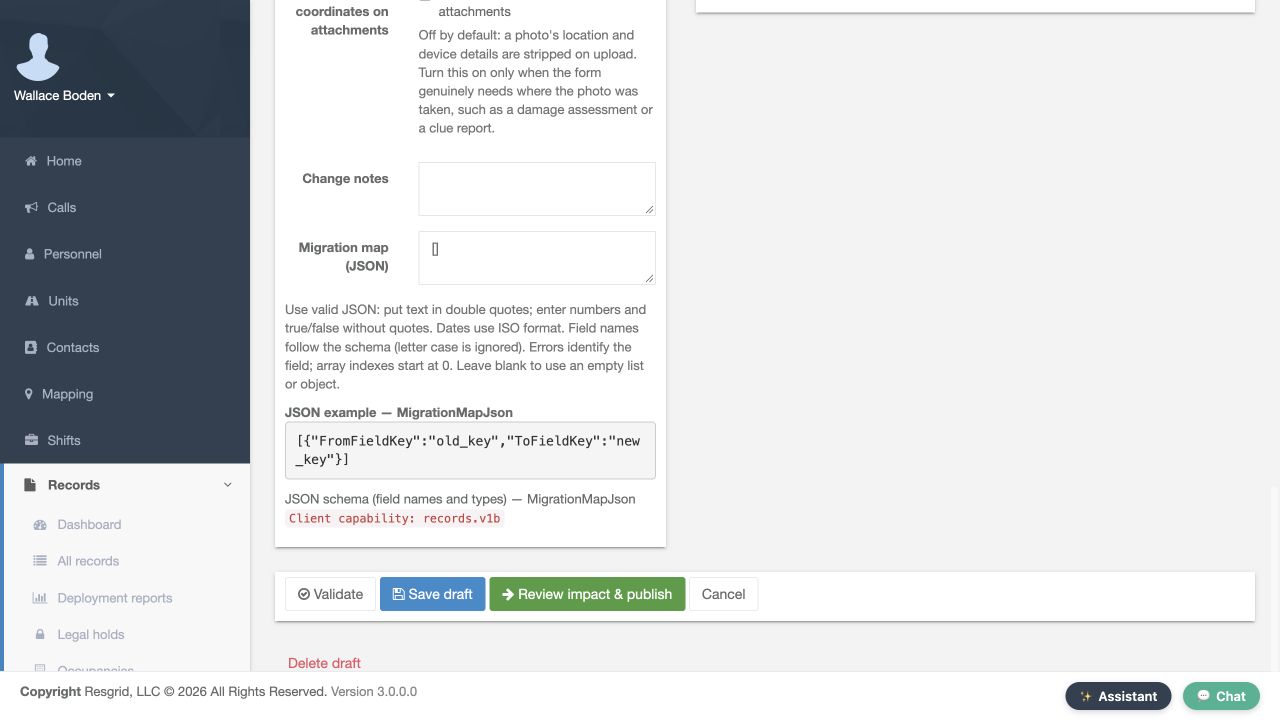
Classification is Standard. In Client surfaces, only Responder is selected. Allow offline is off, Allow attachments is on, and Keep photo coordinates on attachments is off. Together, these choices control where the form is offered, whether it can be used offline, and whether authors can attach files. The Fields table describes the unchanged starter form: Summary is required ShortText, while Notes is optional LongText. A short summary helps identify an entry; longer notes provide its context. Check that table rather than mistaking the nearby JSON example for the saved form.
Practice
Read the two field types and required flags, keeping definition classification separate from a later attachment classification.
Step 5
Keep validation and saving distinct
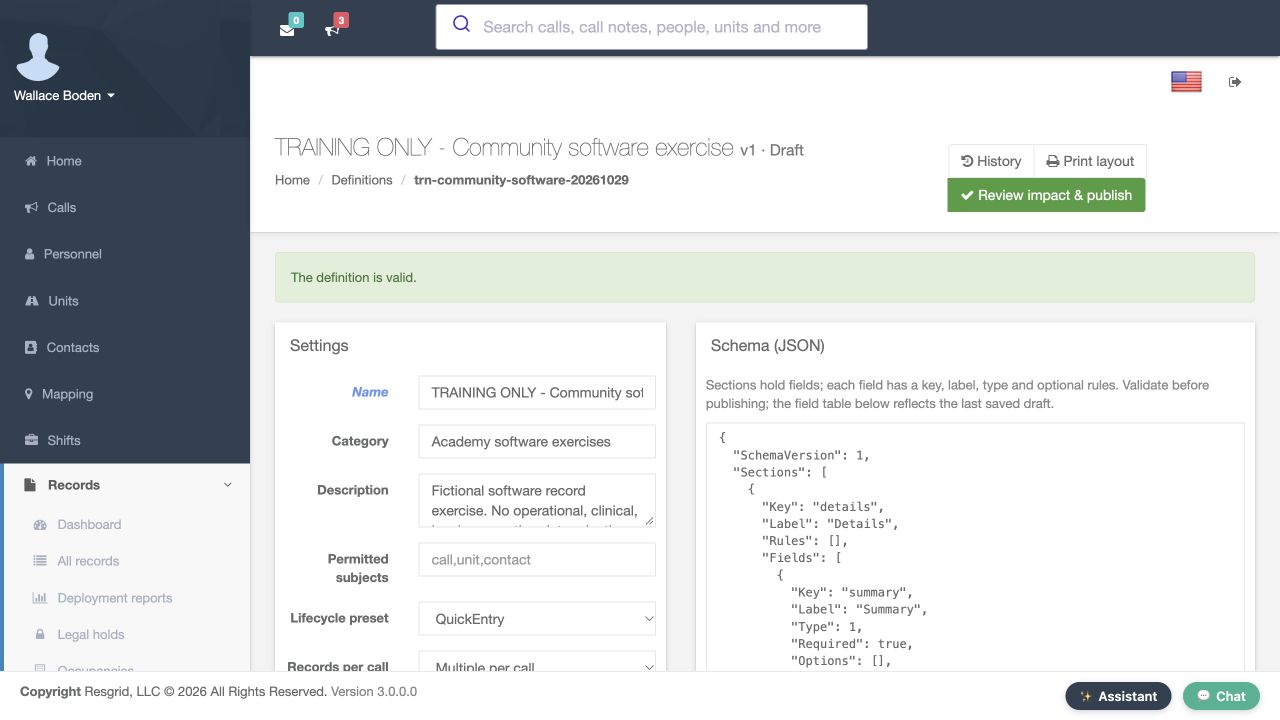
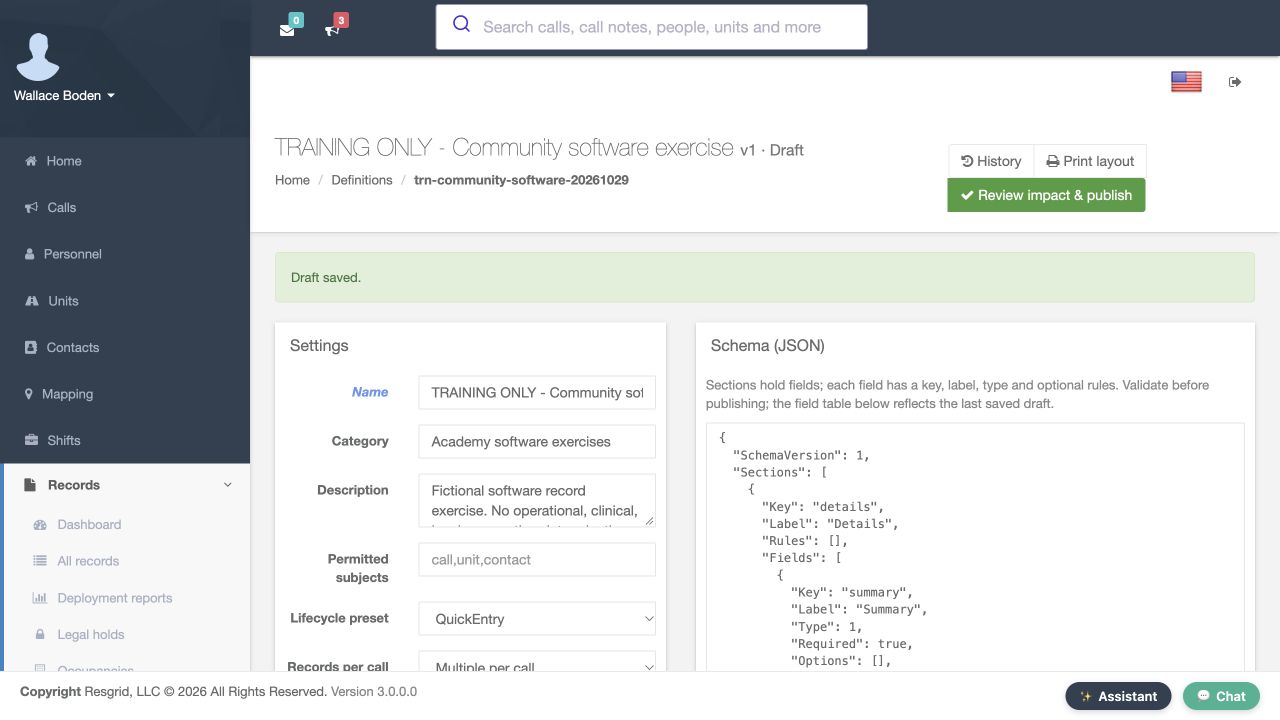
At the foot of the reopened draft, Validate, Save draft and Review impact and publish are separate controls. Validate checks the definition without publishing it. The validation result says The definition is valid, while the version remains Draft. The save confirmation says Draft saved. That confirms a definition save, not an individual record entry. Freshly reopening the saved version retains its numbering and attestation settings. Keep the validation result, saved configuration and publication state distinct.
Practice
Identify the separate control and result for validation, saving and publication; do not resave this published example.
Step 6
Review publication impact
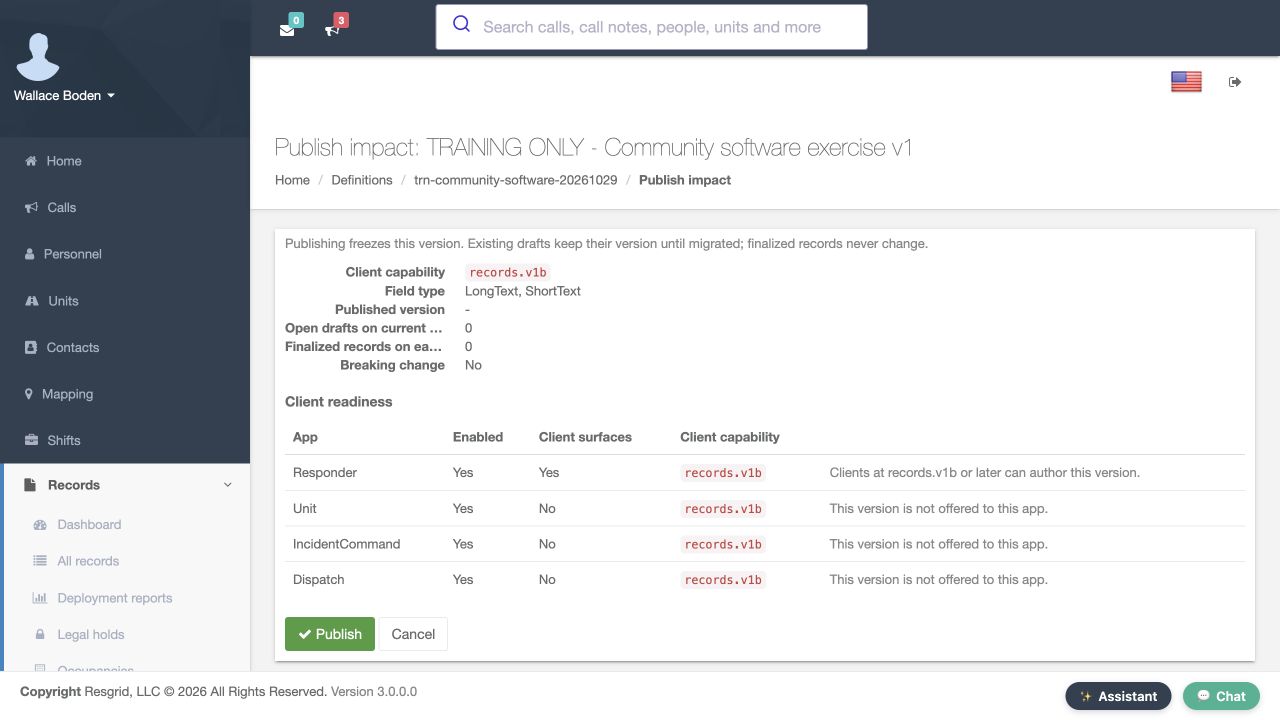
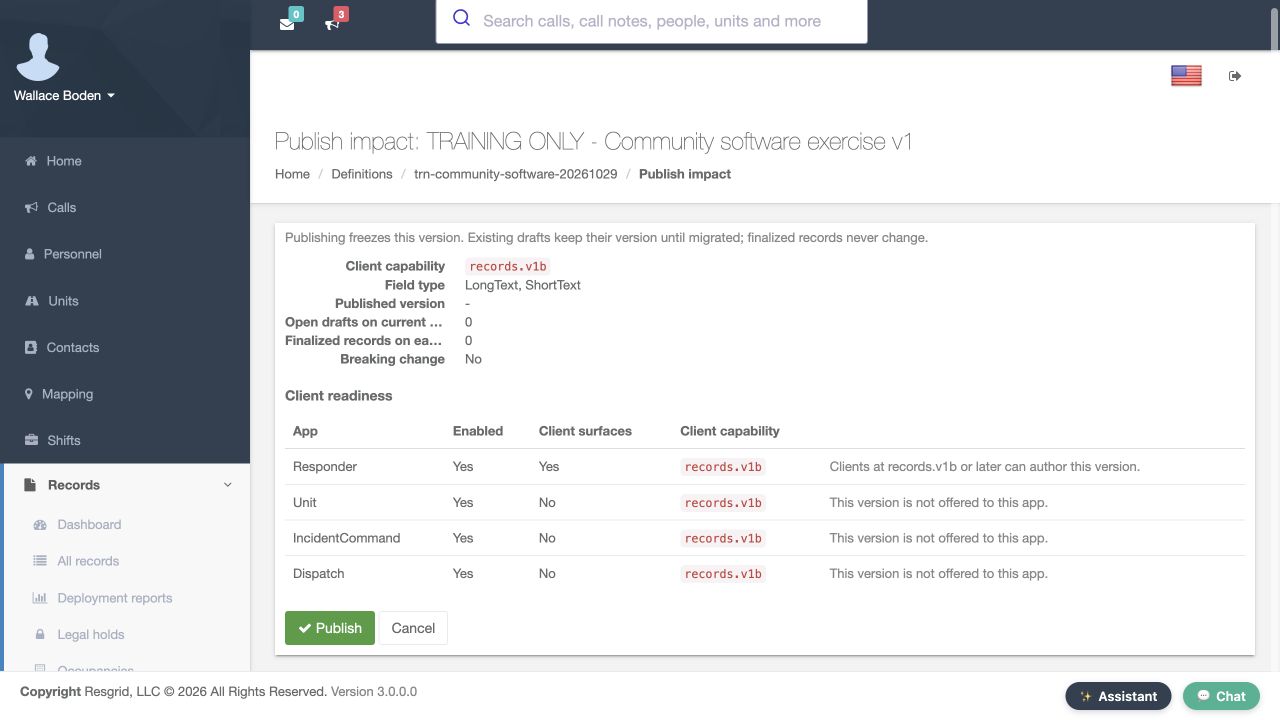
Review impact and publish opens Publish impact. Before the first publication, Published version is a dash and Breaking change is No. Read the impact before making the version available. Client readiness compares app availability, client surfaces and capability. Only Responder is offered this version. Review this table before using Publish to make the version available to authors.
Practice
Compare the client-surface column with the enabled-app column and explain why they answer different questions.
Step 7
Verify the published version and its settings
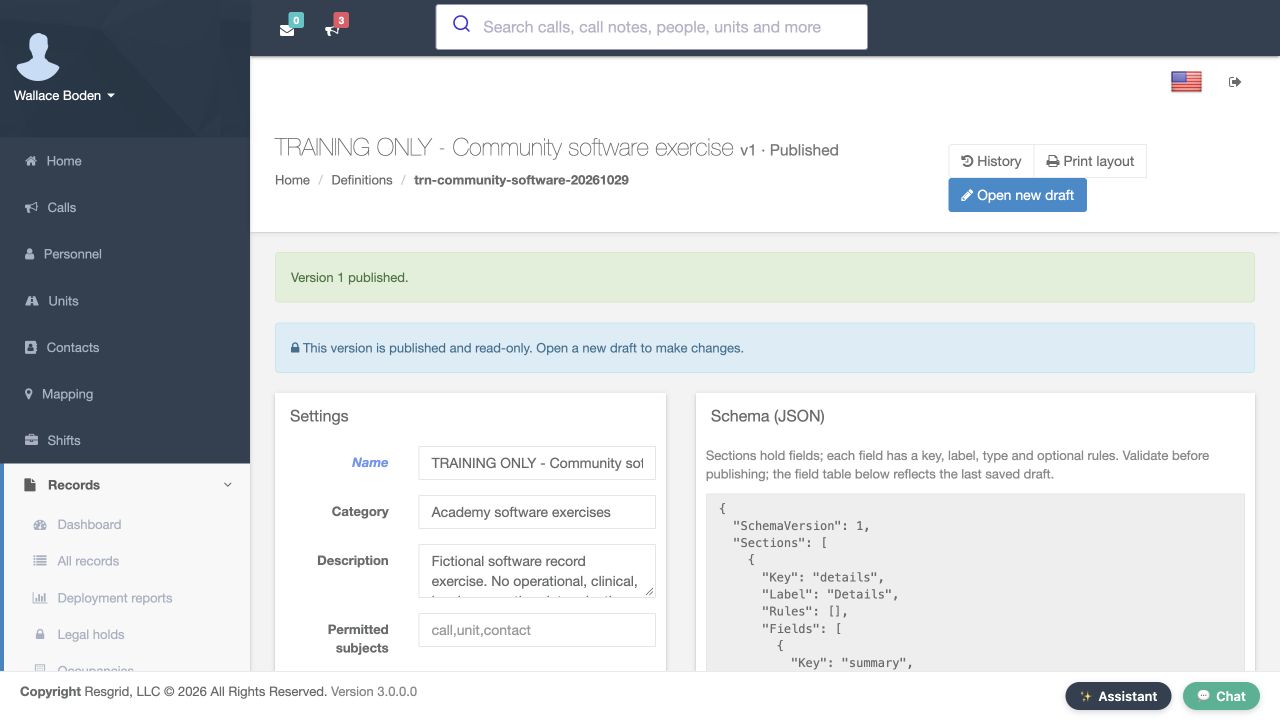
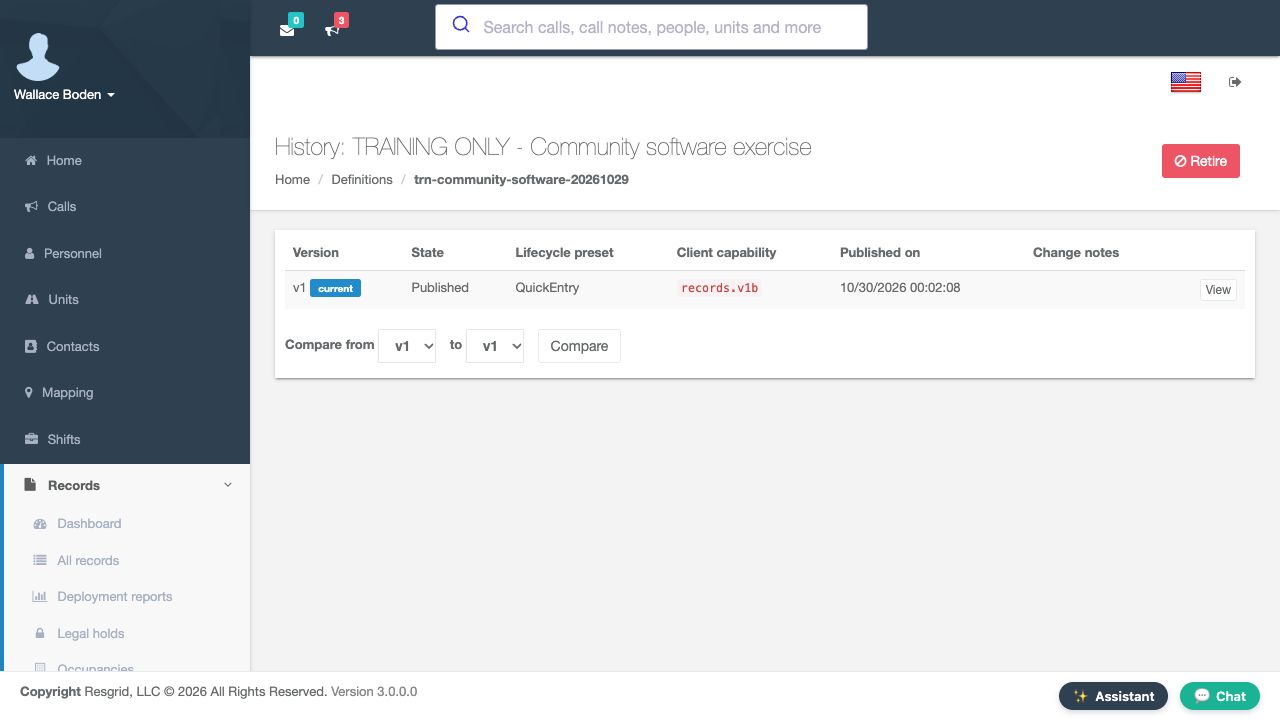
A published version is read-only. Use Open new draft when the form needs a later change. History identifies the current published version and its publication date. Its saved numbering and author-attestation choices remain visible. The complete settings view also retains Standard, the client and attachment choices, and the Summary and Notes fields. This is the configuration authors will use.
Practice
Verify the actual current version and saved choices without opening a new draft or repeating publication.
Step 8
Use the actual department form
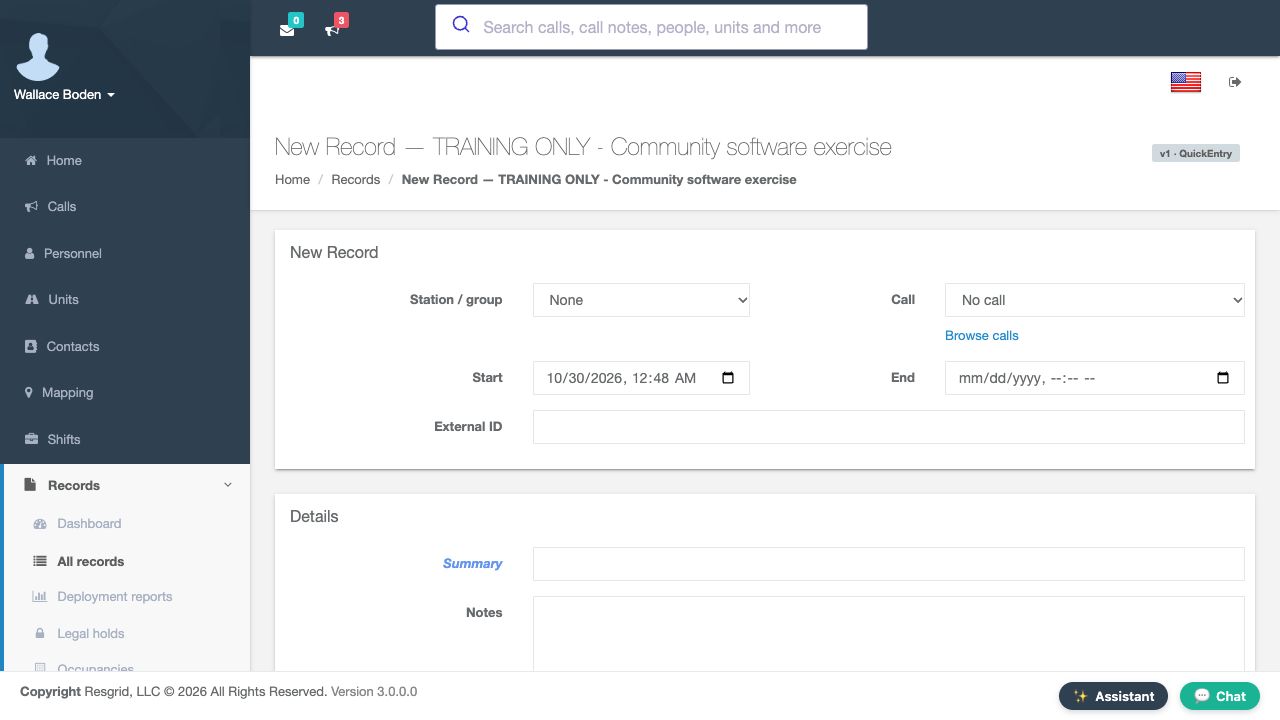
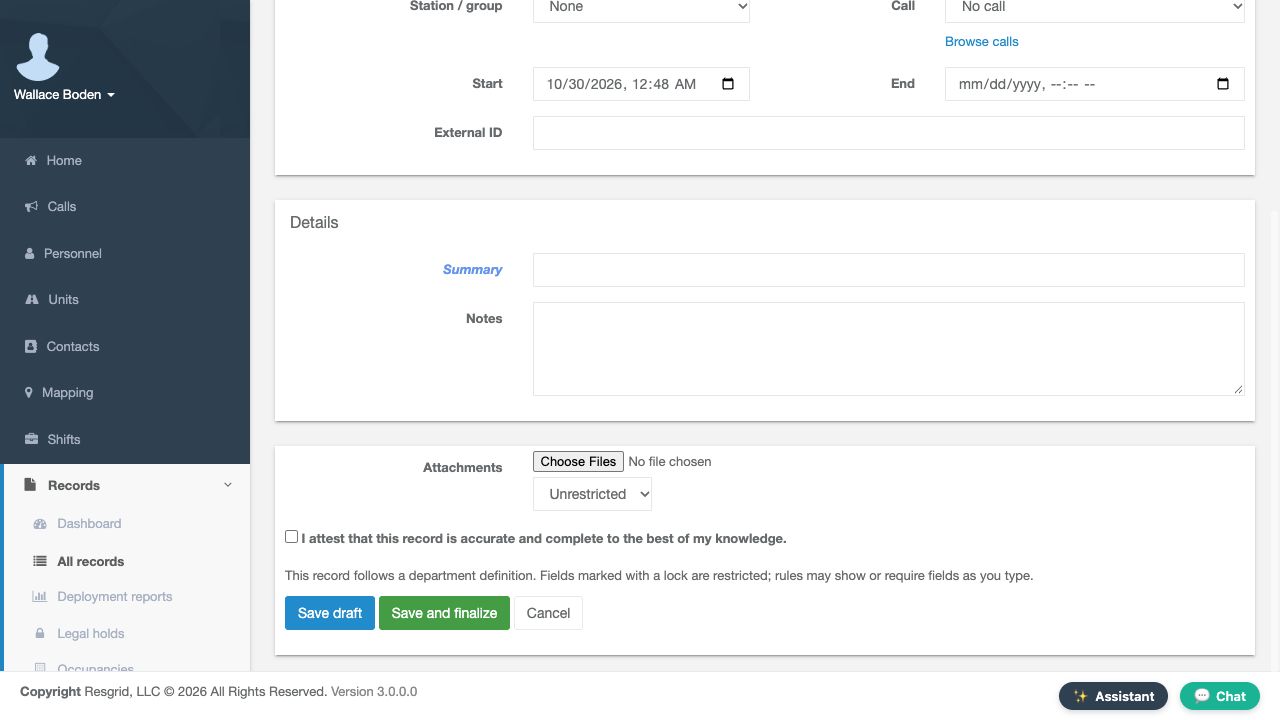
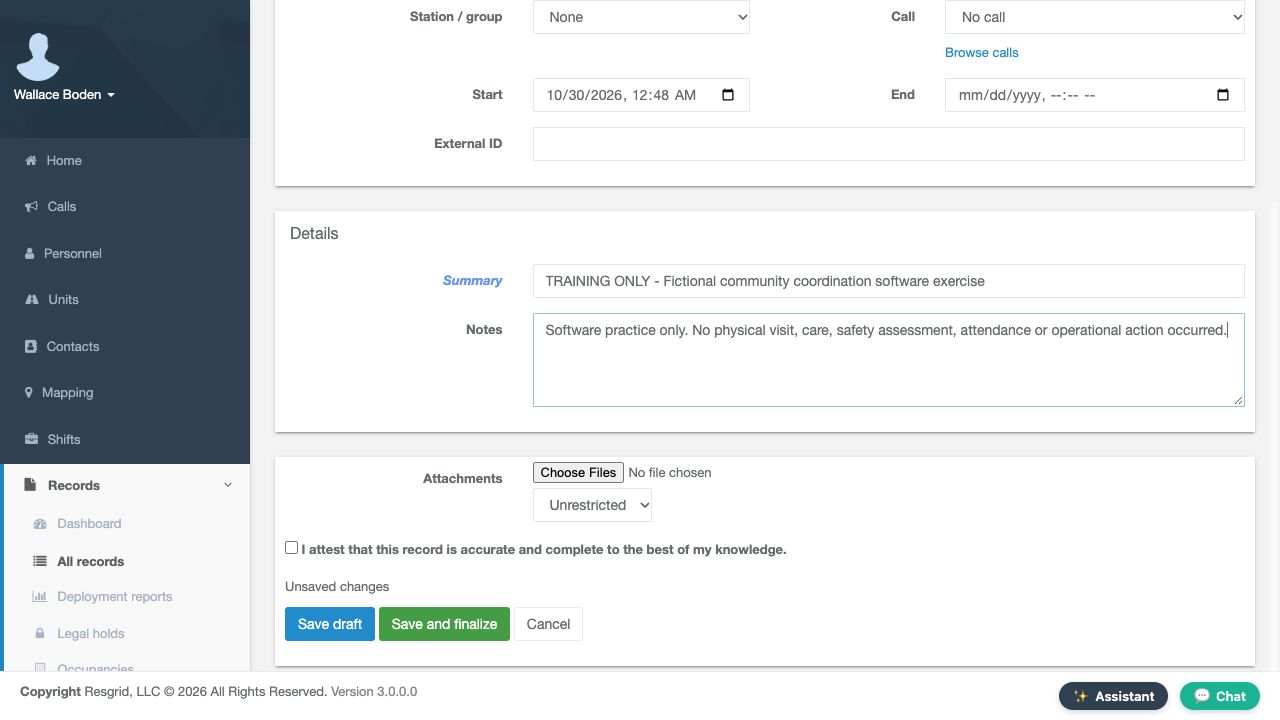
The published department form identifies its name and version one, QuickEntry, above Summary and Notes. Confirm that identity before typing; a generic Training form would be a different record type. The lower form offers Save draft and Save and finalize. We start without a file or attestation. Enter a distinct exercise Summary and explain its purpose in Notes. Choose Save draft first so the saved entry can be checked before finalization.
Practice
Check the form name, required Summary and factual Notes; do not create another copy of the existing example.
Step 9
Read the saved draft identity
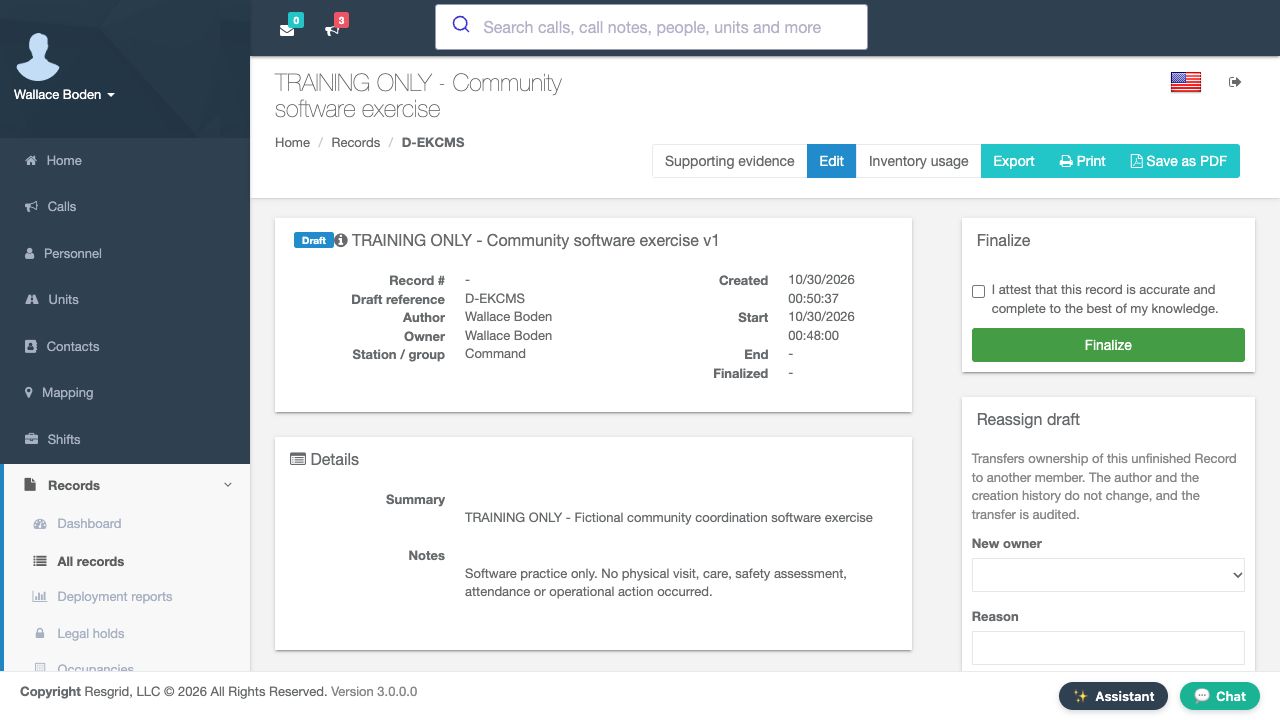
The returned record is Draft, with a draft reference and no final record number. Author and Owner are Wallace Boden. Station and group resolves to Command, although the new form showed None. Read the saved result rather than assuming that a blank selection remained blank. Keep this reference so later editing and attachment work stay with the same record.
Practice
Find the draft reference and returned group, then explain why the empty Record number is expected.
Step 10
Edit and reopen the same draft
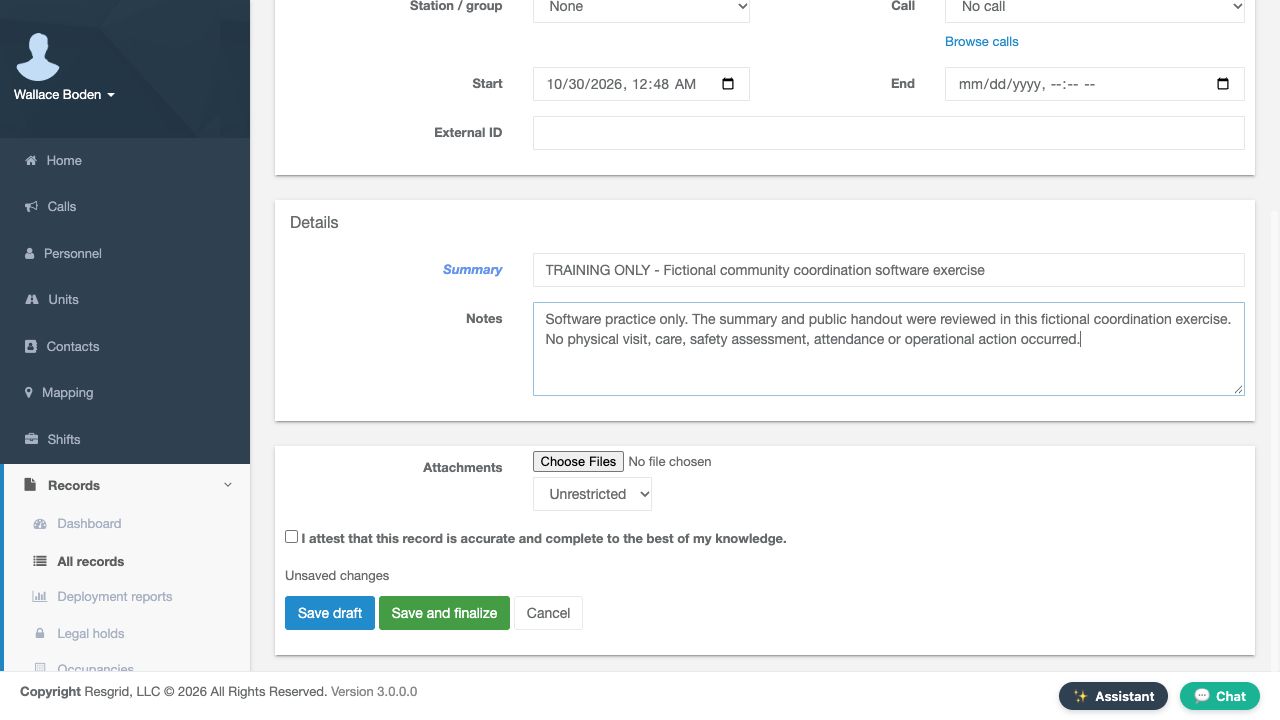
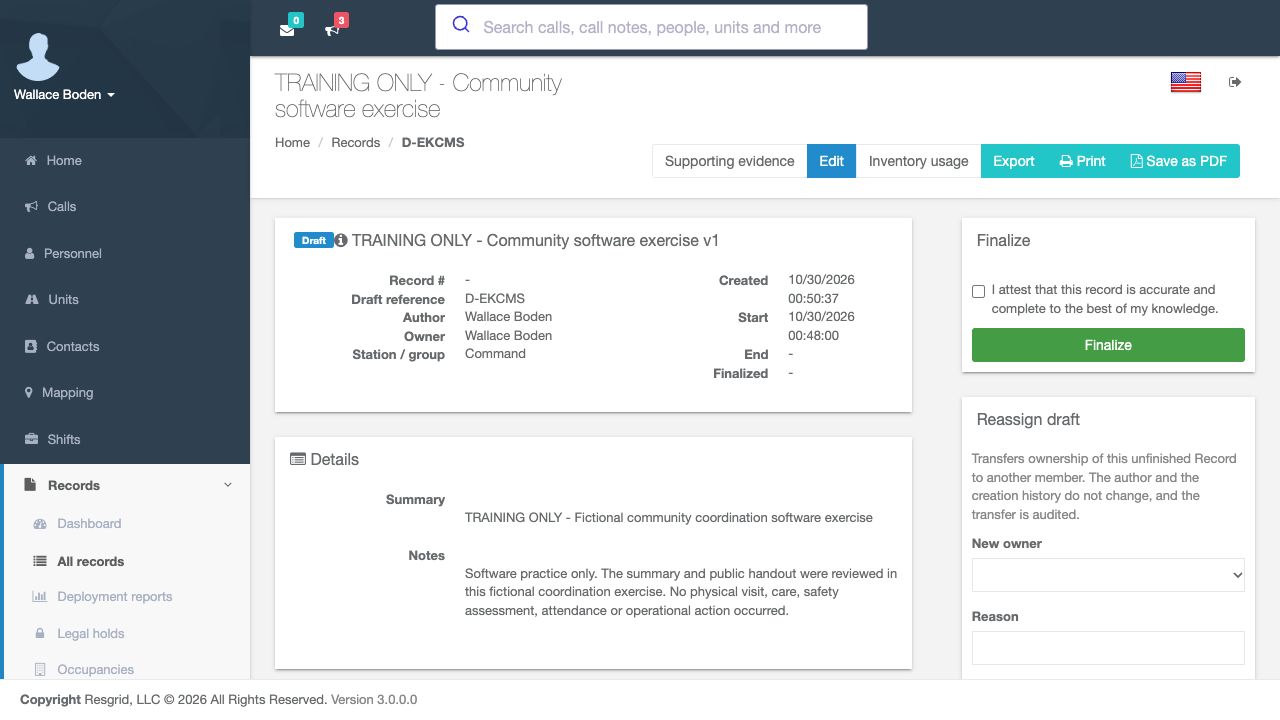
Use Edit on this draft instead of opening another New Record form. Update Notes to explain that the summary and public handout were reviewed in the fictional exercise. Read the complete statement in the editor, then use Save draft. A fresh readback of the same reference contains those revised Notes and remains Draft. The separate readback is the check that the intended text was retained.
Practice
Compare the intended Notes with the reopened saved text on the same reference; do not duplicate the record.
Step 11
Add the handout from the saved record
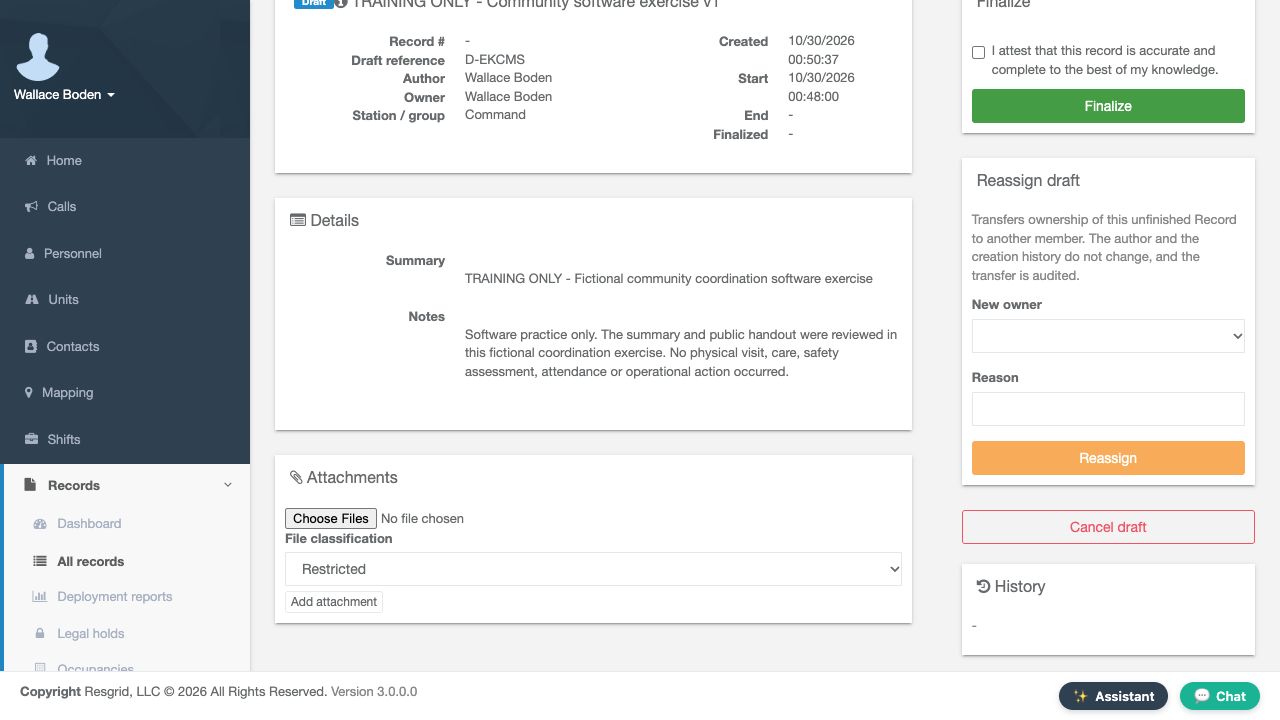
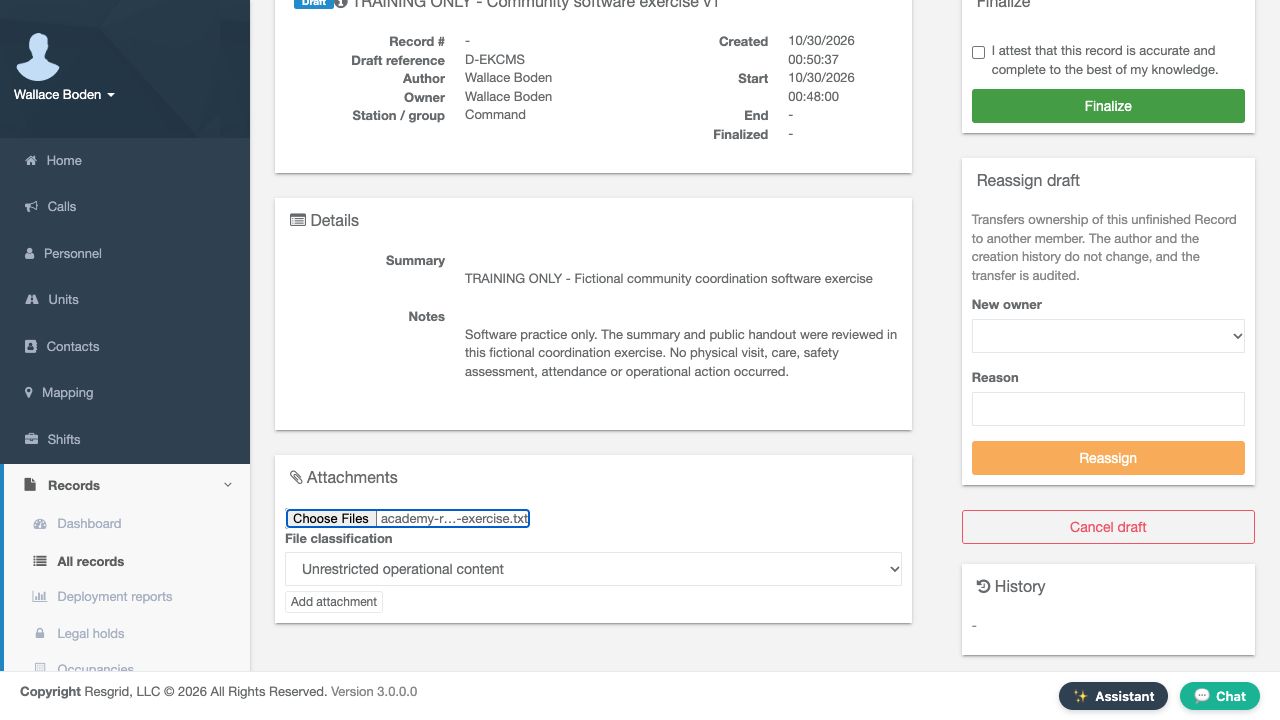
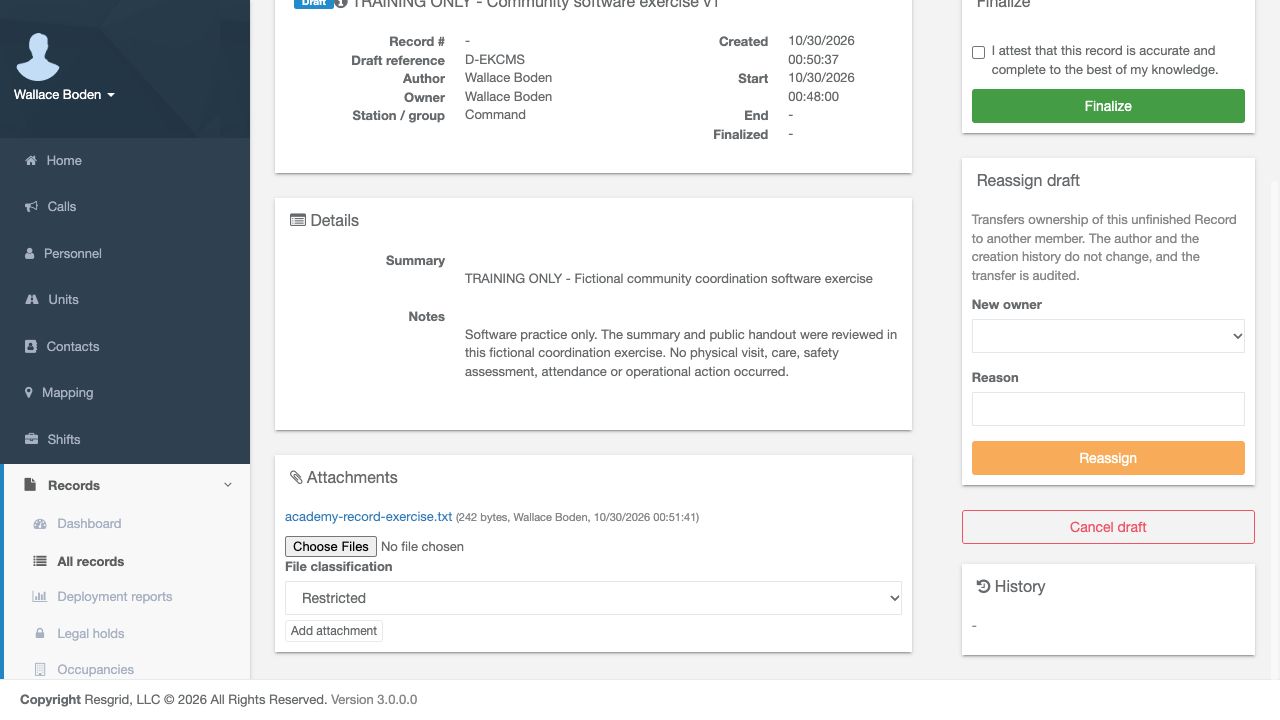
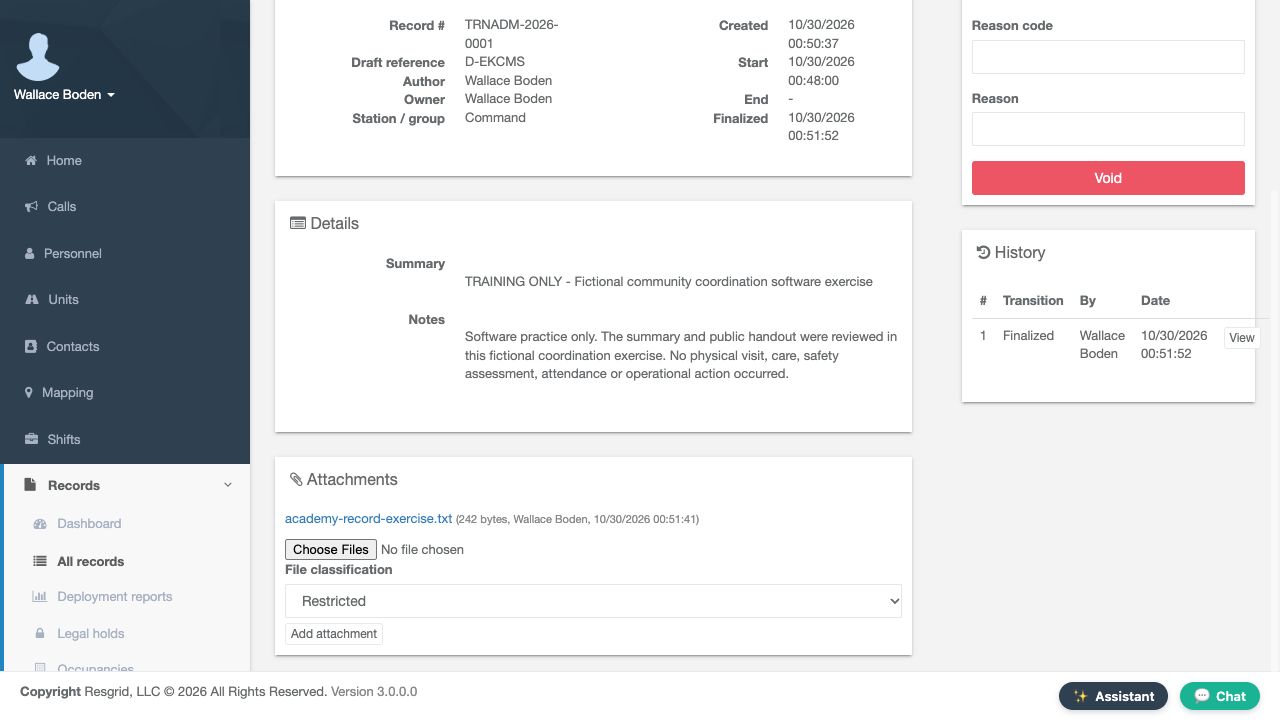
On the saved record, Attachments provides Choose Files, File classification and Add attachment. Choose the public software handout and select Unrestricted operational content, then use Add attachment. This choice is for that file; it is separate from the form’s Standard classification. The fresh list contains the software handout, with a size of two hundred forty-two bytes. The next-upload selector has reset to Restricted. That reset does not describe the file already stored; check its retained metadata in the finalized revision.
Practice
Distinguish the prepared chooser, stored filename and next-upload selector; verify only the public exercise file.
Step 12
Attest and verify the issued number
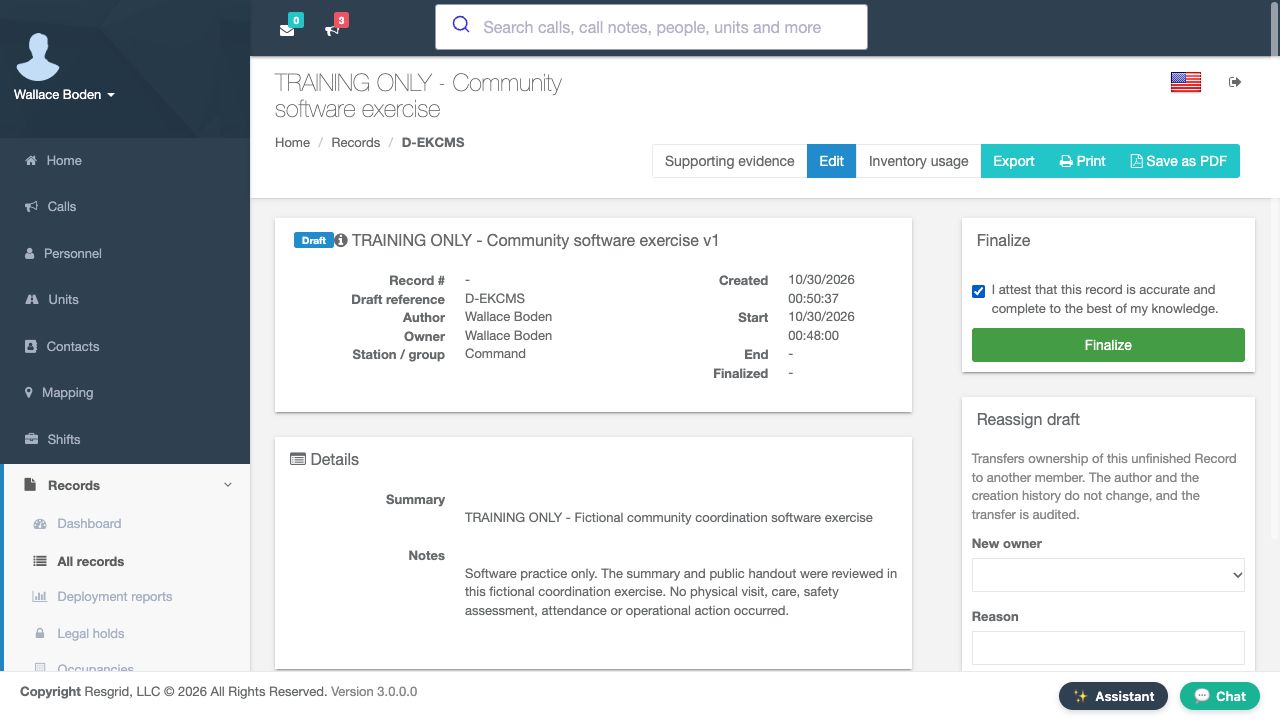
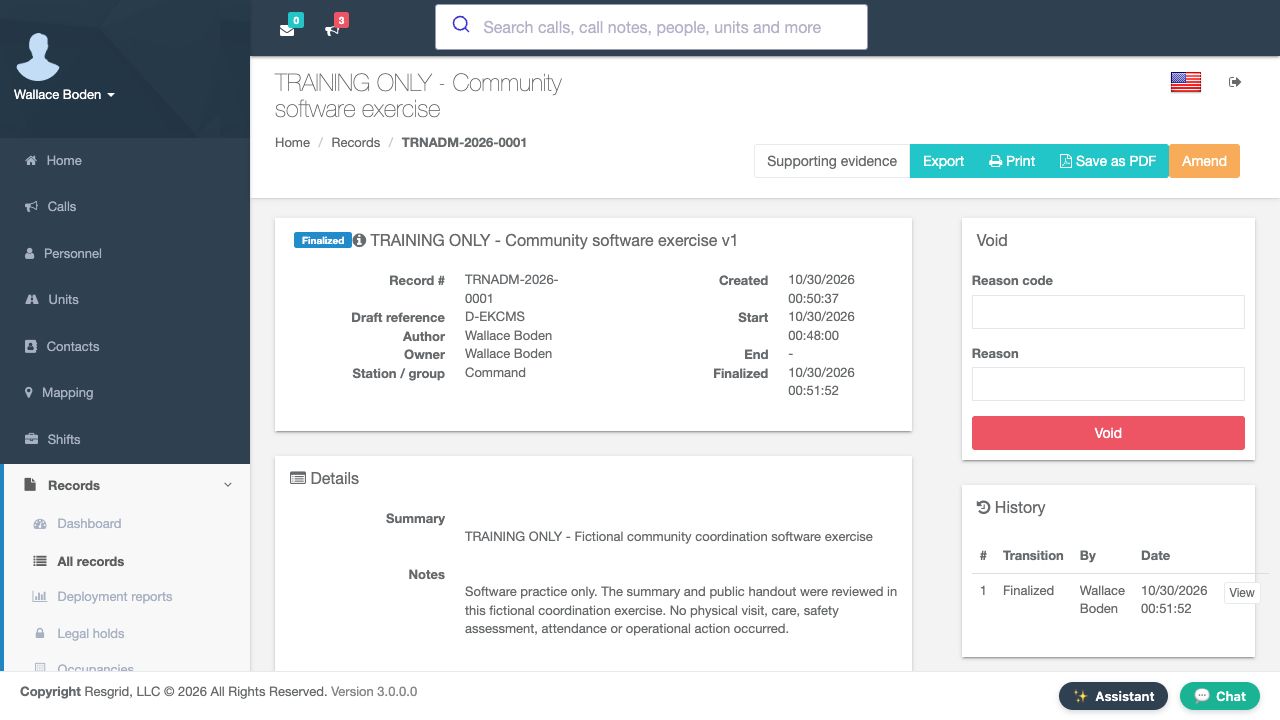
Read the saved Summary and Notes before checking the accuracy attestation and choosing Finalize. The fresh result shows Finalized. Its number uses our T R N A D M prefix, the year twenty twenty-six, and the four-digit sequence zero zero zero one. The draft reference remains alongside it. Amend is available for a later correction to a finalized record.
Practice
Identify the actual issued number and retained draft reference without finalizing again or opening an amendment.
Step 13
Inspect the retained revision and attachment
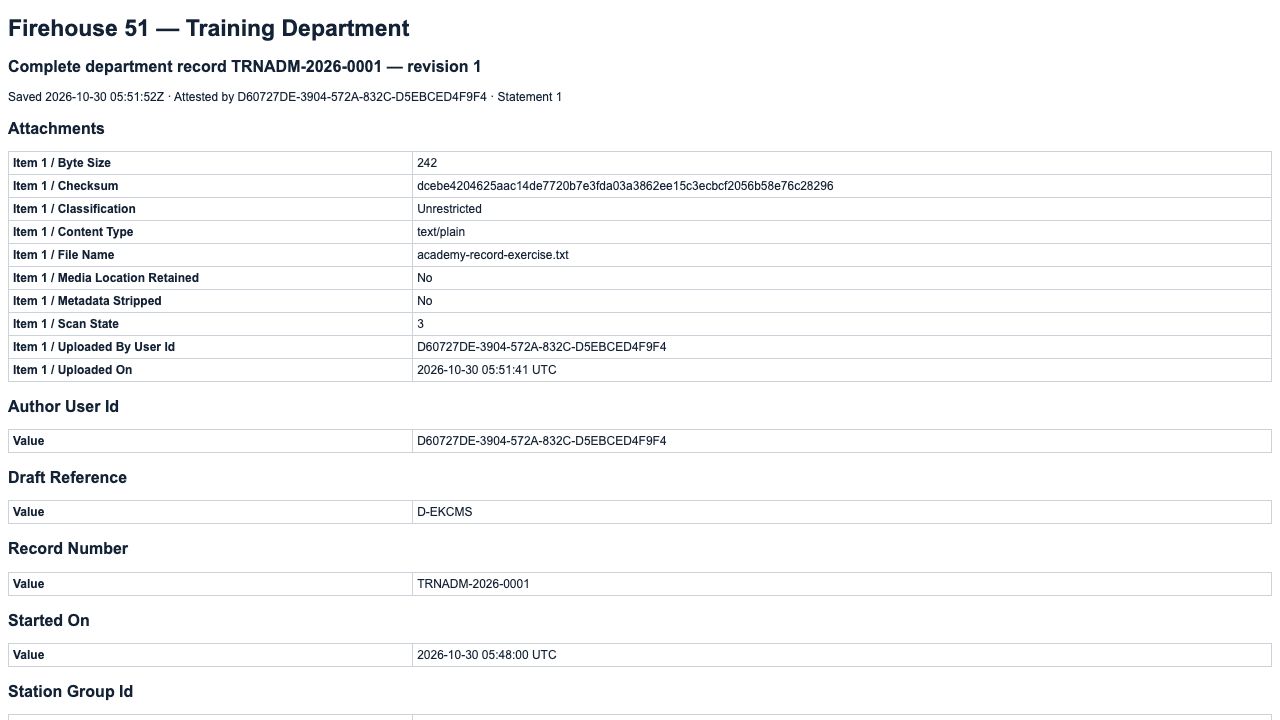
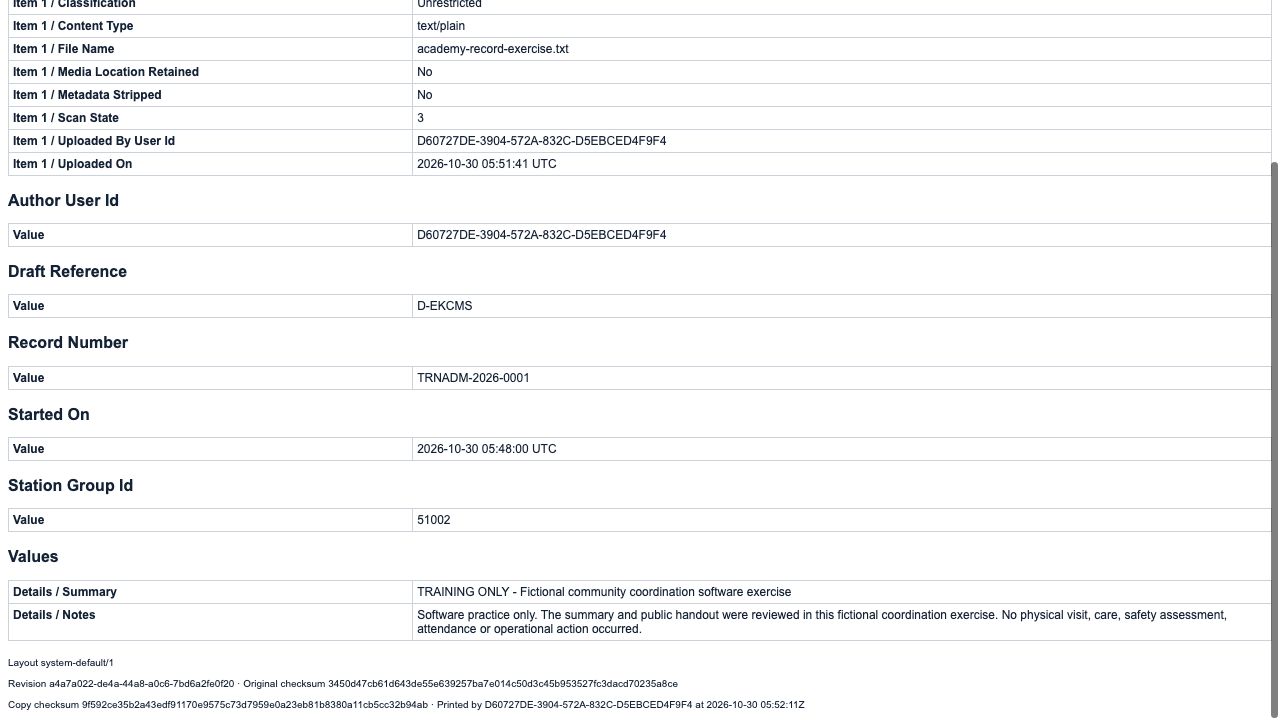
History now shows revision one, Finalized, with the author and date. The handout remains listed. Use View on that history row. The resulting HTML revision identifies the same record. Its attachment metadata retains the filename, byte size, checksum and Unrestricted classification. The checksum matches the public handout. This is the stored classification, independent of the reset upload selector. Farther down, Values preserves the saved Summary and Notes alongside the draft reference and record number. Review this specific revision when checking what finalization retained.
Practice
Compare the saved values and attachment metadata with the intended entry. Do not interpret Scan State3 as a safety certification or claim a PDF export.
Step 14
Reconcile the record queue
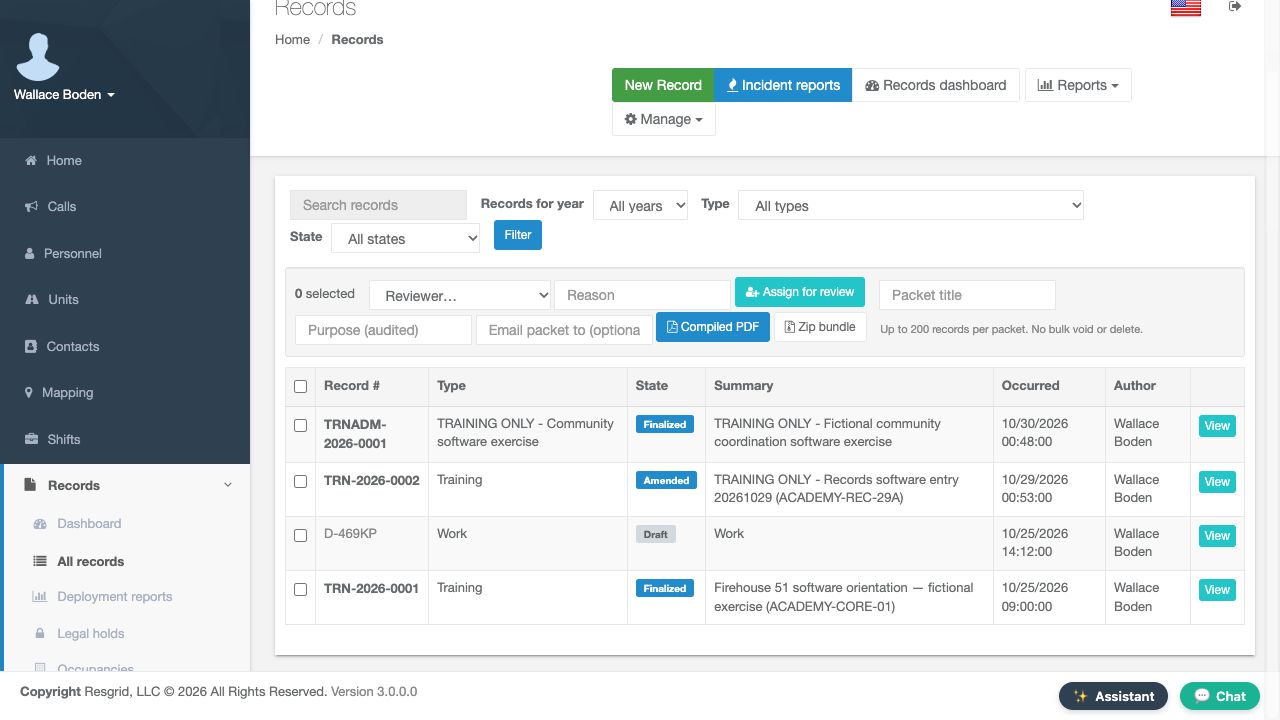
Back in Records, the new custom row is Finalized. The three earlier records remain present: an Amended Training entry, a Work Draft and the older Finalized Training entry. Read Record number, Type, State and Summary together to choose the intended row. This record-entry sequence created only its own custom entry; finding it again does not require creating a replacement.
Practice
Locate all four rows and distinguish the new custom form from the two built-in Training entries and Work draft.
Step 15
Find the right form through its catalog row
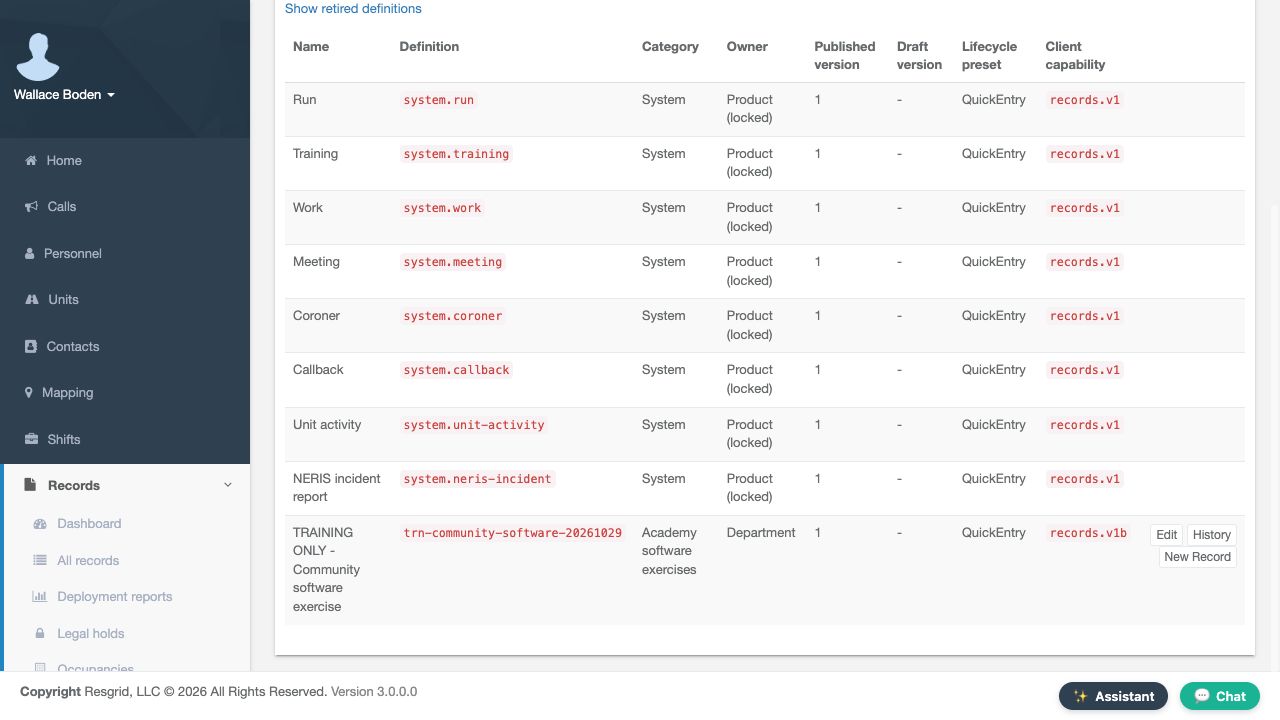
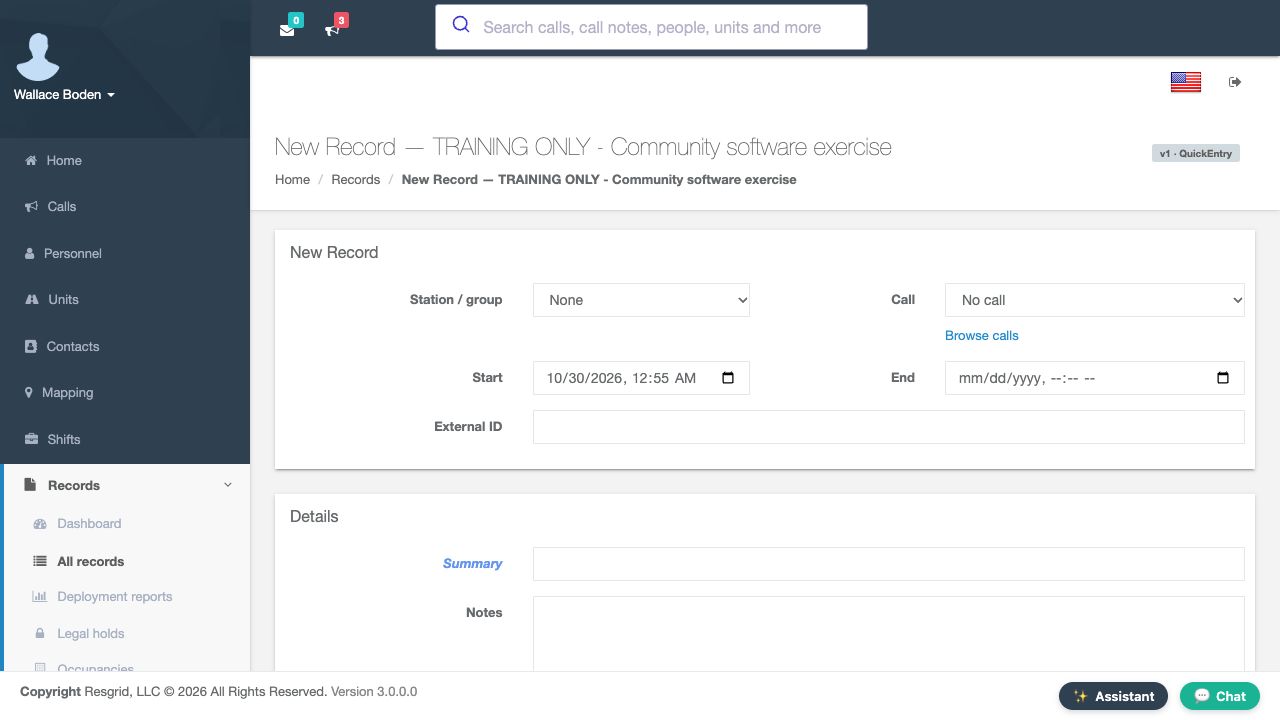
For later use, return to the definition catalog. The department-owned row shows published version one, no draft version, and its own New Record control. Use that row to select the intended form. The actual launcher opens the named version-one form with Summary and Notes. This later check leaves the new form empty. Returning to the queue still shows four records, with no second custom draft.
Practice
Use the correct catalog row for a read-only form check; preserve the existing finalized exercise and all earlier records.
Step 16
Apply the pattern to your department
Fire and EMS teams can use a small form for exercise briefings. Community-care and mental-health teams can standardize coordination notes with suitable information rules. Search-and-rescue teams can organize mission-preparation summaries. Security teams can structure patrol briefings, wildland coordinators can prepare seasonal orientation forms, and industrial teams can retain system-training notes and a public handout. Across those settings, choose fields, numbering and client access for the task. Test the actual published form, verify the saved draft and attachment, and retain the finalized revision that supports the entry.
Practice
Choose one department use and explain which Summary, Notes, numbering and access choices would support it, without claiming an unshown workflow.
Examples for your department
- Fire / EMS
- Use Summary, Notes and a public exercise handout for a fictional briefing, with a distinct definition number sequence.
- Community response
- Plan a coordination form with appropriate information rules and deliberate client access; this example carries no client history or clinical determination.
- Search and rescue
- Structure mission-preparation summaries and preserve the finalized version actually reviewed, without claiming a mission response.
- Security
- Organize a patrol briefing form with clear summary and notes; select the correct department definition rather than a similarly named system form.
- Wildland
- Use a seasonal orientation form with an annual numbering policy and verify the published fields before authors use it.
- Industrial
- Retain system-training notes and a public handout with verified attachment classification; do not treat the record as a physical inspection certificate.
Transcript
Download transcriptRead the complete transcript
Create a department record definition and use its published form
Audience: Department administrators and authorized record authors

Start with the definition catalog
Department administrators use record definitions to give authors a consistent form and lifecycle. In Records, open Manage and choose Definitions. This example builds a department-owned form for a fictional community coordination exercise. The catalog separates published and draft versions. A definition describes the form; an individual record stores one completed entry. Choose New definition for the new exercise, leaving the product-owned forms unchanged.
Practice: Distinguish a form definition from one record, then locate the permitted New definition control.

Create a distinct blank definition
Start from template is set to Blank definition. Give Definition a unique lower-case key, then enter the Name and Category. Here the name is Training Only, Community Software Exercise, and the category is Academy Software Exercises. The key cannot be changed after creation, so review it before choosing Create definition. The returned editor identifies version one as Draft and confirms that the definition was created. It is not yet a published form.
Practice: Plan a distinct training key and descriptive category. Inspect this existing example instead of submitting its key again.

Choose a lifecycle and numbering policy
Lifecycle preset is QuickEntry, supporting a draft followed by finalization. Records per call is Multiple per call. Require author attestation at finalize is checked; reviewer and approver roles are not selected for this example. Under Numbering, Number prefix gives record numbers a recognizable label. Sequence width is four and Assign number is OnFinalize. Reset yearly is checked, while the station and incident sequence options are off. These choices provide one annual sequence for this definition and issue the number when the record is finalized, rather than when its draft first appears.
Practice: Explain why the draft has a reference before it receives a final number; identify the actual sequence options.

Review fields, classification and client choices
Classification is Standard. In Client surfaces, only Responder is selected. Allow offline is off, Allow attachments is on, and Keep photo coordinates on attachments is off. Together, these choices control where the form is offered, whether it can be used offline, and whether authors can attach files. The Fields table describes the unchanged starter form: Summary is required ShortText, while Notes is optional LongText. A short summary helps identify an entry; longer notes provide its context. Check that table rather than mistaking the nearby JSON example for the saved form.
Practice: Read the two field types and required flags, keeping definition classification separate from a later attachment classification.

Keep validation and saving distinct
At the foot of the reopened draft, Validate, Save draft and Review impact and publish are separate controls. Validate checks the definition without publishing it. The validation result says The definition is valid, while the version remains Draft. The save confirmation says Draft saved. That confirms a definition save, not an individual record entry. Freshly reopening the saved version retains its numbering and attestation settings. Keep the validation result, saved configuration and publication state distinct.
Practice: Identify the separate control and result for validation, saving and publication; do not resave this published example.

Review publication impact
Review impact and publish opens Publish impact. Before the first publication, Published version is a dash and Breaking change is No. Read the impact before making the version available. Client readiness compares app availability, client surfaces and capability. Only Responder is offered this version. Review this table before using Publish to make the version available to authors.
Practice: Compare the client-surface column with the enabled-app column and explain why they answer different questions.

Verify the published version and its settings
A published version is read-only. Use Open new draft when the form needs a later change. History identifies the current published version and its publication date. Its saved numbering and author-attestation choices remain visible. The complete settings view also retains Standard, the client and attachment choices, and the Summary and Notes fields. This is the configuration authors will use.
Practice: Verify the actual current version and saved choices without opening a new draft or repeating publication.

Use the actual department form
The published department form identifies its name and version one, QuickEntry, above Summary and Notes. Confirm that identity before typing; a generic Training form would be a different record type. The lower form offers Save draft and Save and finalize. We start without a file or attestation. Enter a distinct exercise Summary and explain its purpose in Notes. Choose Save draft first so the saved entry can be checked before finalization.
Practice: Check the form name, required Summary and factual Notes; do not create another copy of the existing example.

Read the saved draft identity
The returned record is Draft, with a draft reference and no final record number. Author and Owner are Wallace Boden. Station and group resolves to Command, although the new form showed None. Read the saved result rather than assuming that a blank selection remained blank. Keep this reference so later editing and attachment work stay with the same record.
Practice: Find the draft reference and returned group, then explain why the empty Record number is expected.

Edit and reopen the same draft
Use Edit on this draft instead of opening another New Record form. Update Notes to explain that the summary and public handout were reviewed in the fictional exercise. Read the complete statement in the editor, then use Save draft. A fresh readback of the same reference contains those revised Notes and remains Draft. The separate readback is the check that the intended text was retained.
Practice: Compare the intended Notes with the reopened saved text on the same reference; do not duplicate the record.

Add the handout from the saved record
On the saved record, Attachments provides Choose Files, File classification and Add attachment. Choose the public software handout and select Unrestricted operational content, then use Add attachment. This choice is for that file; it is separate from the form’s Standard classification. The fresh list contains the software handout, with a size of two hundred forty-two bytes. The next-upload selector has reset to Restricted. That reset does not describe the file already stored; check its retained metadata in the finalized revision.
Practice: Distinguish the prepared chooser, stored filename and next-upload selector; verify only the public exercise file.

Attest and verify the issued number
Read the saved Summary and Notes before checking the accuracy attestation and choosing Finalize. The fresh result shows Finalized. Its number uses our T R N A D M prefix, the year twenty twenty-six, and the four-digit sequence zero zero zero one. The draft reference remains alongside it. Amend is available for a later correction to a finalized record.
Practice: Identify the actual issued number and retained draft reference without finalizing again or opening an amendment.

Inspect the retained revision and attachment
History now shows revision one, Finalized, with the author and date. The handout remains listed. Use View on that history row. The resulting HTML revision identifies the same record. Its attachment metadata retains the filename, byte size, checksum and Unrestricted classification. The checksum matches the public handout. This is the stored classification, independent of the reset upload selector. Farther down, Values preserves the saved Summary and Notes alongside the draft reference and record number. Review this specific revision when checking what finalization retained.
Practice: Compare the saved values and attachment metadata with the intended entry. Do not interpret Scan State3 as a safety certification or claim a PDF export.

Reconcile the record queue
Back in Records, the new custom row is Finalized. The three earlier records remain present: an Amended Training entry, a Work Draft and the older Finalized Training entry. Read Record number, Type, State and Summary together to choose the intended row. This record-entry sequence created only its own custom entry; finding it again does not require creating a replacement.
Practice: Locate all four rows and distinguish the new custom form from the two built-in Training entries and Work draft.

Find the right form through its catalog row
For later use, return to the definition catalog. The department-owned row shows published version one, no draft version, and its own New Record control. Use that row to select the intended form. The actual launcher opens the named version-one form with Summary and Notes. This later check leaves the new form empty. Returning to the queue still shows four records, with no second custom draft.
Practice: Use the correct catalog row for a read-only form check; preserve the existing finalized exercise and all earlier records.

Apply the pattern to your department
Fire and EMS teams can use a small form for exercise briefings. Community-care and mental-health teams can standardize coordination notes with suitable information rules. Search-and-rescue teams can organize mission-preparation summaries. Security teams can structure patrol briefings, wildland coordinators can prepare seasonal orientation forms, and industrial teams can retain system-training notes and a public handout. Across those settings, choose fields, numbering and client access for the task. Test the actual published form, verify the saved draft and attachment, and retain the finalized revision that supports the entry.
Practice: Choose one department use and explain which Summary, Notes, numbering and access choices would support it, without claiming an unshown workflow.

Examples for your department
Fire / EMS: Use Summary, Notes and a public exercise handout for a fictional briefing, with a distinct definition number sequence.
Community response: Plan a coordination form with appropriate information rules and deliberate client access; this example carries no client history or clinical determination.
Search and rescue: Structure mission-preparation summaries and preserve the finalized version actually reviewed, without claiming a mission response.
Security: Organize a patrol briefing form with clear summary and notes; select the correct department definition rather than a similarly named system form.
Wildland: Use a seasonal orientation form with an annual numbering policy and verify the published fields before authors use it.
Industrial: Retain system-training notes and a public handout with verified attachment classification; do not treat the record as a physical inspection certificate.