
Core · Video walkthrough
Create groups, stations and a unit with deliberate crew positions
Create an organizational parent, a Station group, a Support unit type and a two-position unit; verify saved relationships, inspect unchanged staffing, and find the unit through the group tree.
Before you begin
- Use a fictional practice department and existing authorized group/unit/type permissions.
- Prepare unique training names and an illustrative coordinate pair; preserve all current members and unit crews.
- Have the intended personnel role available for the unit position; do not change actual staffing in this exercise.
Chapters
- Inspect groups and their hierarchy
- Prepare an organizational parent
- Save and reopen the empty group
- Prepare a station under the new parent
- Enter a complete illustrative coordinate pair
- Verify the saved station and relationship
- Separate a unit definition from its crew
- Create a useful unit type
- Save the built-in icon and verify the type
- Define two distinct positions
- Inspect a template without applying it
- Save the unit and reopen its definition
- Inspect staffing without changing assignments
- Find the unit through its parent and station
- Apply the structure across sectors
Watch the walkthrough
Step 1
Inspect groups and their hierarchy
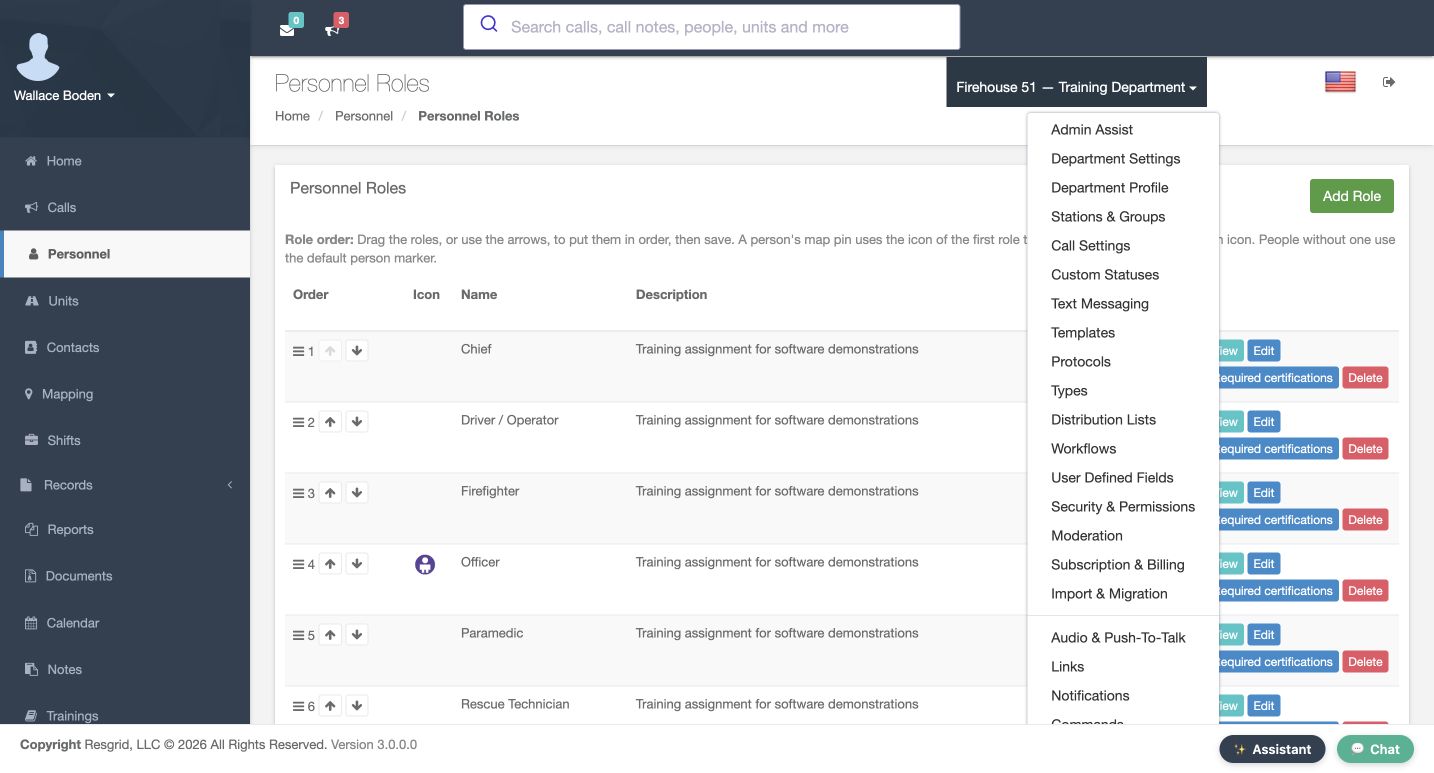
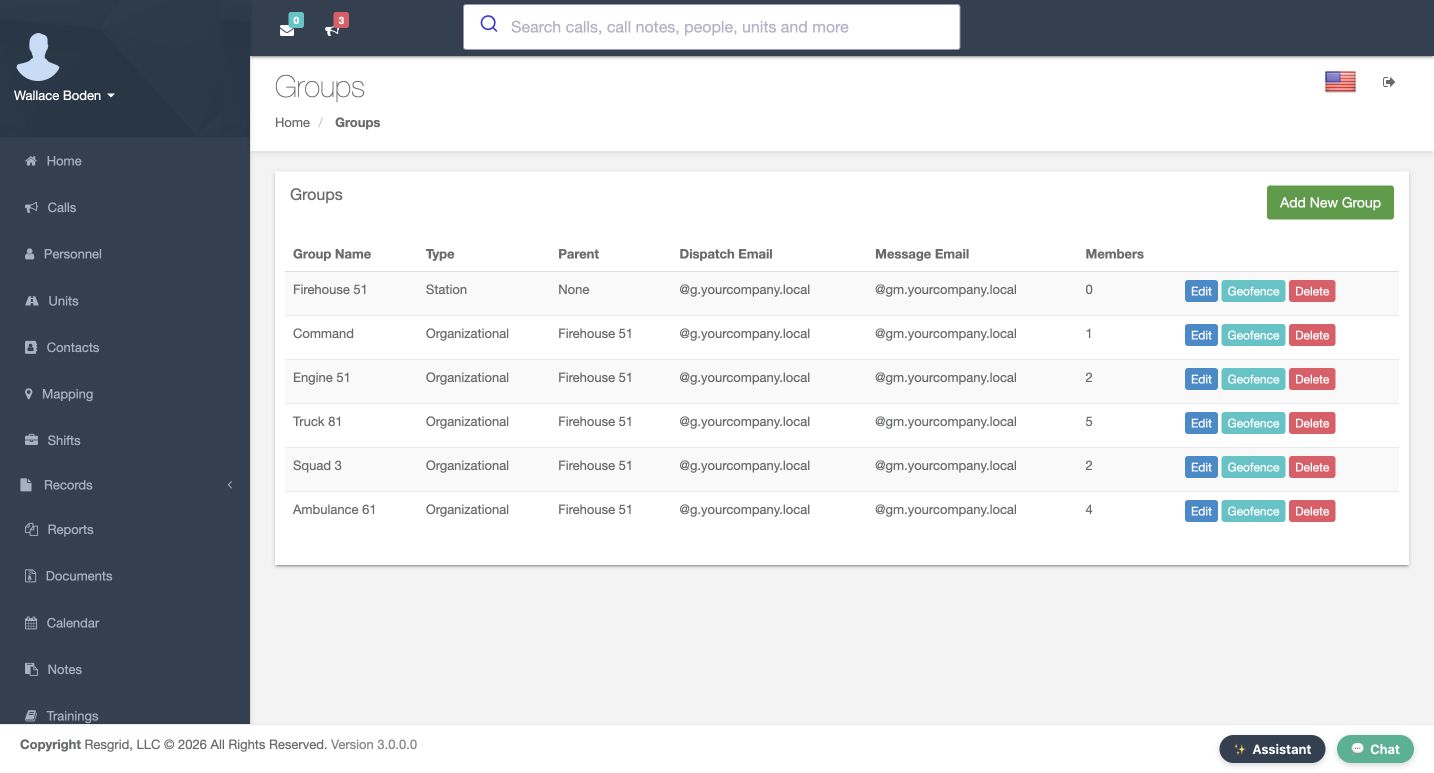
Open the department menu and choose Stations and Groups. The table separates each group’s type, parent, and member count. Our fictional Chicago Fire department already has a station and organizational groups beneath it. We will add an empty coordination parent and a separate station beneath that parent. Read the existing rows first so the new exercise is easy to identify and the original memberships remain intact.
Practice
Identify the existing parent relationships before adding your own fictional group.
Step 2
Prepare an organizational parent
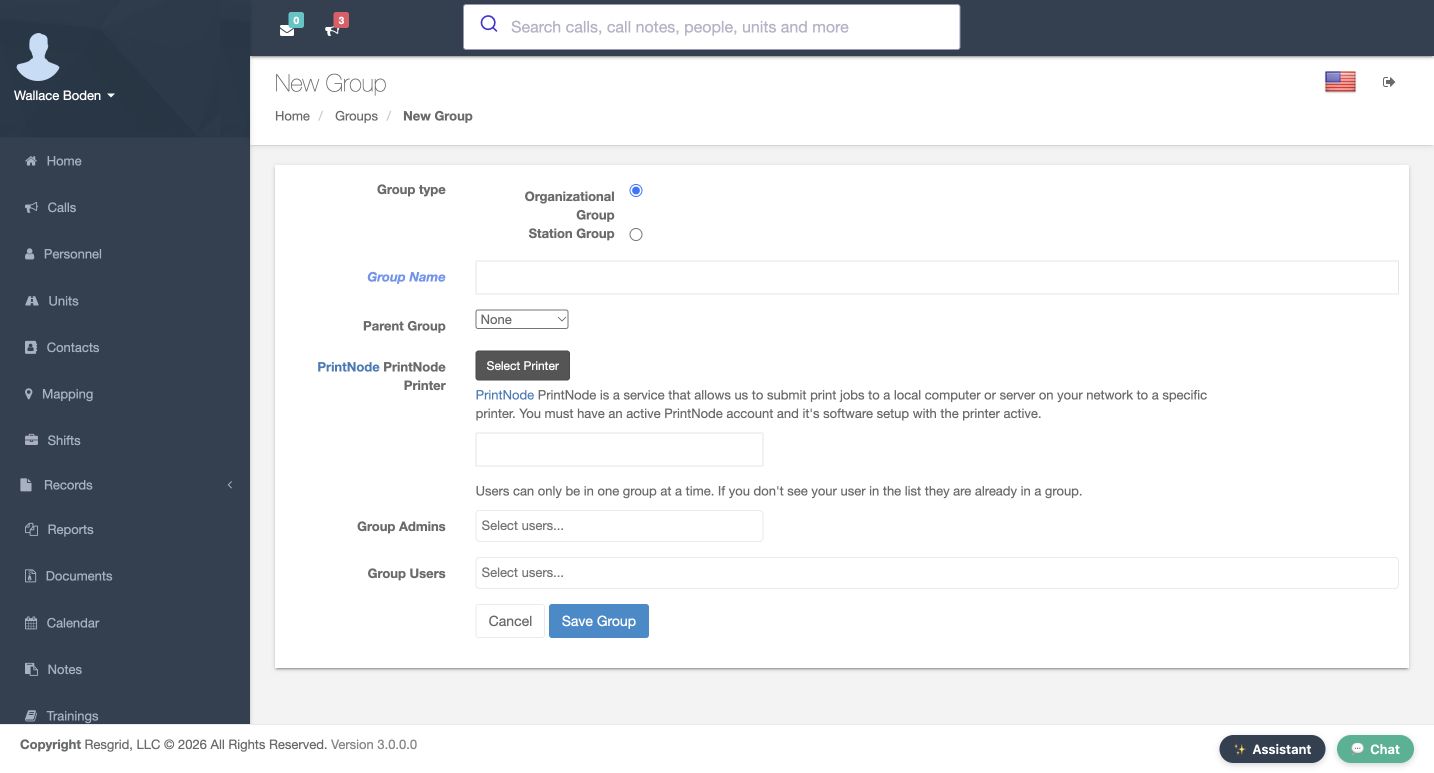
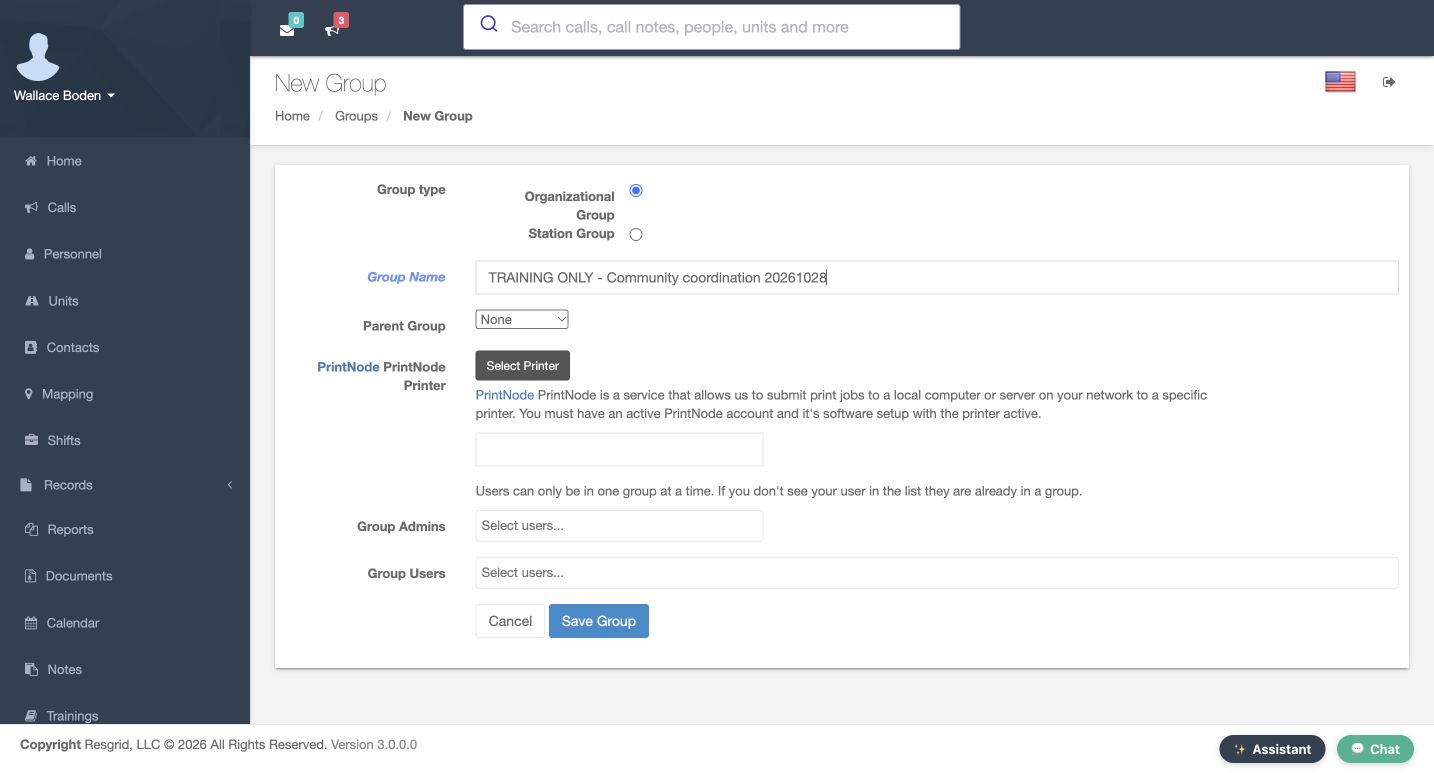
Choose Add New Group and keep Organizational Group selected. Enter Training Only, Community Coordination, followed by the exercise date. Parent Group remains None, making this a top-level group. Group Admins and Group Users stay empty. These fields describe different membership responsibilities; choosing an administrator is a permission decision. We are preparing a structure, so we do not move a person from an existing group or assign an administrator.
Practice
Prepare an empty organizational root with a unique training name and Parent None.
Step 3
Save and reopen the empty group
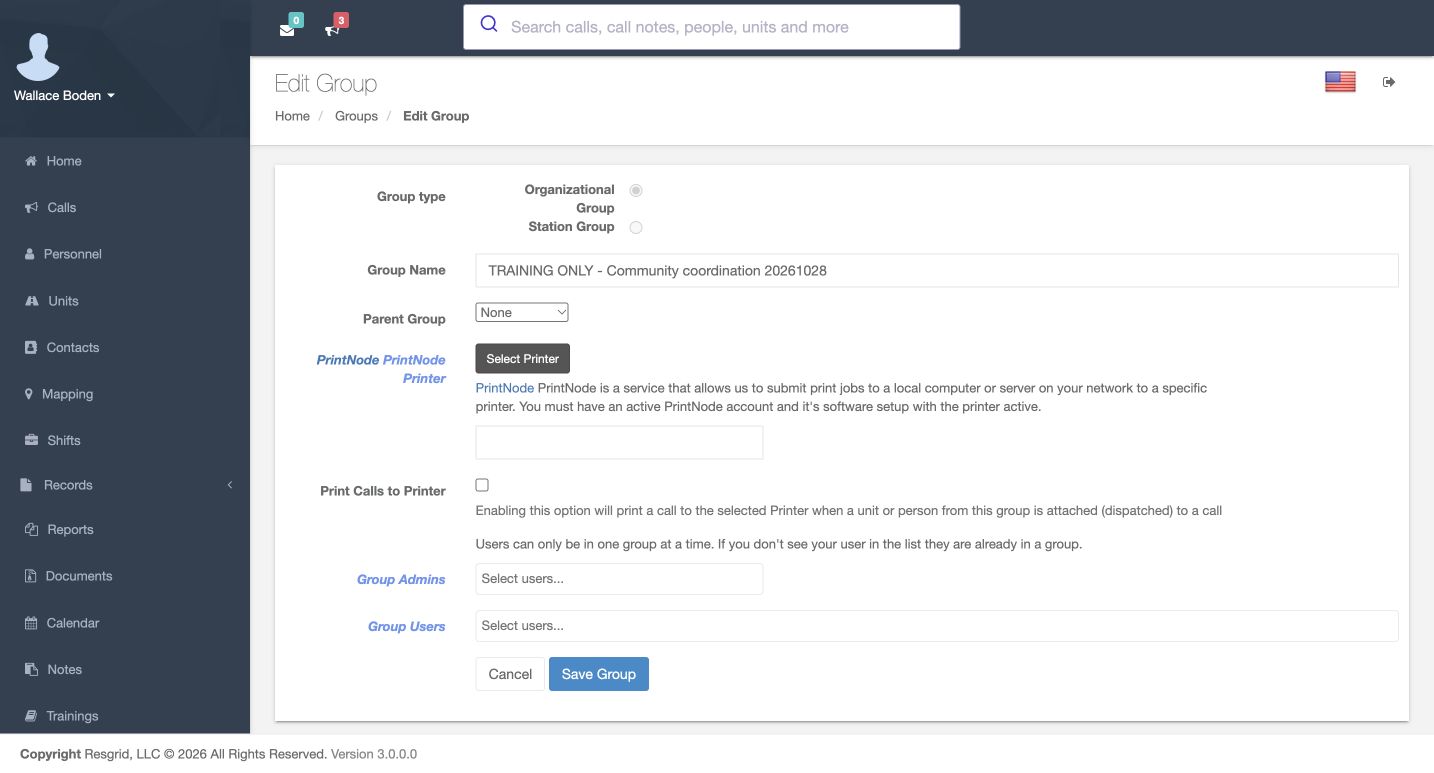
Use Save Group. The fresh Edit Group readback retains its full name and Parent None, and displays the Organizational type read-only. Both membership selectors remain empty. The page explains that a person can belong to only one group at a time. When maintaining a populated group, let its existing selections load before saving: the form submits the complete member and administrator selection.
Practice
Reopen the saved root and check its type, parent and empty membership.
Step 4
Prepare a station under the new parent
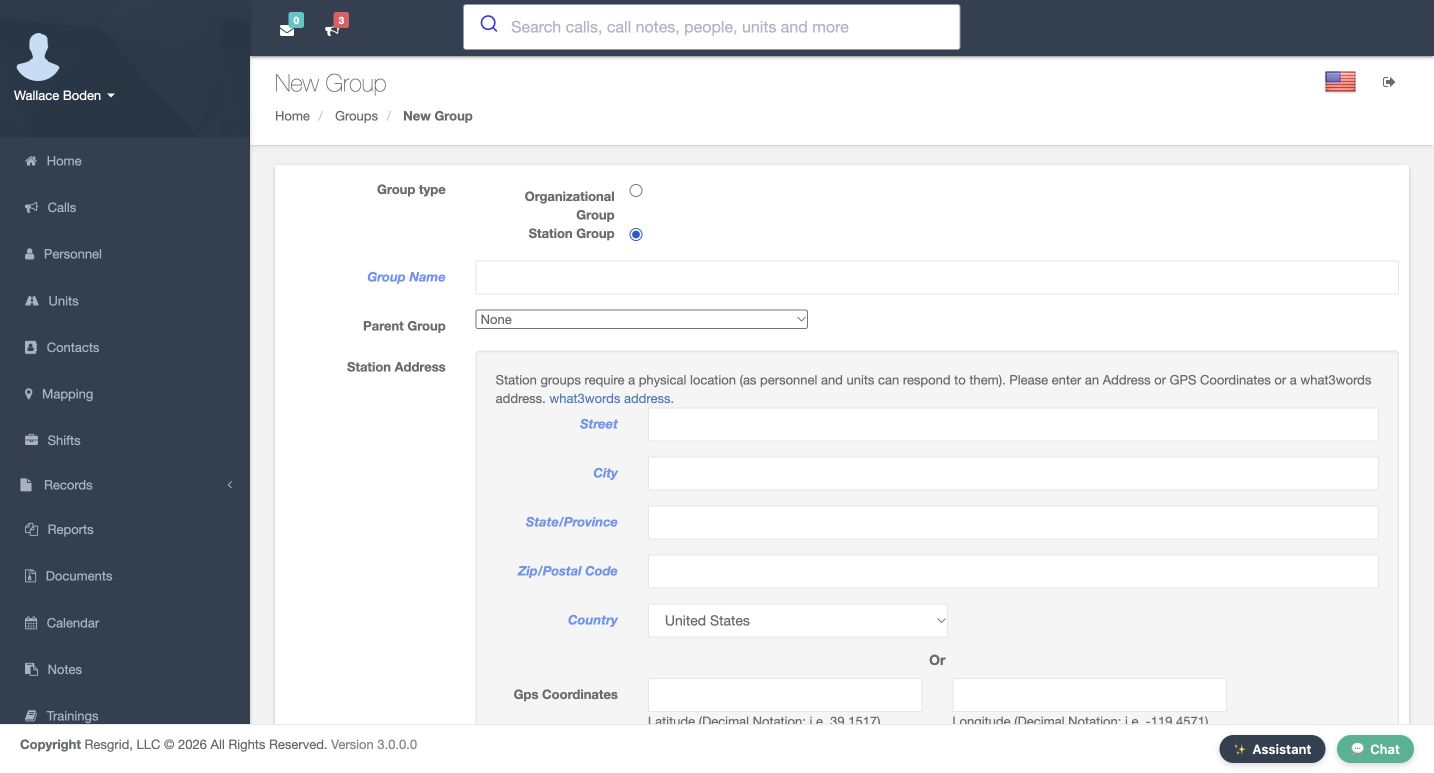
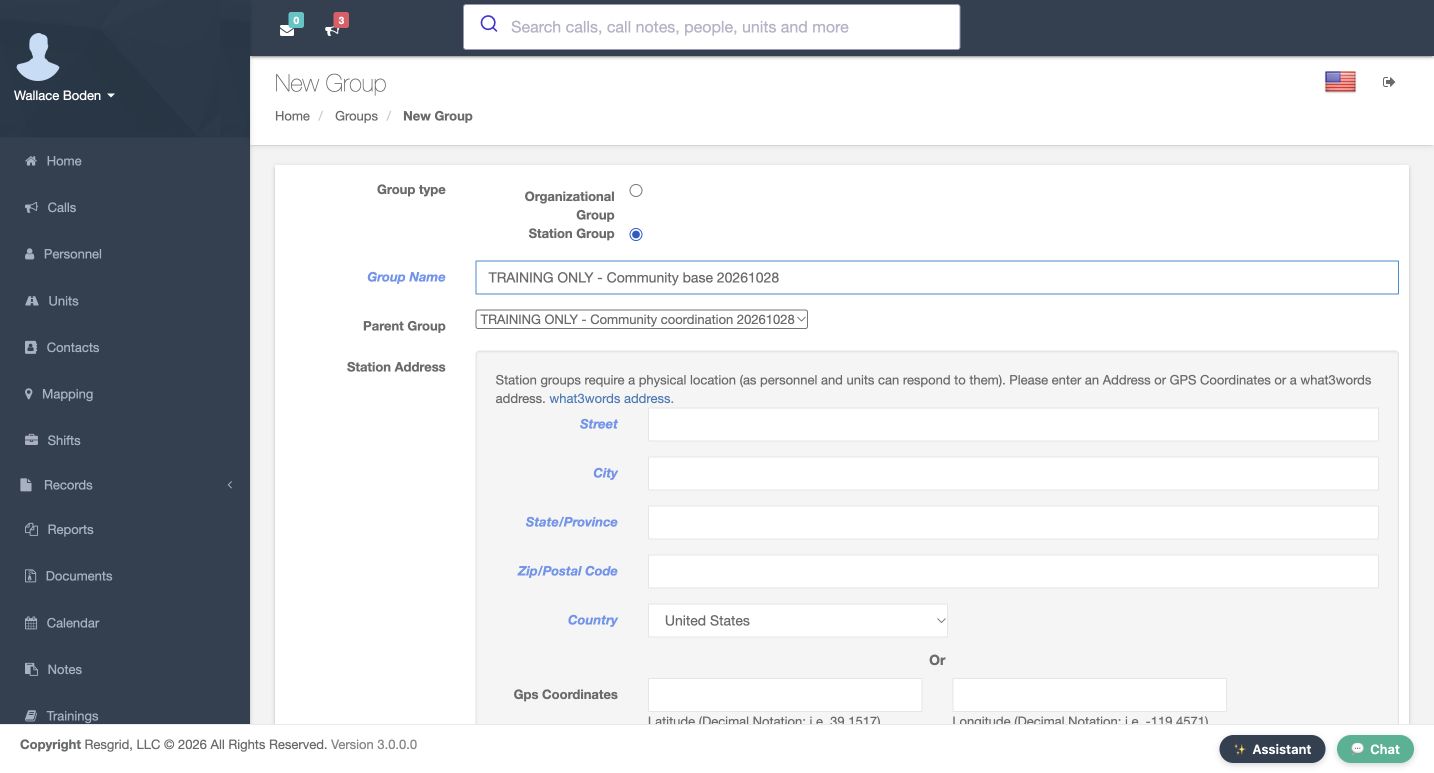
Create another group and select Station Group. Name it Training Only, Community Base, with the exercise date, and choose the new coordination group as its parent. A station requires a physical reference location. The form offers address fields, a coordinate pair, or a what3words address. We will use an explicitly illustrative Chicago coordinate pair. The parent describes the organizational relationship; it does not replace the station’s own location.
Practice
Prepare a Station group with your own organizational group as its parent.
Step 5
Enter a complete illustrative coordinate pair
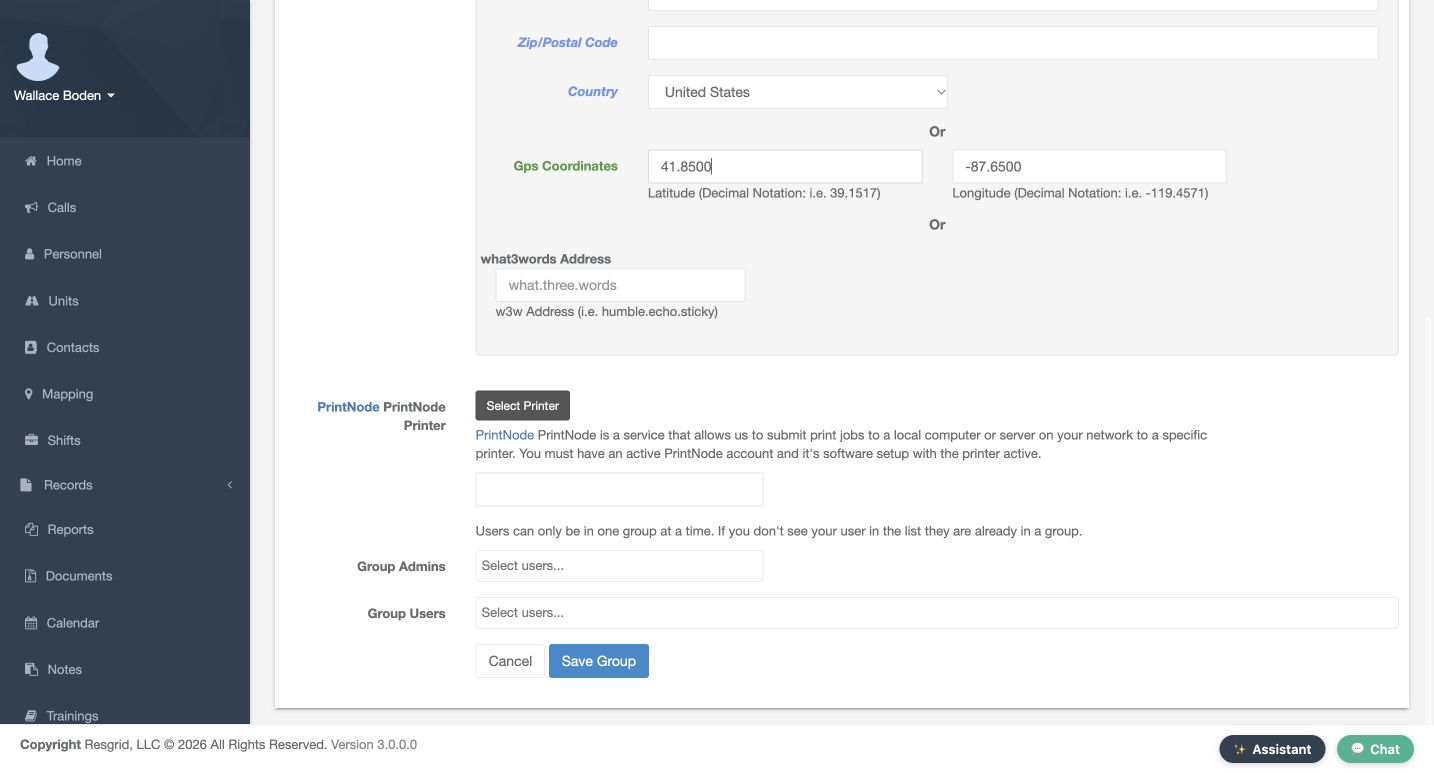
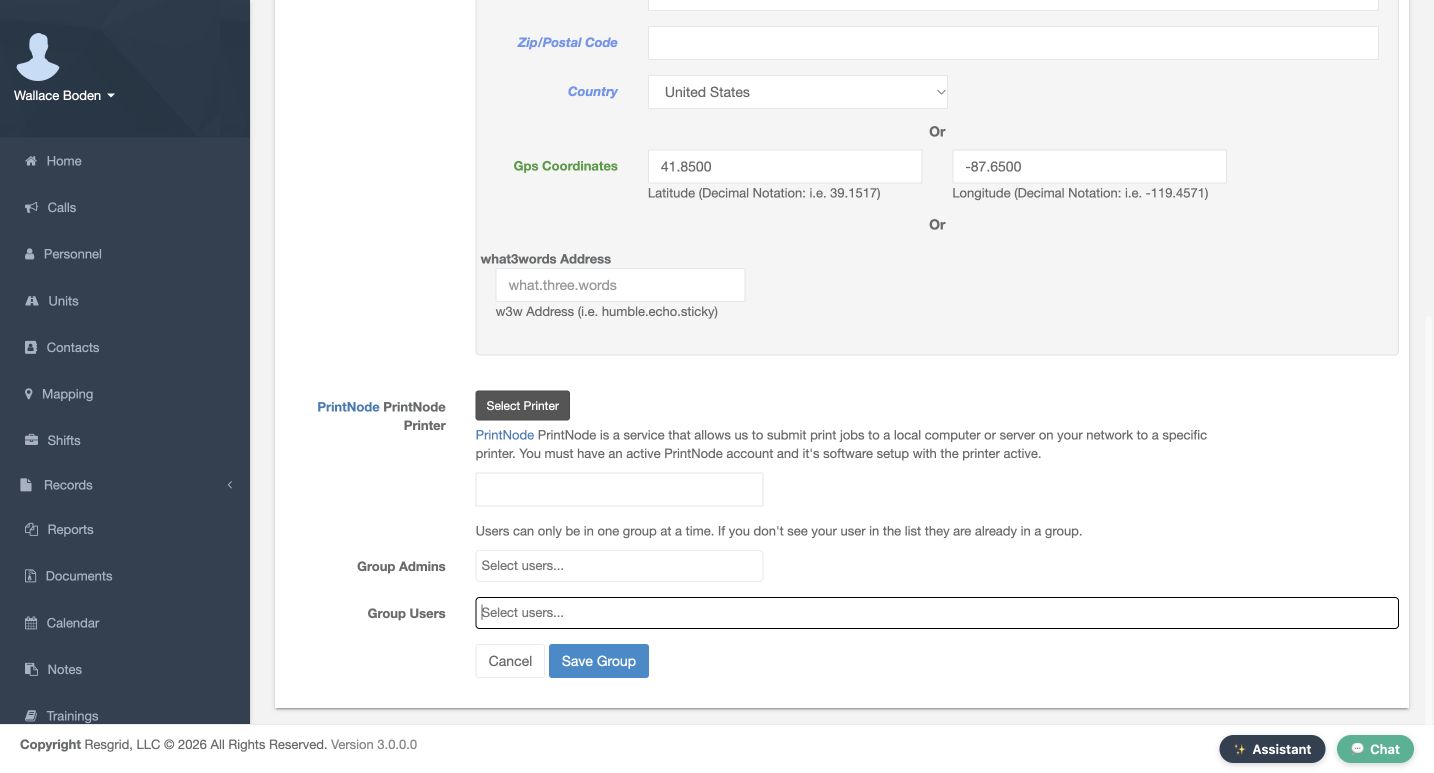
In Gps Coordinates, enter latitude forty-one point eight five and longitude minus eighty-seven point six five. Enter both values together. The street fields are unused and what3words stays blank. This is a typed station reference, not a device-location reading or proof that anyone arrived there. Keep the member and administrator selectors empty and leave printing unconfigured. Use Save Group once after checking the prepared values.
Practice
Save the complete fictional pair with no membership or provider setup changes.
Step 6
Verify the saved station and relationship
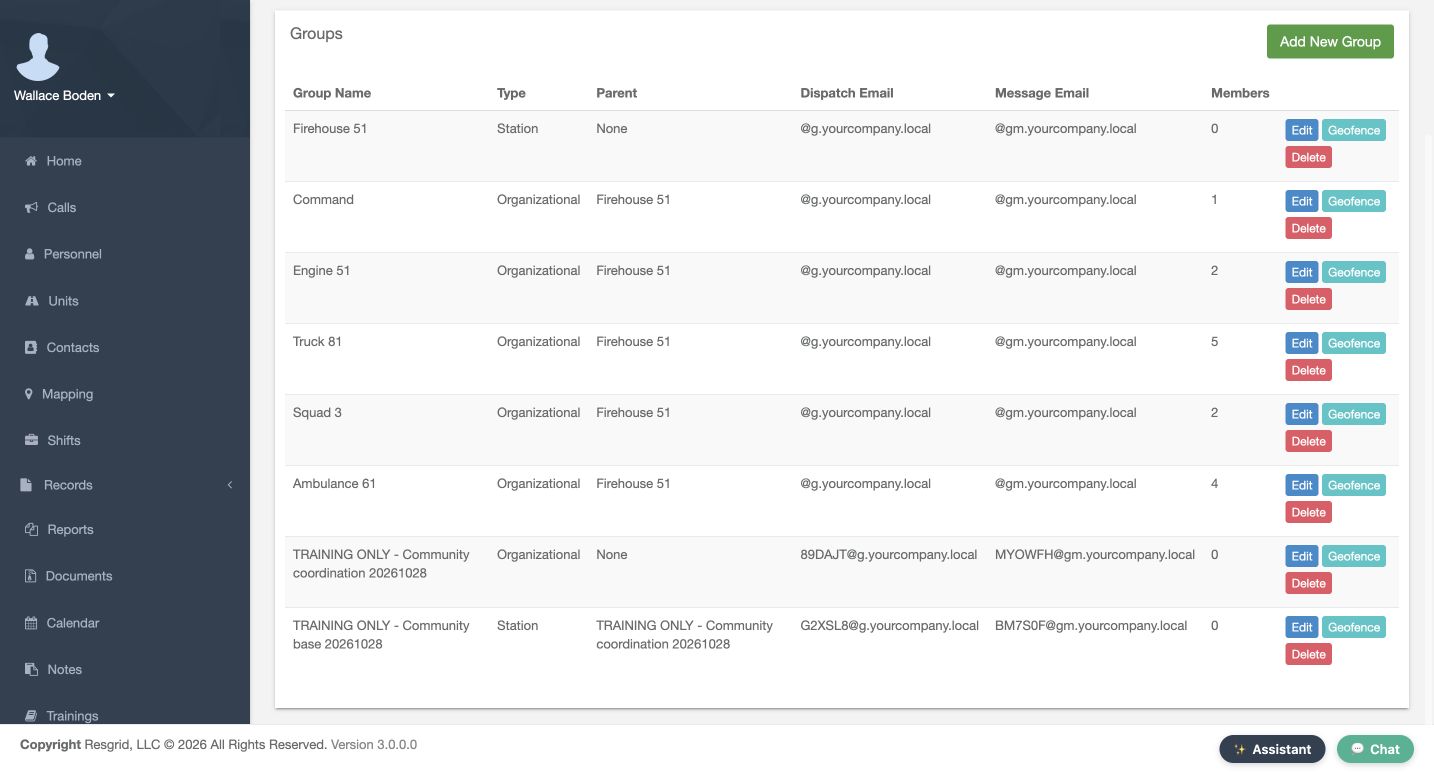
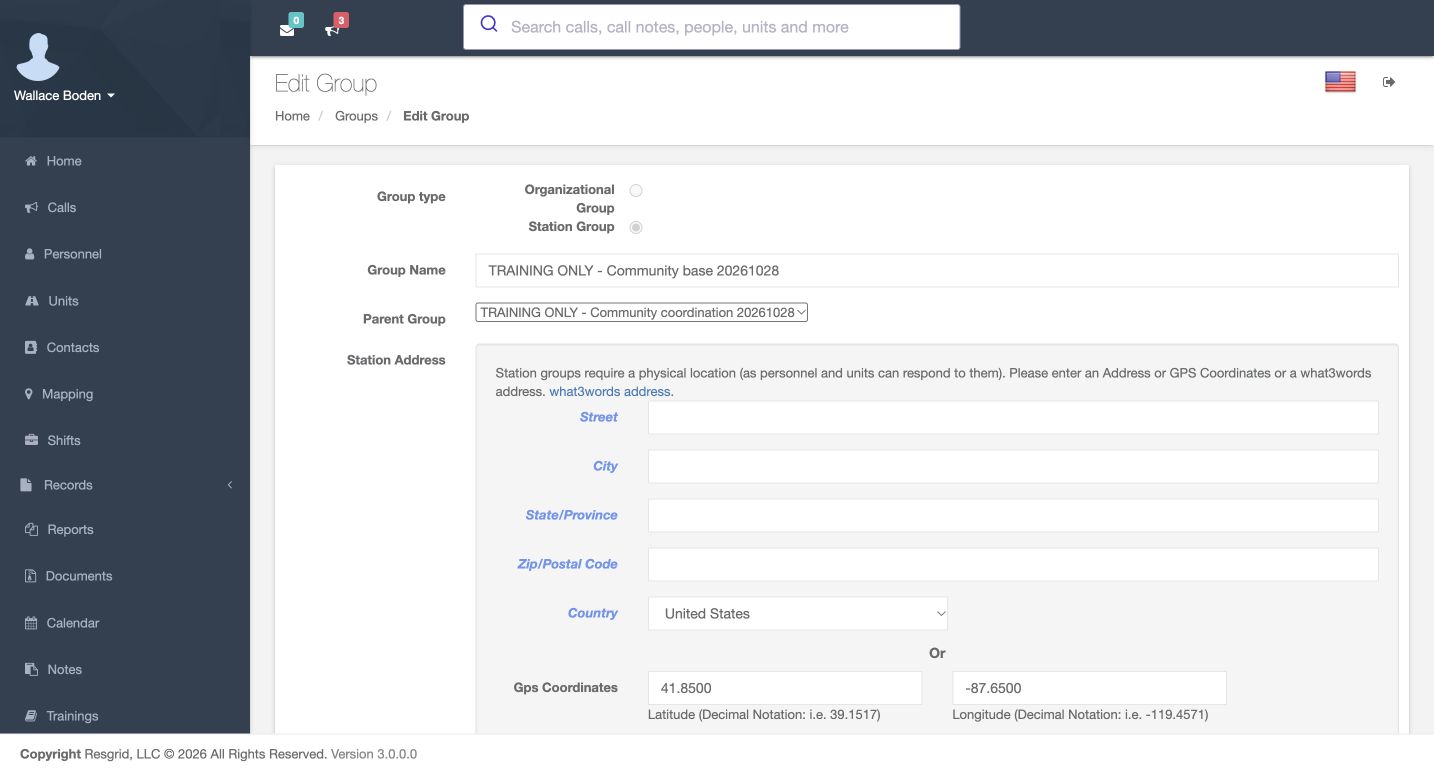
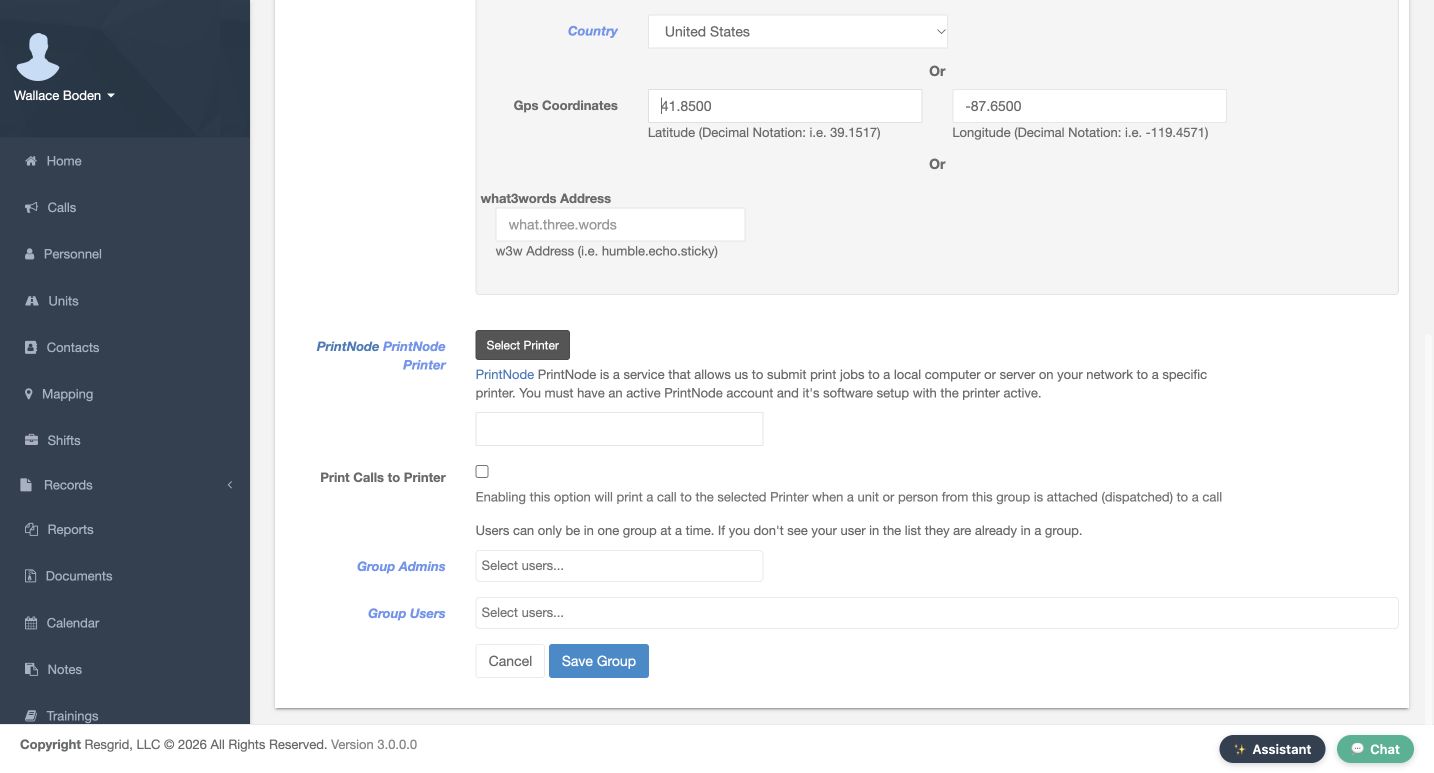
The returned catalog shows both new groups with zero members. The organizational root has no parent, while the station names that root as its parent. Use the station’s Edit control to check its full name and relationship again. Scroll to verify the saved coordinate pair, blank what3words field, and clear Print Calls to Printer option. This readback checks the particular fields we stored without changing the station type or configuring printing.
Practice
Compare the catalog relationship with the station’s reopened name, parent and coordinates.
Step 7
Separate a unit definition from its crew
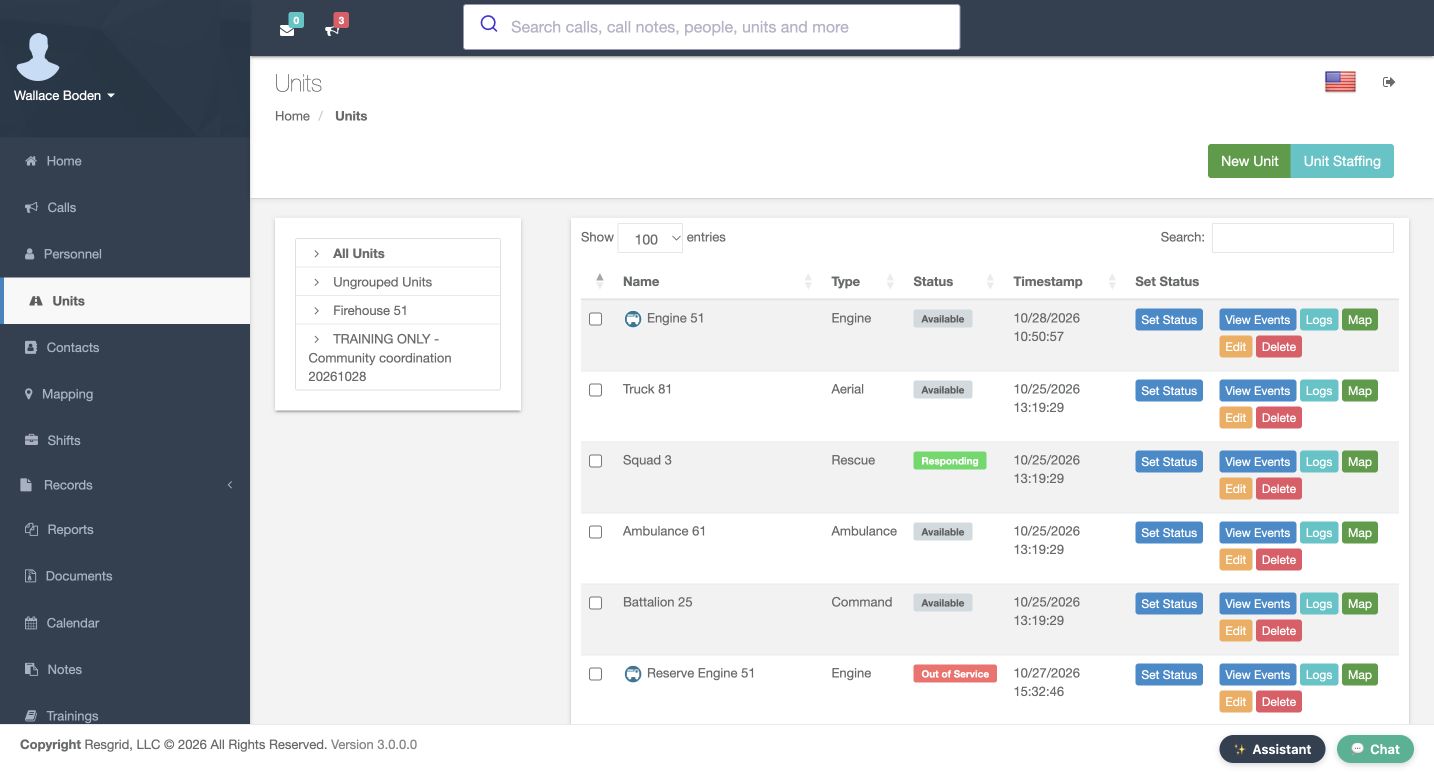
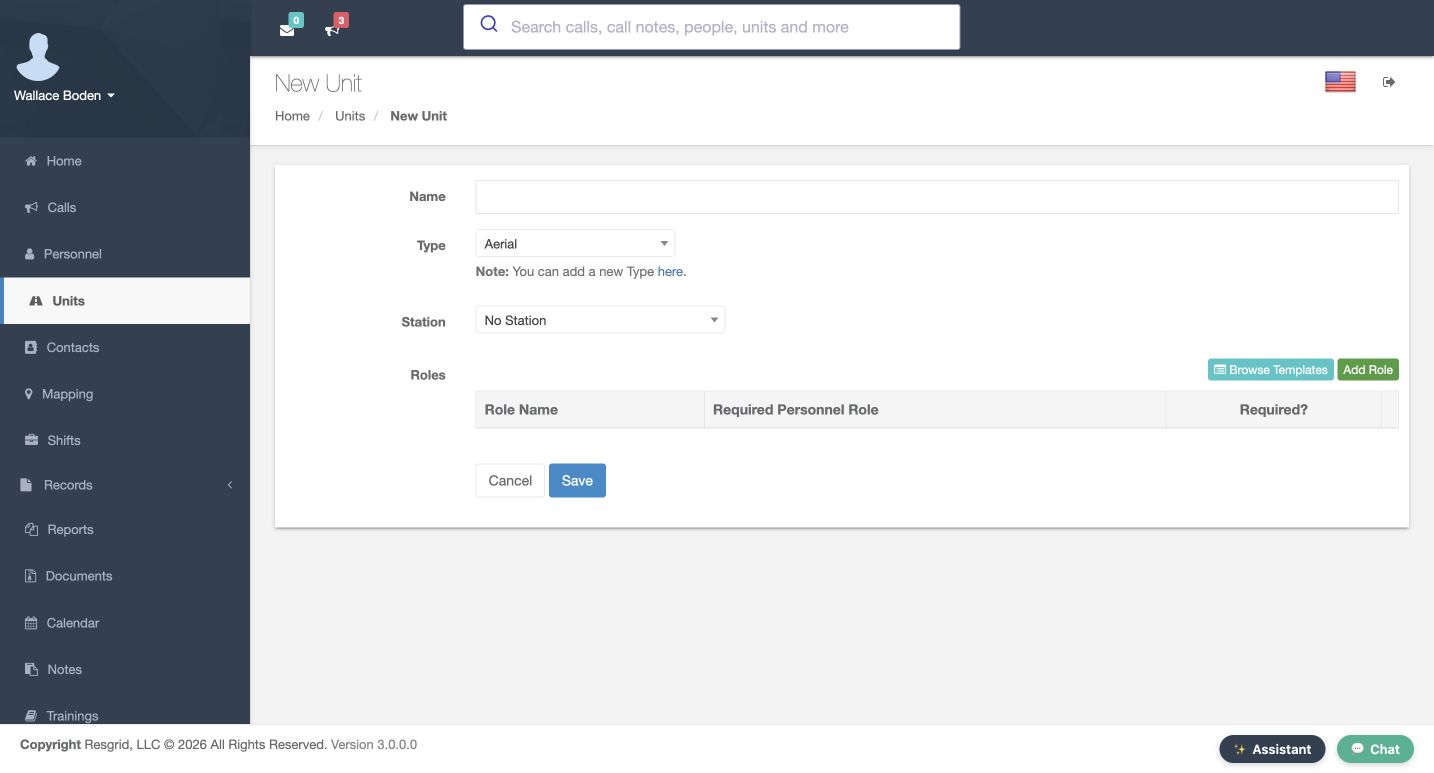
Open Units and choose New Unit. The form separates Name, Type, Station, and the unit’s role positions. No Station is available, but our exercise will use the station we just created. A role position defines a seat; it does not select the person occupying that seat. Before completing this unit, use the type link to create a distinct training vehicle type that will be recognizable in the unit list.
Practice
Identify the type, station and seat-definition controls before creating the unit.
Step 8
Create a useful unit type
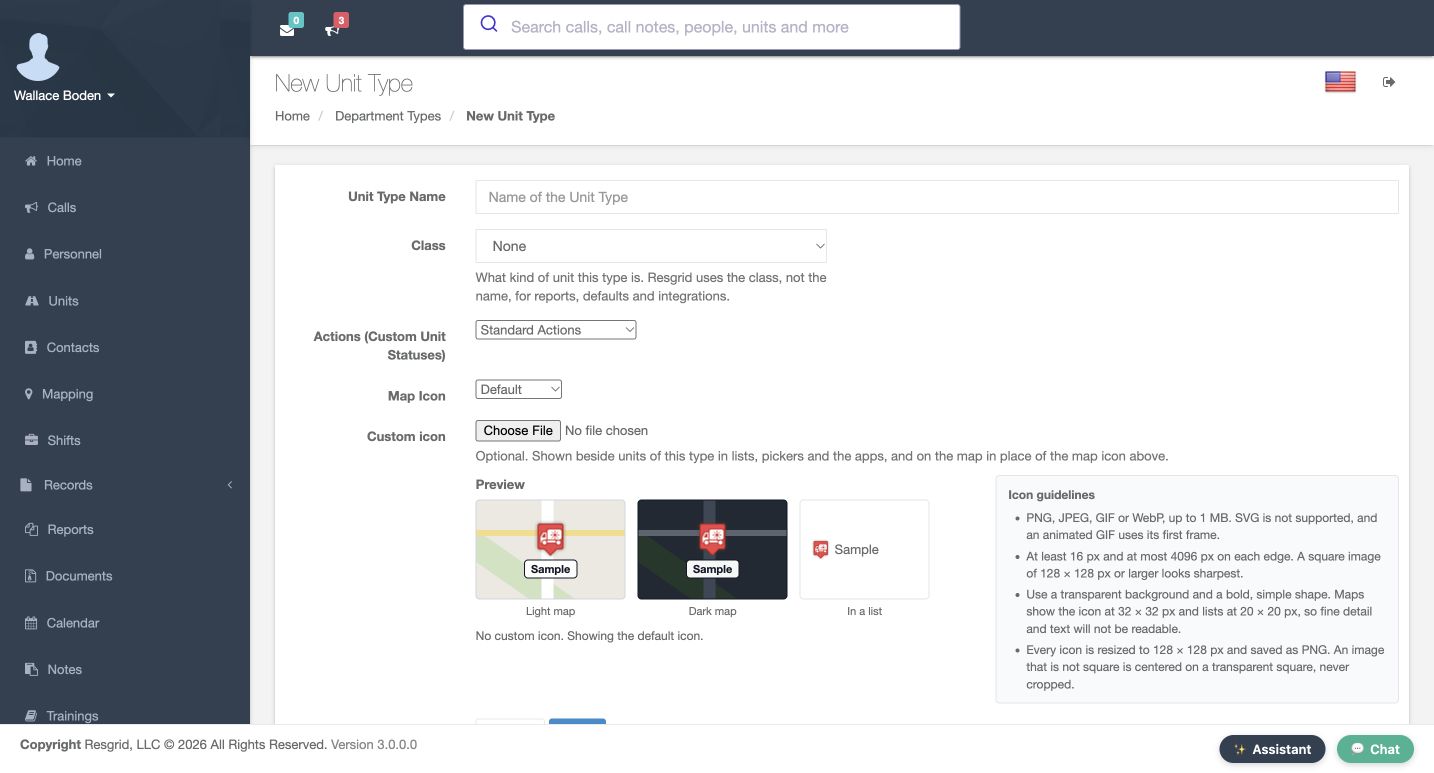
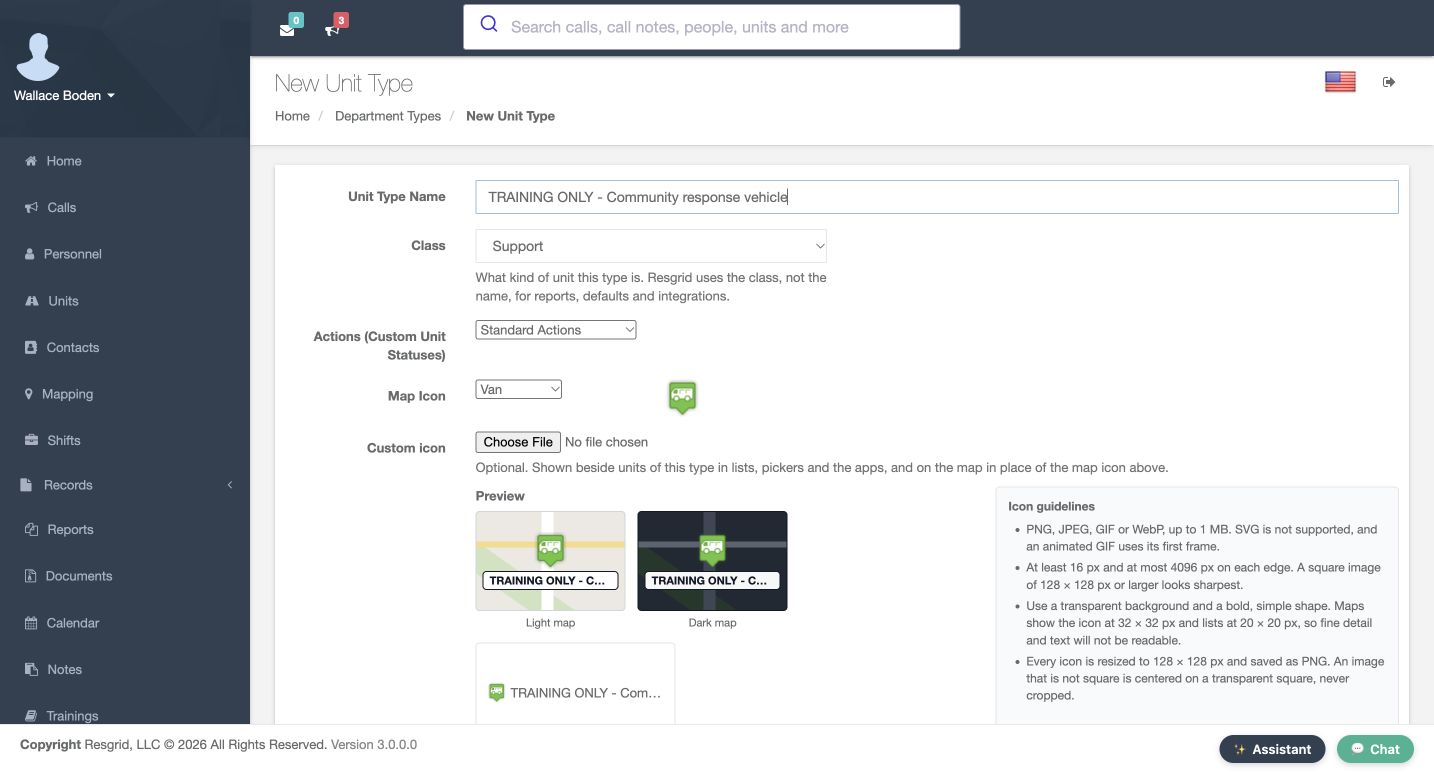
From the Unit Types section, choose New Unit Type. Enter Training Only, Community Response Vehicle. Set Class to Support; the help explains that class is used for reports, defaults, and integrations, separately from the display name. Keep Actions on Standard Actions and choose Van for Map Icon. The optional custom-icon file remains empty. These choices define the new type without changing an existing type or a department status set.
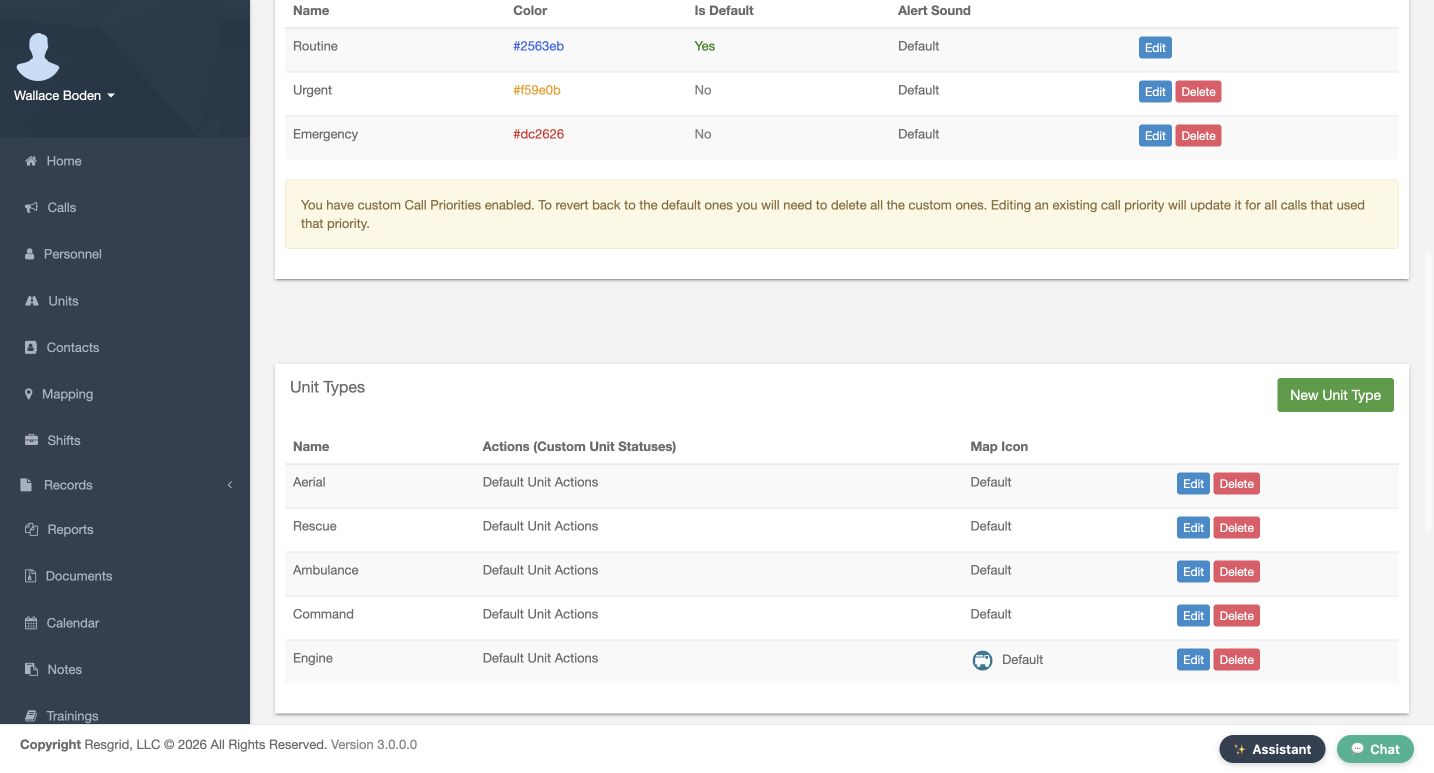
Practice
Prepare an own Support type with Standard Actions and the built-in Van icon.
Step 9
Save the built-in icon and verify the type
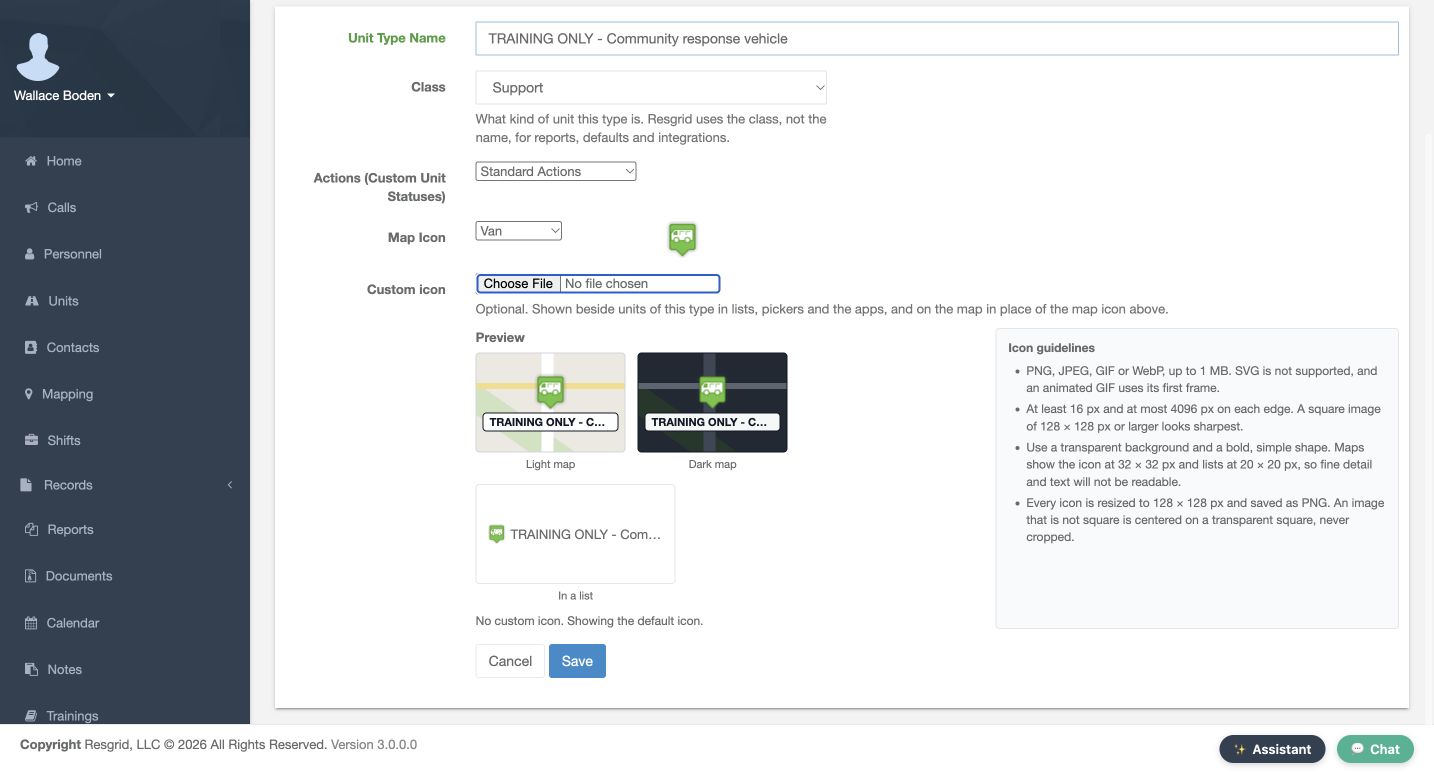
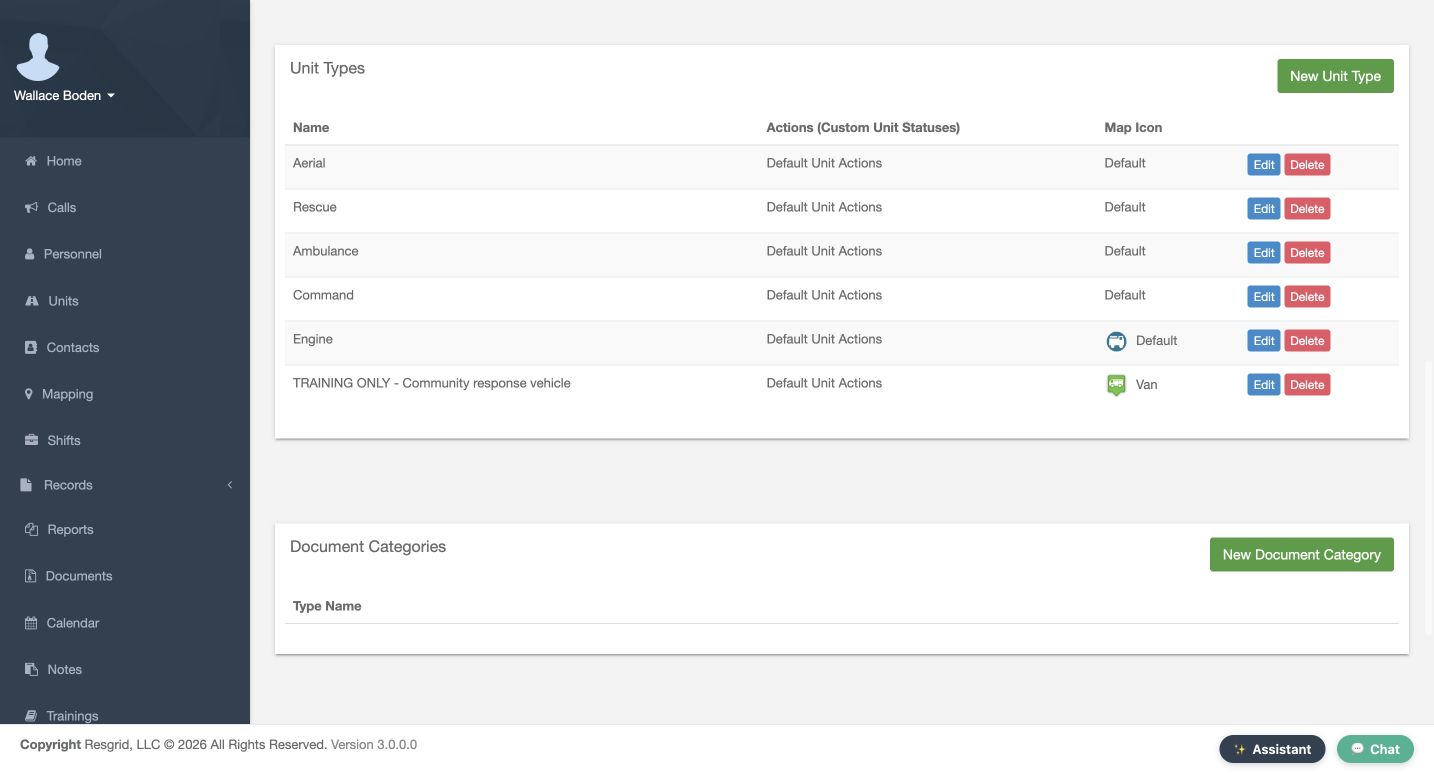
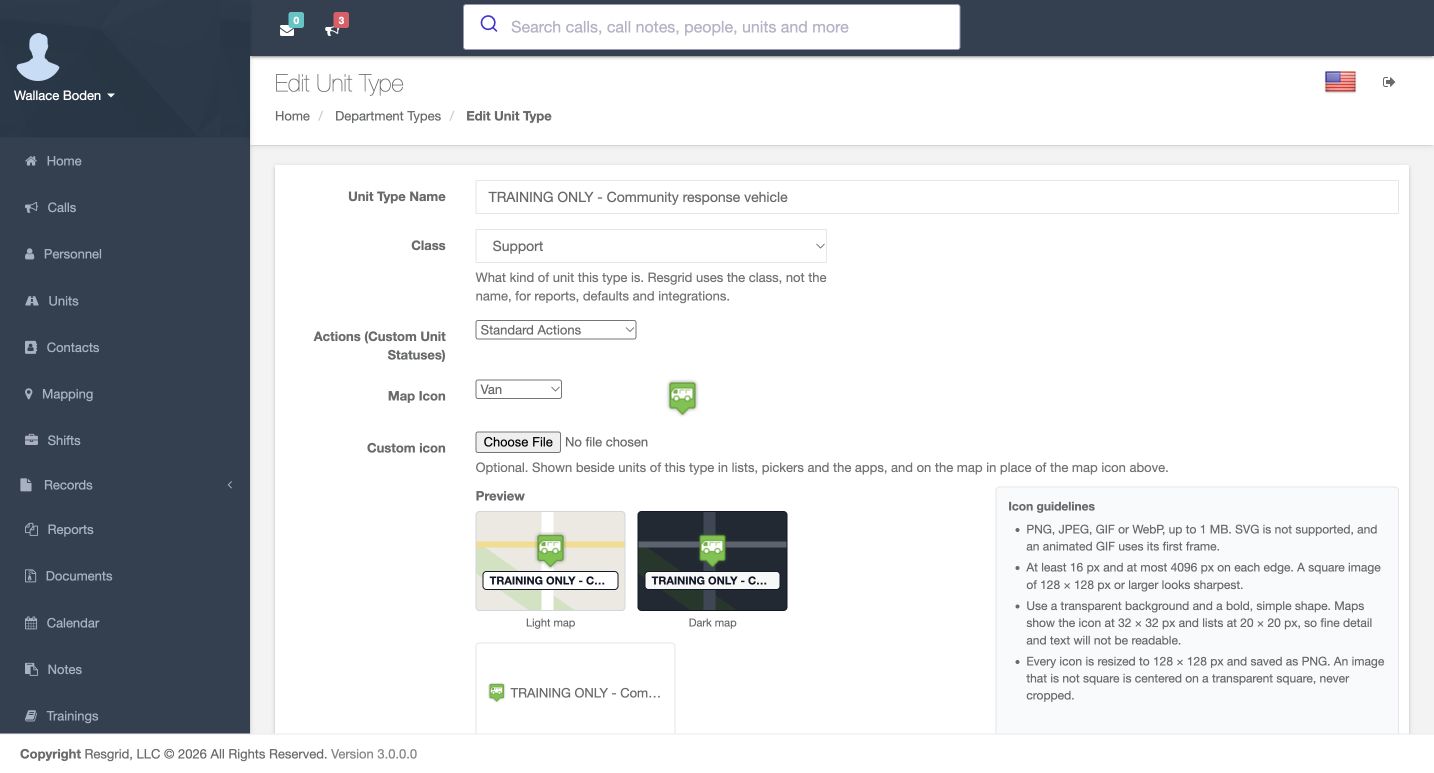
The preview now shows the built-in green Van symbol on light and dark backgrounds and in a list. No custom image has been uploaded. Save, then read the new type row in the catalog. It shows the full name, Default Unit Actions, and Van. Open Edit to verify Support, Standard Actions, and the Van choice again. This confirms the type configuration; it is not a demonstration of a vehicle’s live map location.
Practice
Verify the saved type’s full name, class, actions and built-in icon.
Step 10
Define two distinct positions
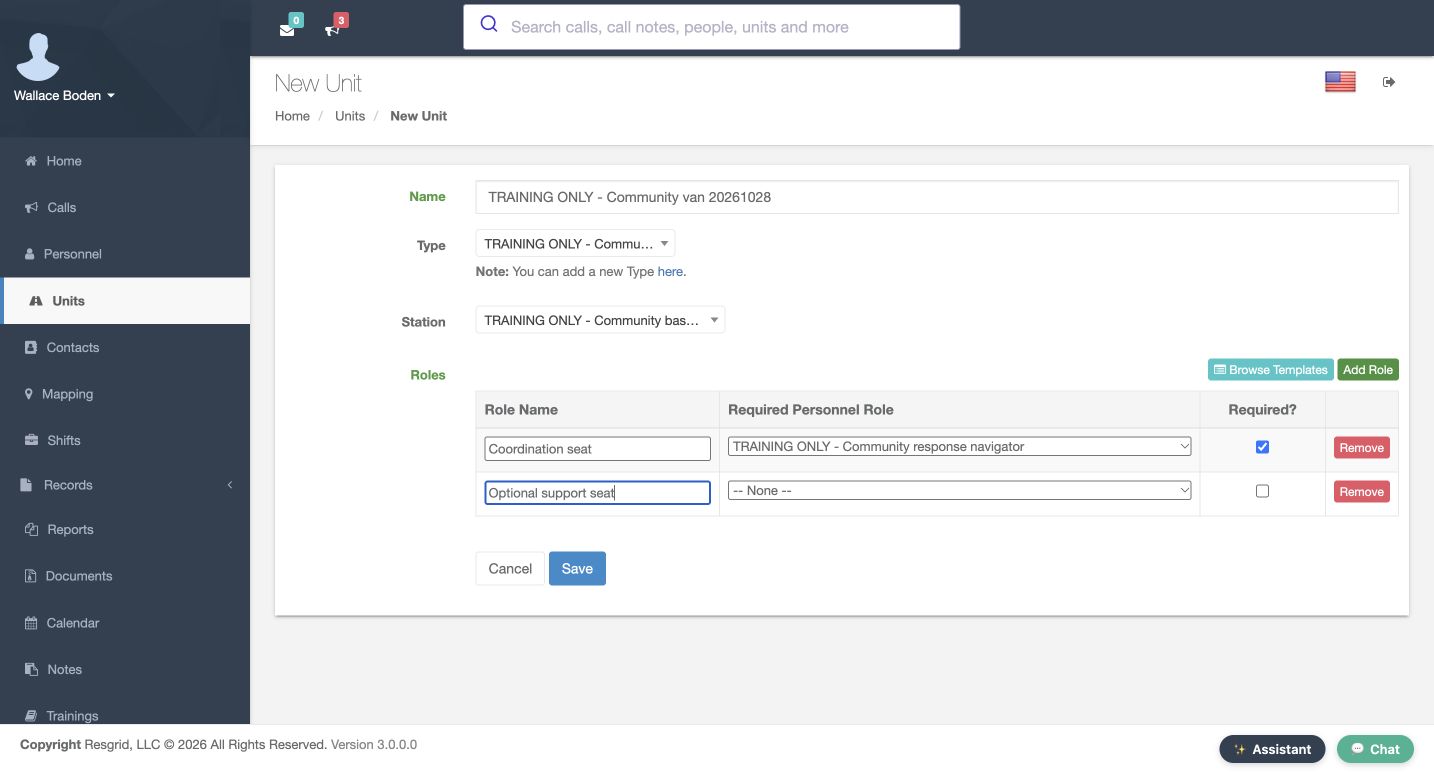
Return to New Unit and name the vehicle Training Only, Community Van, with the exercise date. Select the new type and station. Add two positions with different names. Coordination Seat requires the existing Community Response Navigator personnel role, and its Required box is checked. Optional Support Seat has no personnel-role restriction and its Required box is clear. These are the unit’s seat definitions. No person is assigned by creating either row.
Practice
Prepare the two seat definitions and compare their personnel-role conditions.
Step 11
Inspect a template without applying it
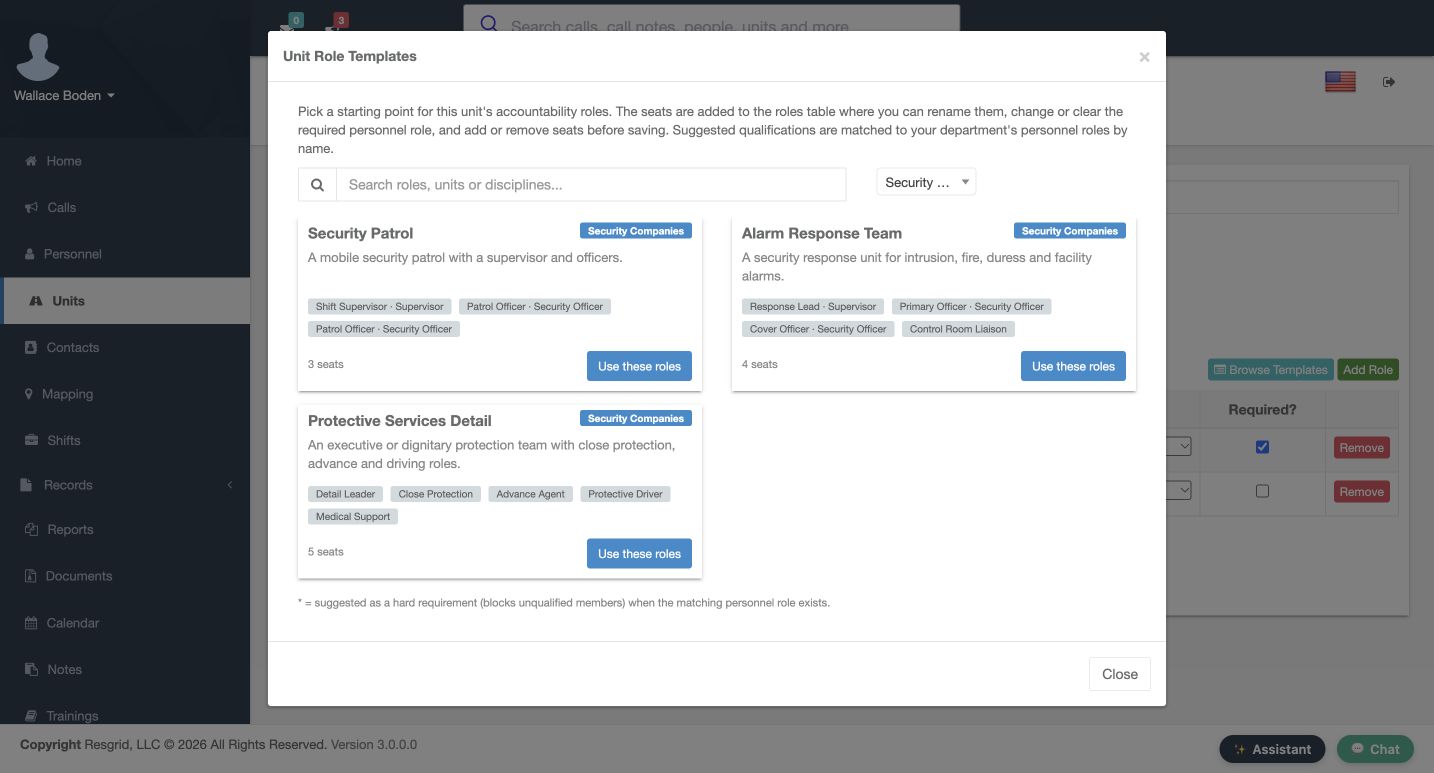
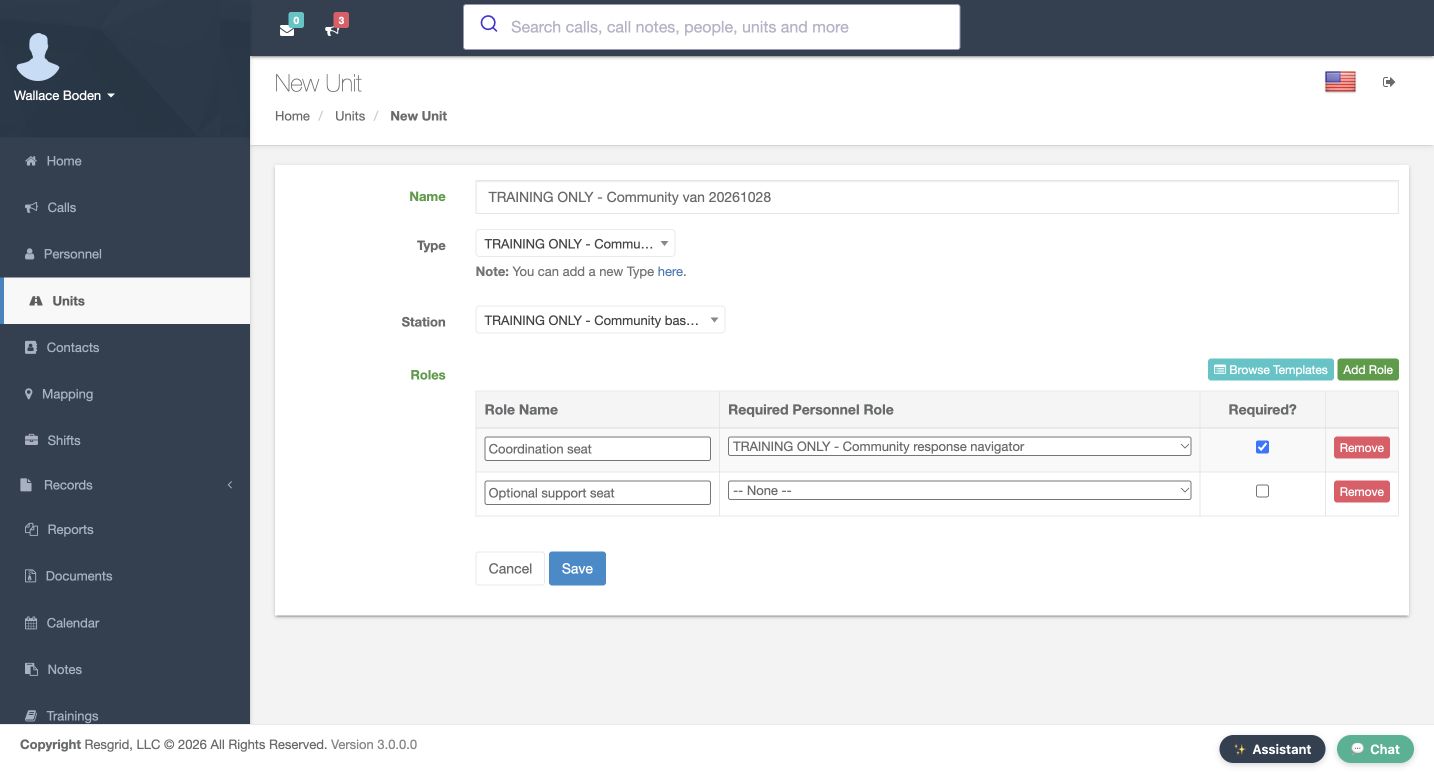
Browse Templates opens reusable starting layouts. Here the Security Companies cards show examples such as Security Patrol and Alarm Response Team. Use These Roles would add a template’s positions to the form for review before saving. For this exercise, choose Close instead. The settled unit form still contains our two prepared positions. Inspect a template’s suggested roles deliberately rather than assuming its names or suggested qualifications match your department.
Practice
Inspect and close a template, leaving the two prepared positions unchanged.
Step 12
Save the unit and reopen its definition
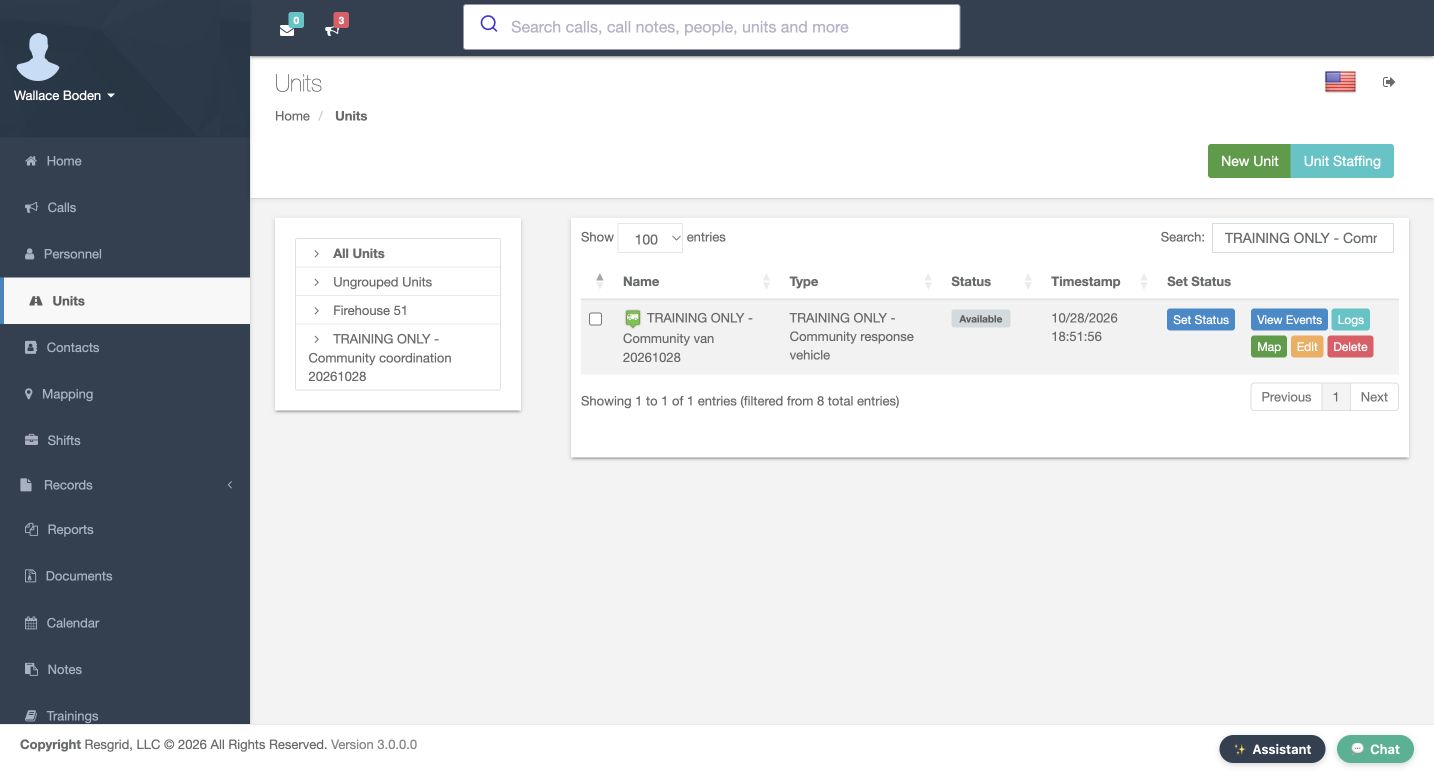
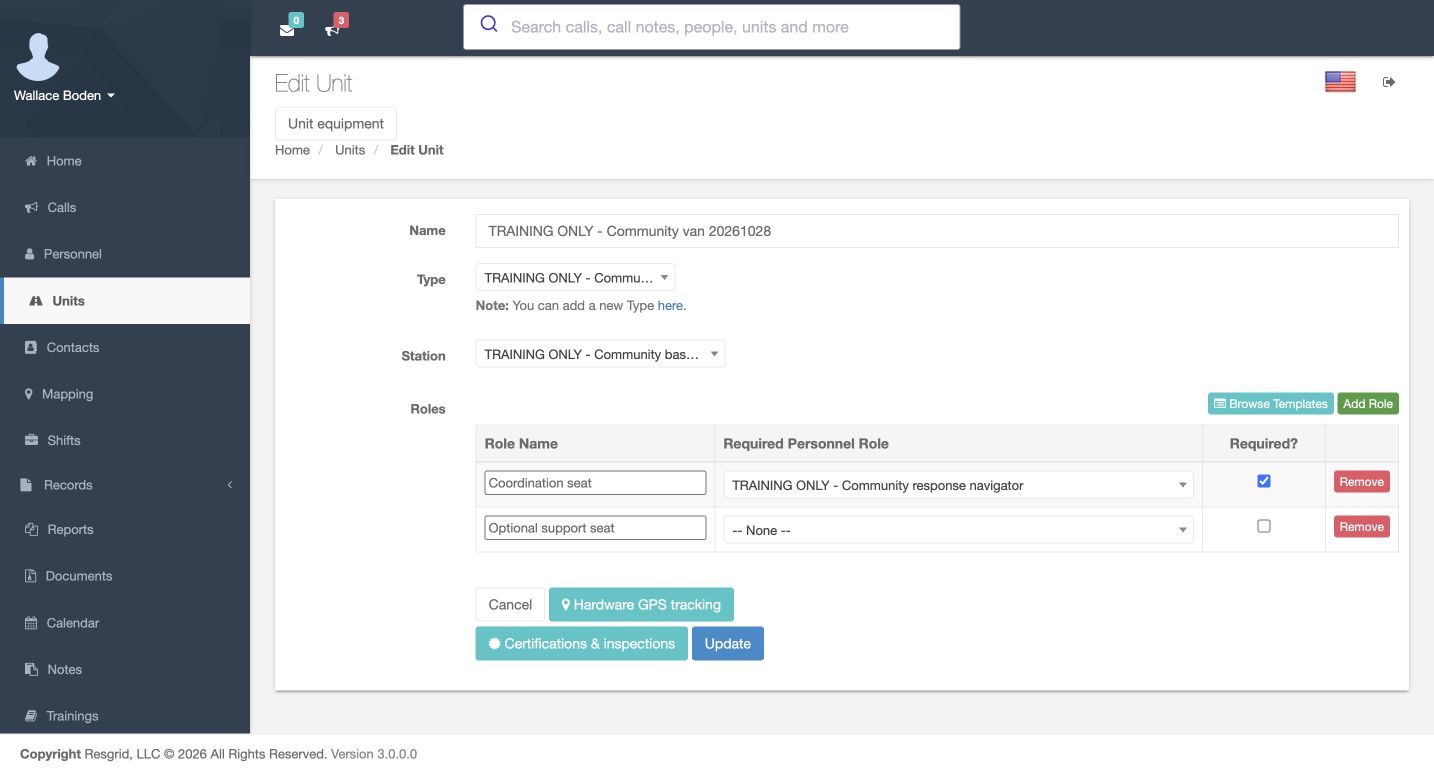
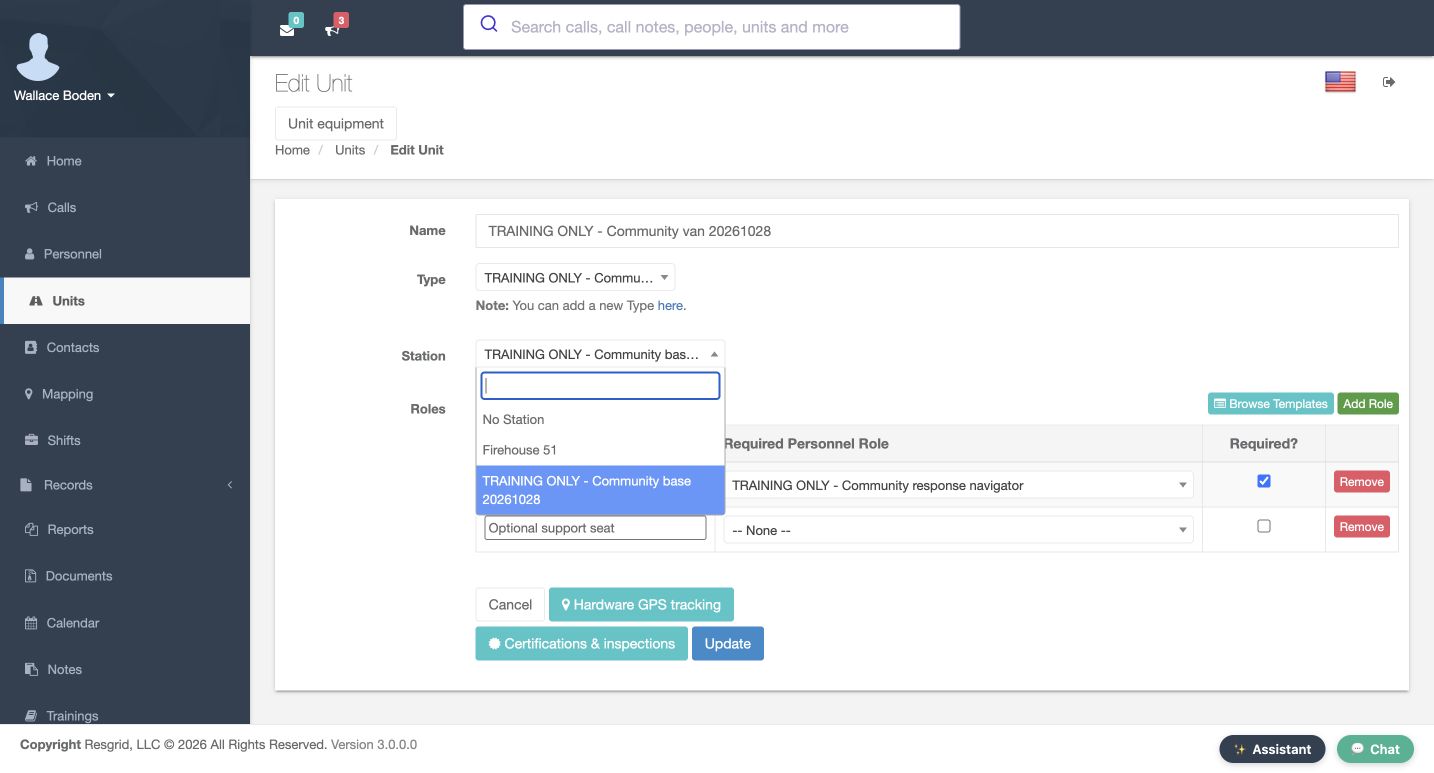
Use Save on the prepared unit. The returned list shows its full name and training vehicle type. Open Edit and check that both positions and their Required choices remain. Open the Station dropdown to read the complete selected Community Base name; the closed field truncates it. We are verifying the stored definition without pressing Update. The list’s Available display alone does not establish crew readiness or prove a newly recorded status event.
Practice
Reopen the saved unit and verify its full station selection and both seat definitions.
Step 13
Inspect staffing without changing assignments
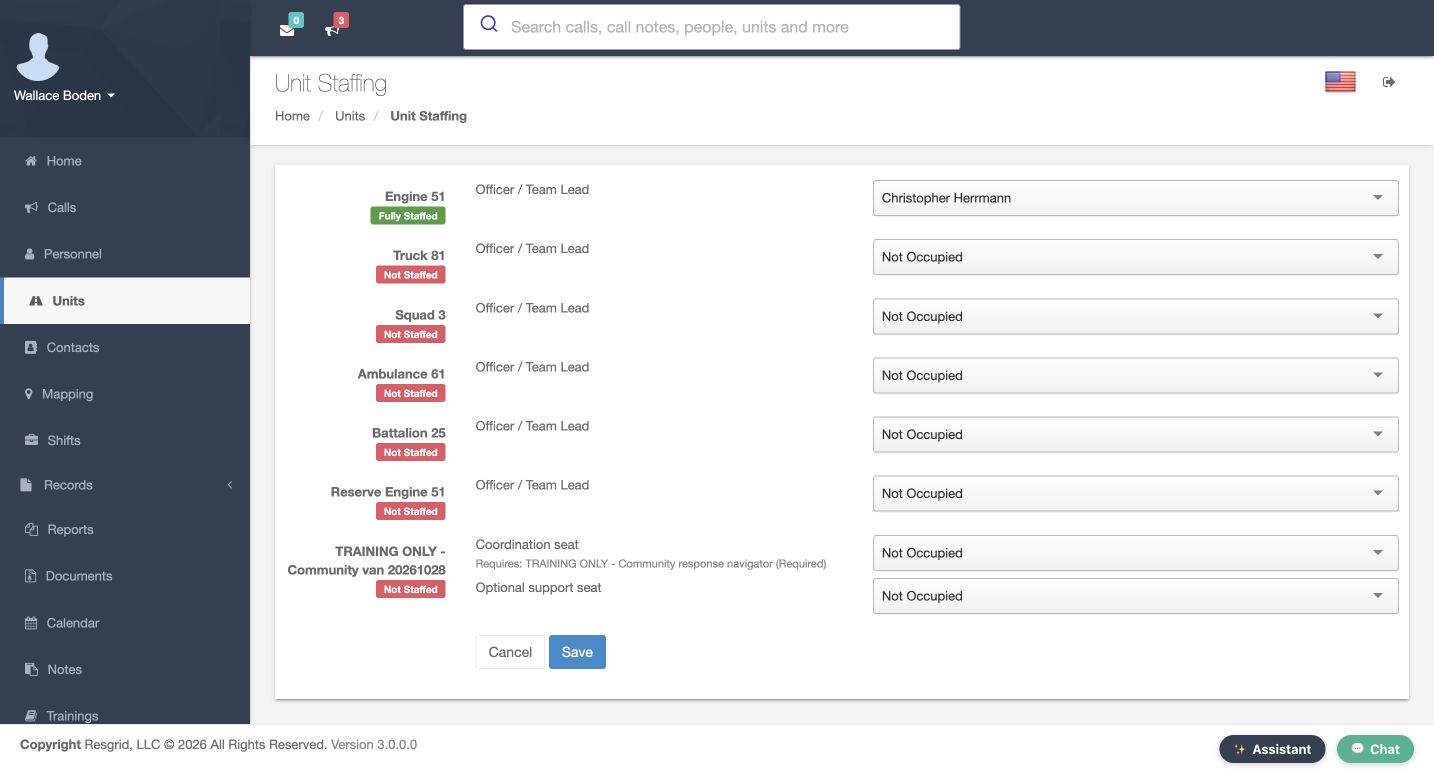
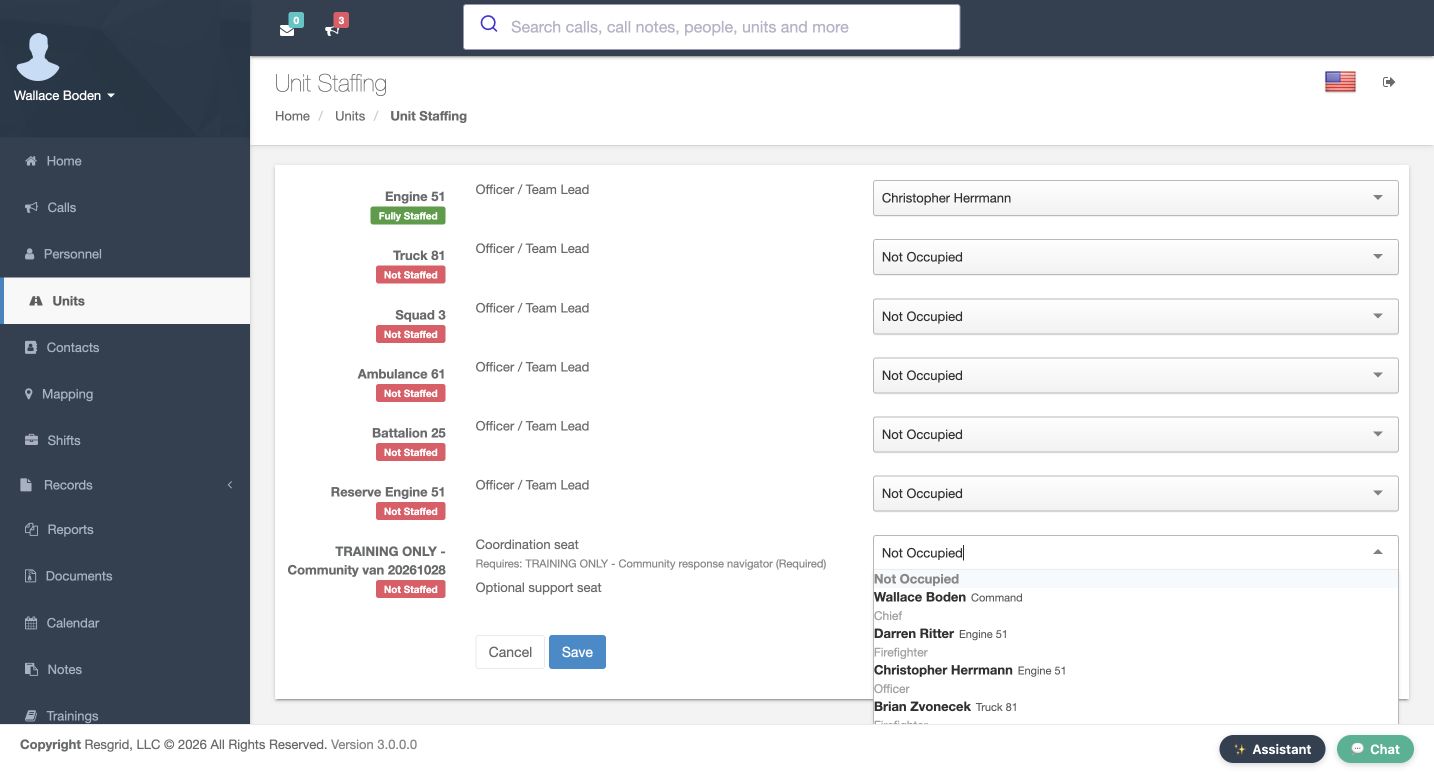
Open Unit Staffing to distinguish positions from assigned people. Engine fifty-one retains Herrmann in its one configured seat. The new van is Not Staffed, and both positions are Not Occupied. Opening a person selector does not itself prove that the listed people hold the required role. We close it without selecting anyone. Save on this page replaces staffing selections across the department, so we leave it untouched and preserve every existing assignment.
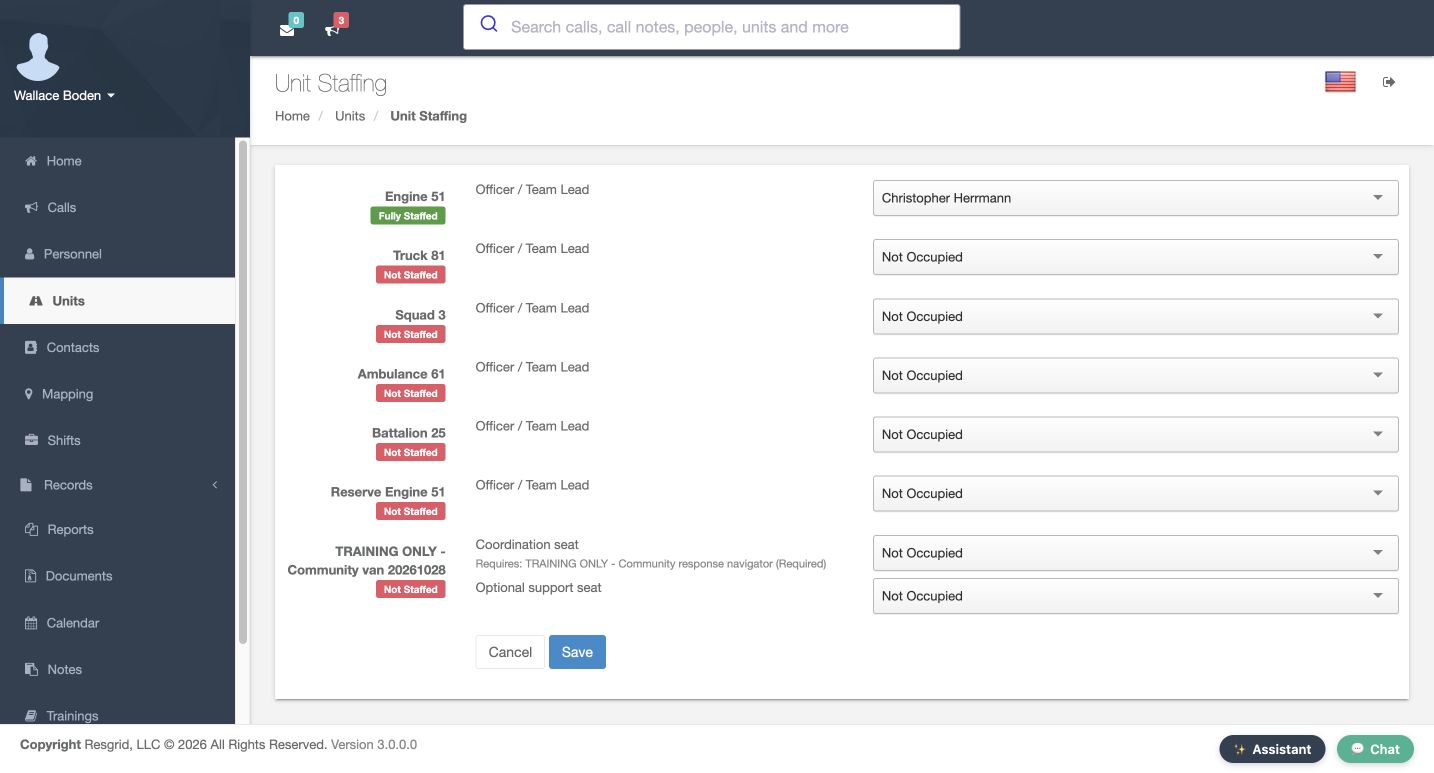
Practice
Read the new unit’s empty seats and existing crew, then leave without saving staffing.
Step 14
Find the unit through its parent and station
Finish with the group tree on Units. Expand and select the Community Coordination parent. Its view includes the vehicle assigned to the child Community Base station. Select that station directly and the same unit appears. This demonstrates the saved relationship from organizational parent to station to unit. These tree choices filter the view; they do not move a unit, assign a crew member, or change its status.
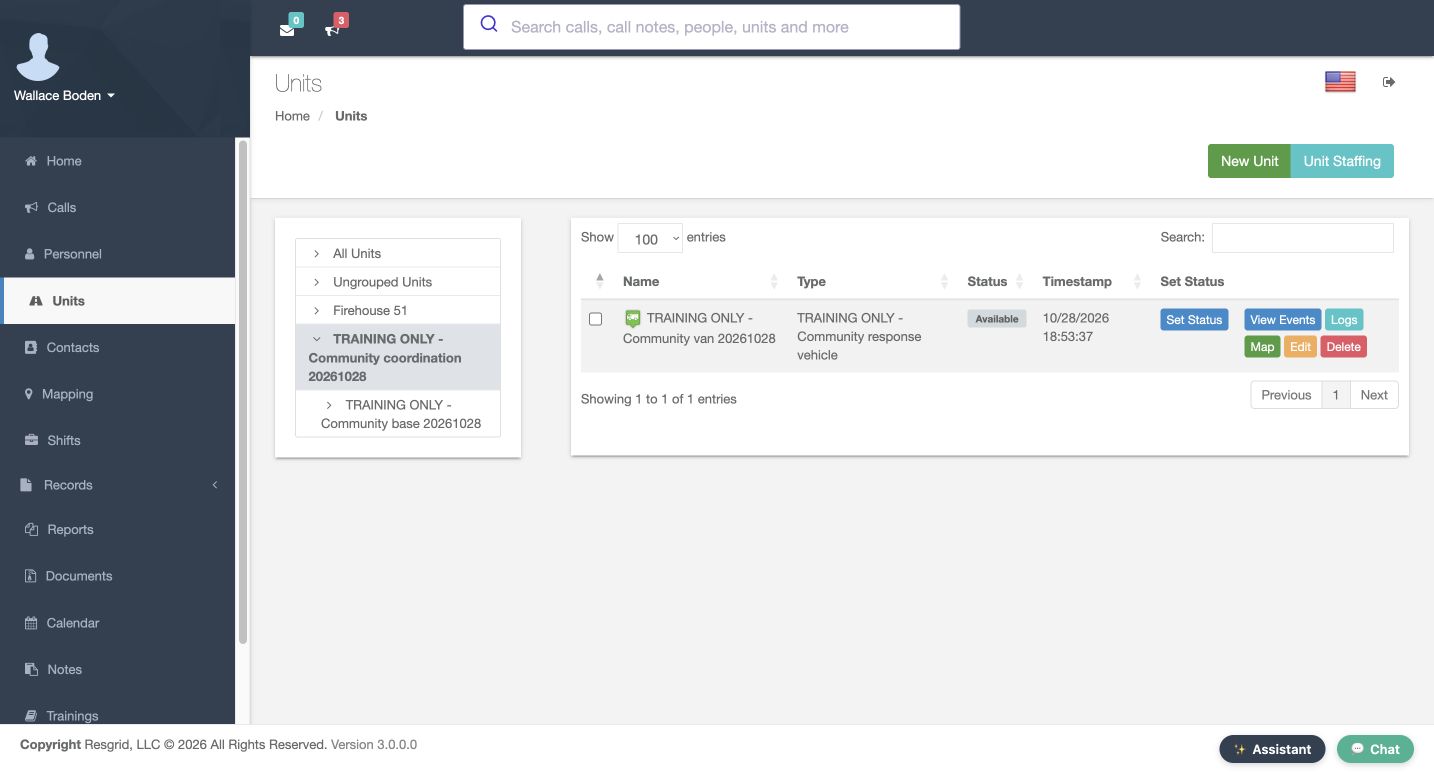
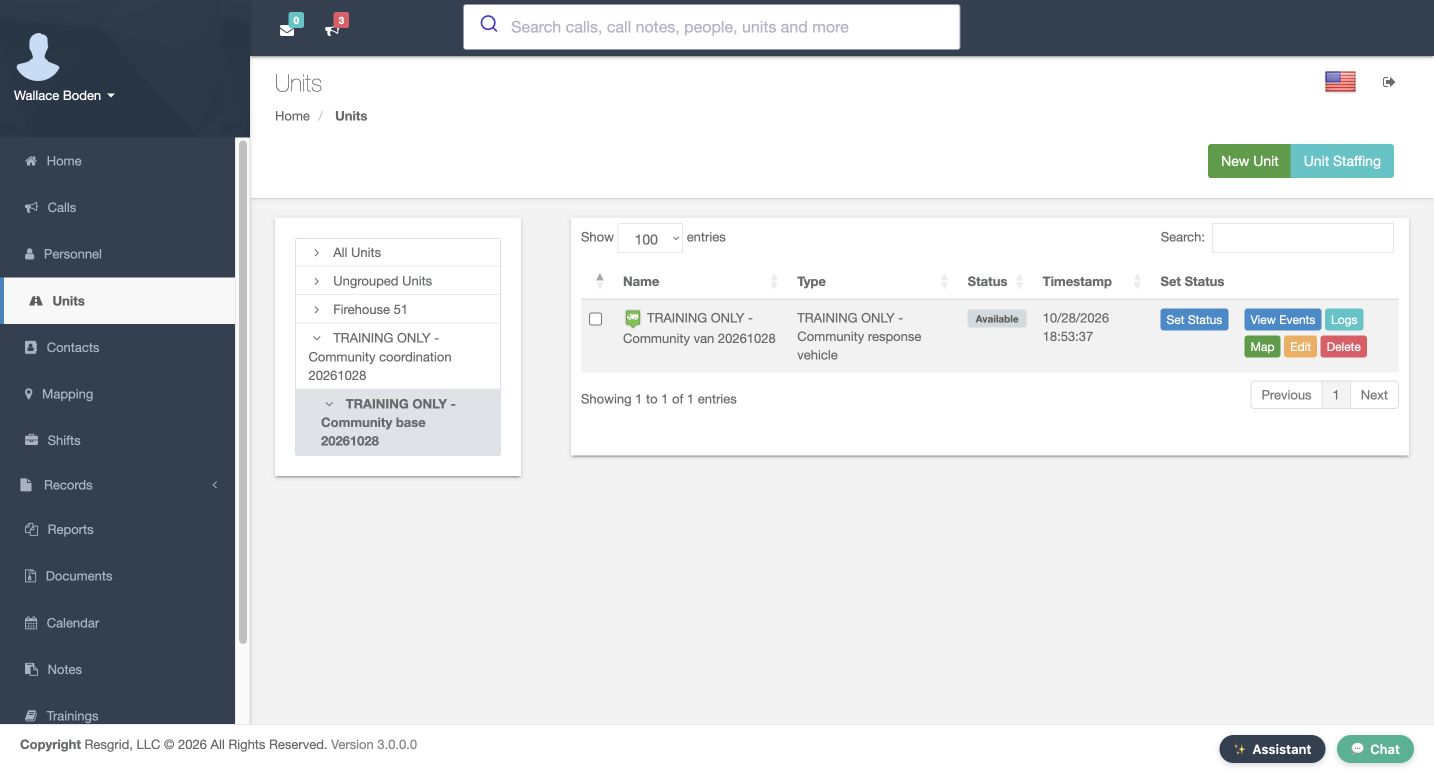
Practice
Find the saved unit through both its parent group and its station.
Step 15
Apply the structure across sectors
Chicago Fire can separate a coordination structure from a station and its vehicles. Community care and mental health teams can organize operational teams and bases without patient detail. Search and rescue can distinguish coordination groups, staging bases, and resources; security teams can structure patrol resources; wildland teams can organize seasonal bases; and industrial response teams can separate facility groups from response vehicles. In each setting, verify saved relationships and seat requirements, then manage actual staffing as a separate, deliberate operation.
Practice
Sketch a fictional parent, station, type and unit suited to your sector before changing real configuration.
Examples for your department
- Fire / EMS
- Separate coordination groups, stations and response vehicles; verify definitions before staffing.
- Community response
- Organize operational teams/bases without patient detail or clinical authorization claims.
- Search and rescue
- Distinguish coordination, staging bases and resources.
- Security
- Inspect patrol templates and choose deliberate local positions rather than applying them blindly.
- Wildland
- Separate seasonal coordination groups, bases and resource types.
- Industrial
- Distinguish facility groups from response vehicles and their seat requirements.
Transcript
Download transcriptRead the complete transcript
Create groups, stations and a unit with deliberate crew positions
Audience: department administrators, resource coordinators

Inspect groups and their hierarchy
Open the department menu and choose Stations and Groups. The table separates each group’s type, parent, and member count. Our fictional Chicago Fire department already has a station and organizational groups beneath it. We will add an empty coordination parent and a separate station beneath that parent. Read the existing rows first so the new exercise is easy to identify and the original memberships remain intact.
Practice: Identify the existing parent relationships before adding your own fictional group.

Prepare an organizational parent
Choose Add New Group and keep Organizational Group selected. Enter Training Only, Community Coordination, followed by the exercise date. Parent Group remains None, making this a top-level group. Group Admins and Group Users stay empty. These fields describe different membership responsibilities; choosing an administrator is a permission decision. We are preparing a structure, so we do not move a person from an existing group or assign an administrator.
Practice: Prepare an empty organizational root with a unique training name and Parent None.

Save and reopen the empty group
Use Save Group. The fresh Edit Group readback retains its full name and Parent None, and displays the Organizational type read-only. Both membership selectors remain empty. The page explains that a person can belong to only one group at a time. When maintaining a populated group, let its existing selections load before saving: the form submits the complete member and administrator selection.
Practice: Reopen the saved root and check its type, parent and empty membership.

Prepare a station under the new parent
Create another group and select Station Group. Name it Training Only, Community Base, with the exercise date, and choose the new coordination group as its parent. A station requires a physical reference location. The form offers address fields, a coordinate pair, or a what3words address. We will use an explicitly illustrative Chicago coordinate pair. The parent describes the organizational relationship; it does not replace the station’s own location.
Practice: Prepare a Station group with your own organizational group as its parent.

Enter a complete illustrative coordinate pair
In Gps Coordinates, enter latitude forty-one point eight five and longitude minus eighty-seven point six five. Enter both values together. The street fields are unused and what3words stays blank. This is a typed station reference, not a device-location reading or proof that anyone arrived there. Keep the member and administrator selectors empty and leave printing unconfigured. Use Save Group once after checking the prepared values.
Practice: Save the complete fictional pair with no membership or provider setup changes.

Verify the saved station and relationship
The returned catalog shows both new groups with zero members. The organizational root has no parent, while the station names that root as its parent. Use the station’s Edit control to check its full name and relationship again. Scroll to verify the saved coordinate pair, blank what3words field, and clear Print Calls to Printer option. This readback checks the particular fields we stored without changing the station type or configuring printing.
Practice: Compare the catalog relationship with the station’s reopened name, parent and coordinates.

Separate a unit definition from its crew
Open Units and choose New Unit. The form separates Name, Type, Station, and the unit’s role positions. No Station is available, but our exercise will use the station we just created. A role position defines a seat; it does not select the person occupying that seat. Before completing this unit, use the type link to create a distinct training vehicle type that will be recognizable in the unit list.
Practice: Identify the type, station and seat-definition controls before creating the unit.

Create a useful unit type
From the Unit Types section, choose New Unit Type. Enter Training Only, Community Response Vehicle. Set Class to Support; the help explains that class is used for reports, defaults, and integrations, separately from the display name. Keep Actions on Standard Actions and choose Van for Map Icon. The optional custom-icon file remains empty. These choices define the new type without changing an existing type or a department status set.
Practice: Prepare an own Support type with Standard Actions and the built-in Van icon.

Save the built-in icon and verify the type
The preview now shows the built-in green Van symbol on light and dark backgrounds and in a list. No custom image has been uploaded. Save, then read the new type row in the catalog. It shows the full name, Default Unit Actions, and Van. Open Edit to verify Support, Standard Actions, and the Van choice again. This confirms the type configuration; it is not a demonstration of a vehicle’s live map location.
Practice: Verify the saved type’s full name, class, actions and built-in icon.

Define two distinct positions
Return to New Unit and name the vehicle Training Only, Community Van, with the exercise date. Select the new type and station. Add two positions with different names. Coordination Seat requires the existing Community Response Navigator personnel role, and its Required box is checked. Optional Support Seat has no personnel-role restriction and its Required box is clear. These are the unit’s seat definitions. No person is assigned by creating either row.
Practice: Prepare the two seat definitions and compare their personnel-role conditions.

Inspect a template without applying it
Browse Templates opens reusable starting layouts. Here the Security Companies cards show examples such as Security Patrol and Alarm Response Team. Use These Roles would add a template’s positions to the form for review before saving. For this exercise, choose Close instead. The settled unit form still contains our two prepared positions. Inspect a template’s suggested roles deliberately rather than assuming its names or suggested qualifications match your department.
Practice: Inspect and close a template, leaving the two prepared positions unchanged.

Save the unit and reopen its definition
Use Save on the prepared unit. The returned list shows its full name and training vehicle type. Open Edit and check that both positions and their Required choices remain. Open the Station dropdown to read the complete selected Community Base name; the closed field truncates it. We are verifying the stored definition without pressing Update. The list’s Available display alone does not establish crew readiness or prove a newly recorded status event.
Practice: Reopen the saved unit and verify its full station selection and both seat definitions.

Inspect staffing without changing assignments
Open Unit Staffing to distinguish positions from assigned people. Engine fifty-one retains Herrmann in its one configured seat. The new van is Not Staffed, and both positions are Not Occupied. Opening a person selector does not itself prove that the listed people hold the required role. We close it without selecting anyone. Save on this page replaces staffing selections across the department, so we leave it untouched and preserve every existing assignment.
Practice: Read the new unit’s empty seats and existing crew, then leave without saving staffing.

Find the unit through its parent and station
Finish with the group tree on Units. Expand and select the Community Coordination parent. Its view includes the vehicle assigned to the child Community Base station. Select that station directly and the same unit appears. This demonstrates the saved relationship from organizational parent to station to unit. These tree choices filter the view; they do not move a unit, assign a crew member, or change its status.
Practice: Find the saved unit through both its parent group and its station.

Apply the structure across sectors
Chicago Fire can separate a coordination structure from a station and its vehicles. Community care and mental health teams can organize operational teams and bases without patient detail. Search and rescue can distinguish coordination groups, staging bases, and resources; security teams can structure patrol resources; wildland teams can organize seasonal bases; and industrial response teams can separate facility groups from response vehicles. In each setting, verify saved relationships and seat requirements, then manage actual staffing as a separate, deliberate operation.
Practice: Sketch a fictional parent, station, type and unit suited to your sector before changing real configuration.

Examples for your department
Fire / EMS: Separate coordination groups, stations and response vehicles; verify definitions before staffing.
Community response: Organize operational teams/bases without patient detail or clinical authorization claims.
Search and rescue: Distinguish coordination, staging bases and resources.
Security: Inspect patrol templates and choose deliberate local positions rather than applying them blindly.
Wildland: Separate seasonal coordination groups, bases and resource types.
Industrial: Distinguish facility groups from response vehicles and their seat requirements.