
Unit · Video walkthrough
Unit: confirm personnel check-ins and review their history
Read a personnel timer, review earlier entries, confirm a useful check-in note, and verify the reset and saved history.
Before you begin
- A permitted Unit session with an active unit selected.
- A training call with check-in timers enabled and an eligible Personnel timer.
- Use fictional data and your department’s reporting procedure.
Chapters
Watch the walkthrough
Step 1
Find the right call
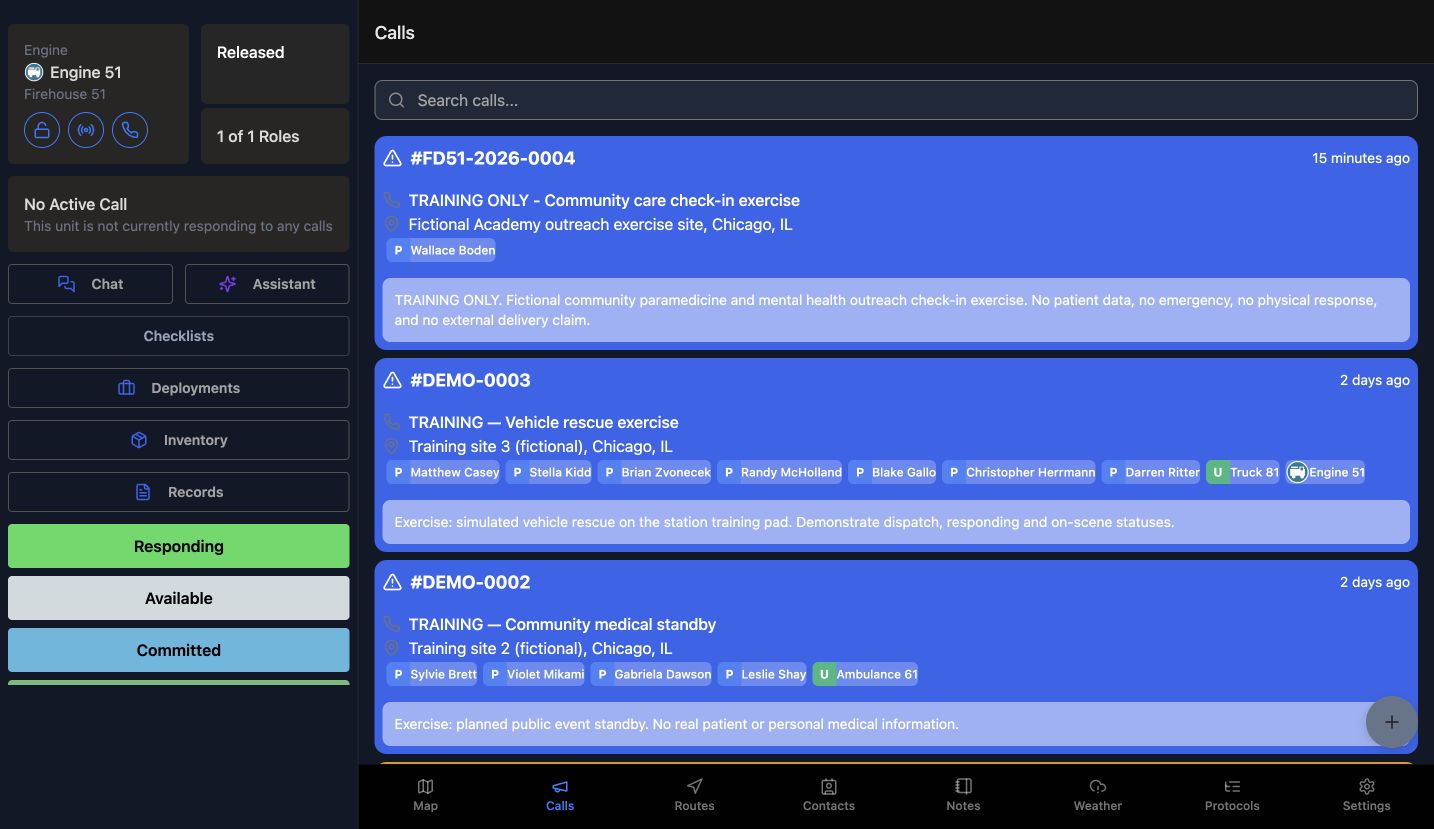
Open Calls and choose the community care check-in exercise. Confirm its training title and department call number before you continue. The left panel identifies Engine 51, the apparatus selected in Unit. No Active Call means that opening a call to read it has not itself assigned that call as the unit's response. This example uses a fictional community paramedicine and mental health outreach visit. The same check-in tools can support other department workflows.
Practice
Open an authorized practice call and confirm the unit, call number, and title.
Step 2
Read the check-in timer
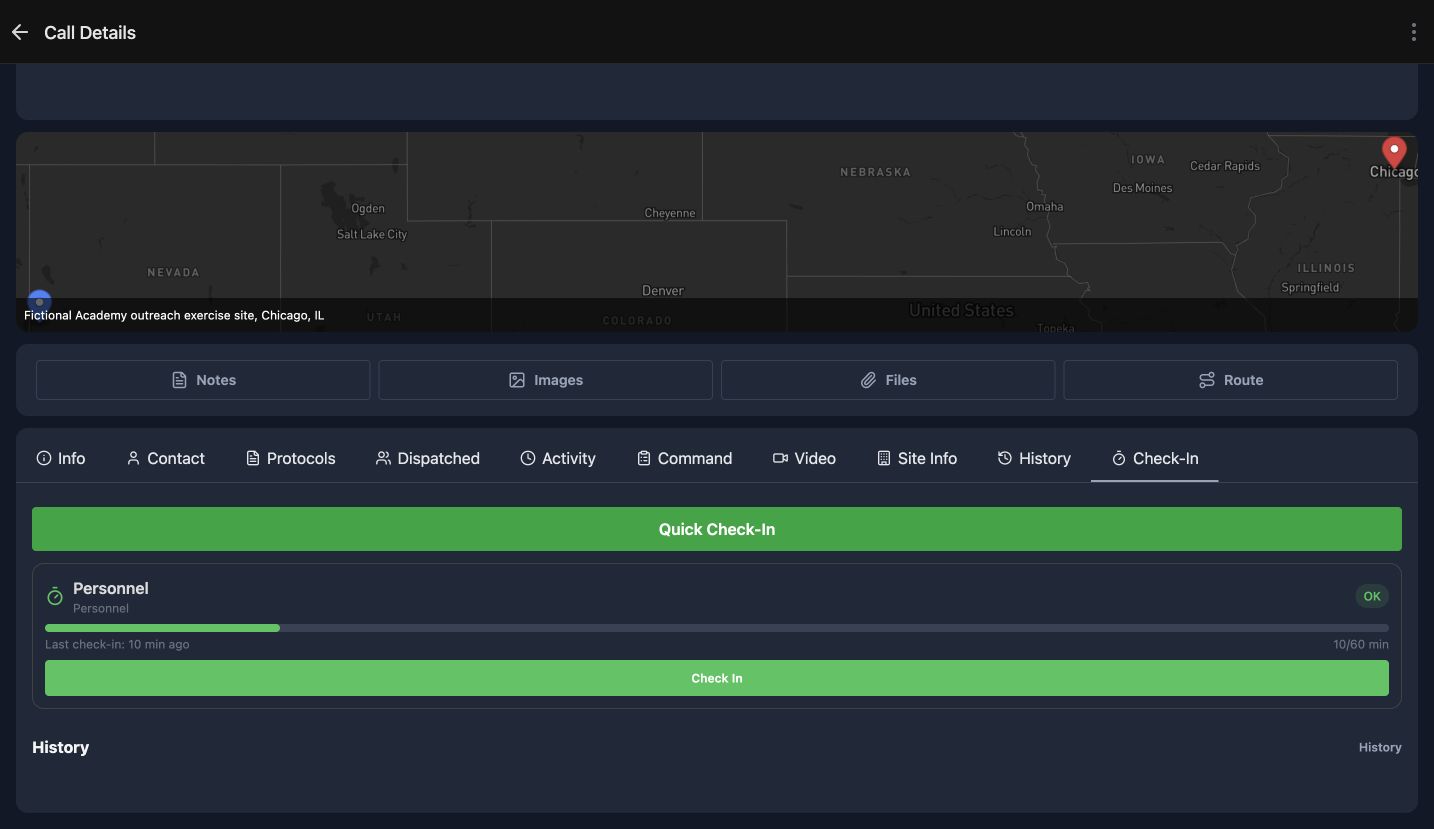
In Call Details, open Check-In. The Personnel card shows the check-in type, the time since the last entry, and its current state. Here the last check-in was ten minutes ago, the counter reads ten of sixty minutes, and the state is OK. These values help a coordinator see when a scheduled update is due. The sixty-minute interval comes from department configuration; it is not a duration that the crew sets on this card.
Practice
Identify the timer type, current elapsed time, configured interval, and state.
Step 3
Read the previous saved note
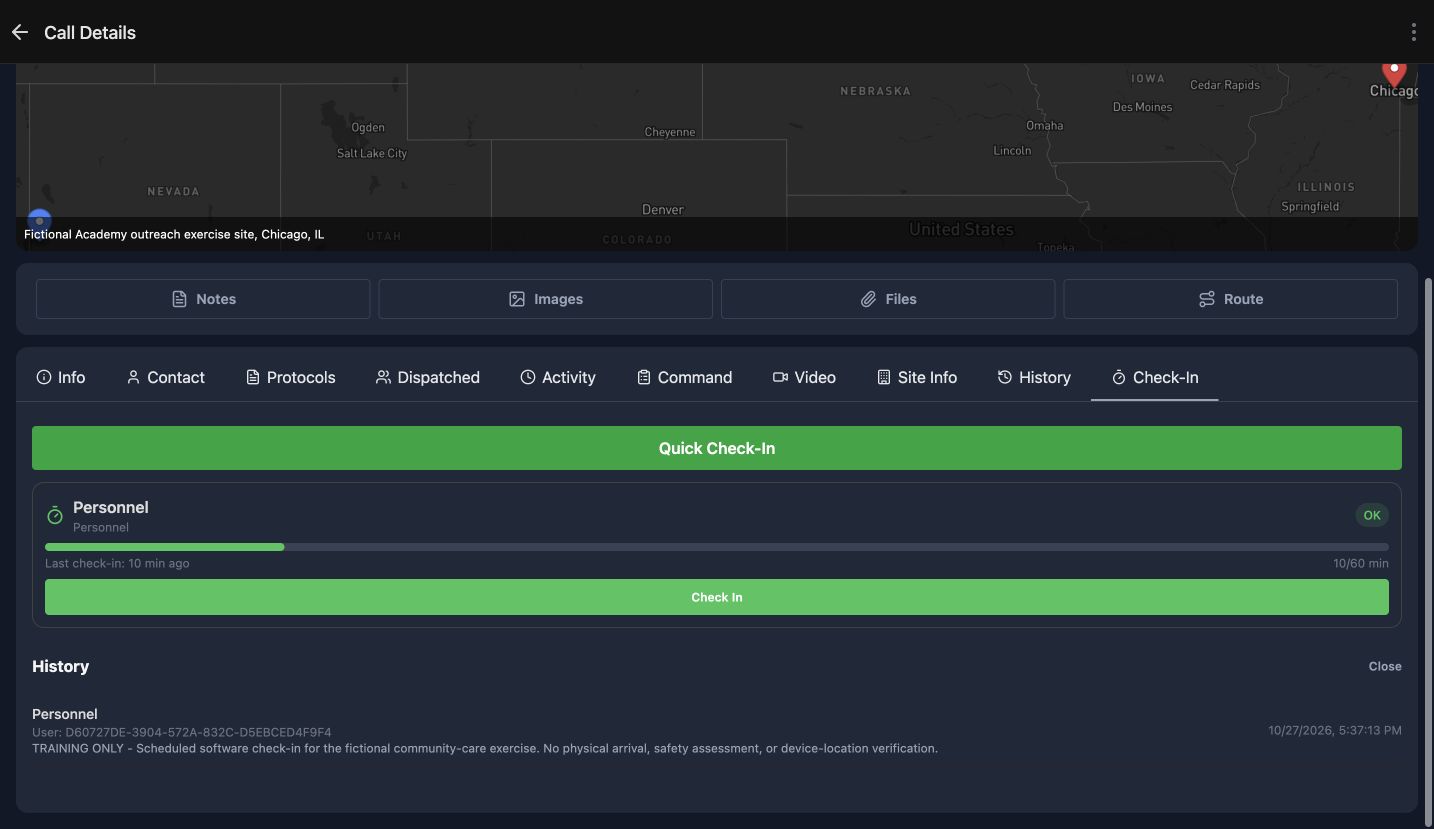
Open History below the timer. The saved Personnel entry includes its timestamp and note, so you can distinguish an earlier check-in from an update you are about to enter. In this exercise the note identifies a scheduled software check-in for the community care visit. Check the history before repeating an update, especially when a crew changes or another team member may already have checked in. A saved software entry does not establish someone's physical location.
Practice
Open History and read the existing entry before adding another one.
Step 4
Add a note and confirm the check-in
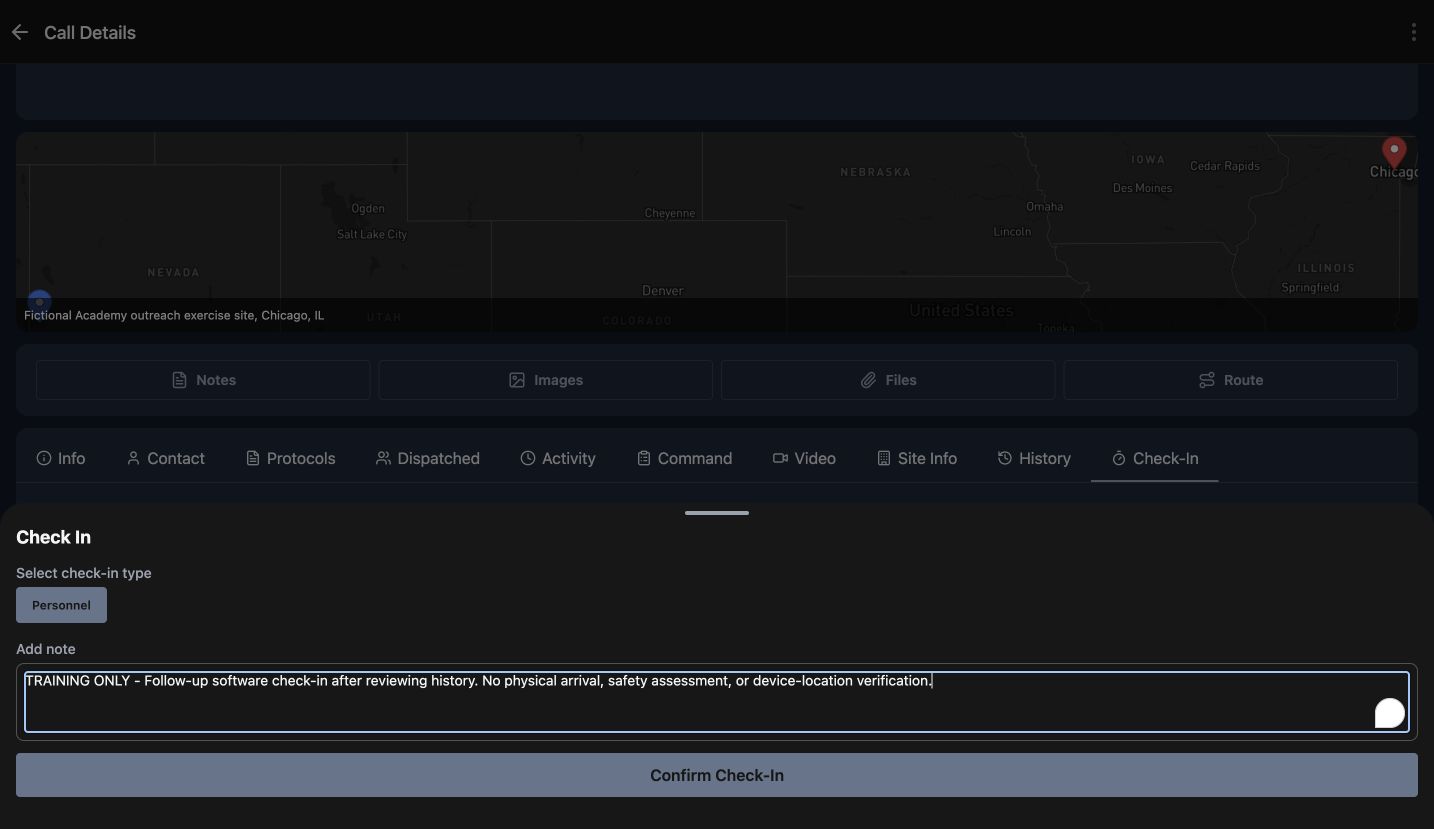
Select Check In on the Personnel card. In the form, confirm Personnel under Select check-in type, then use Add note to explain the update. Our note says this is a follow-up software check-in after reviewing history. Review the wording and select Confirm Check-In. Use a short, useful note that follows your department's procedures. For search and rescue or security patrols, describe the agreed reporting update without adding unnecessary personal details.
Practice
Prepare a concise training note, review its type, and confirm it once.
Step 5
Verify the timer reset
After confirmation, review the Personnel card again. The displayed age is now zero minutes, the counter reads zero of sixty minutes, and the state remains OK. This is the observed reset for this check-in. A timer reset and a unit status change are separate operations. Wildland contractors and industrial response teams can use the same distinction when coordinating regular reports during a longer assignment.
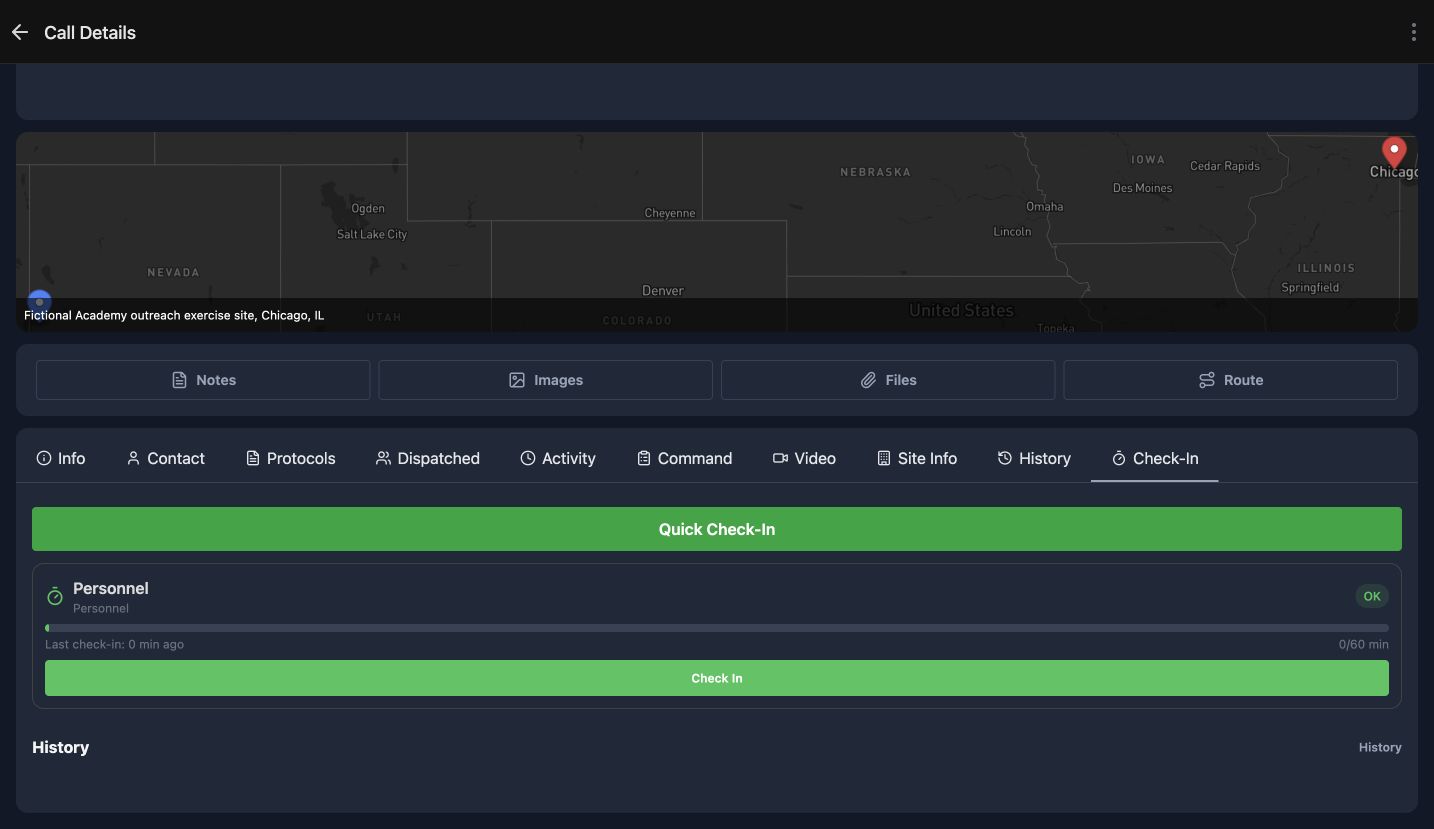
Practice
Compare the elapsed value before and after the confirmed check-in.
Step 6
Verify the new saved history entry
Open History again and read the newest entry. The follow-up note appears above the earlier scheduled check-in, with its own timestamp. This is how you verify that the note was stored, rather than simply left in the form. Check both the timer and history when learning this workflow. Your department decides the reporting interval and escalation procedure; the app supplies the check-in controls and a record of the updates.
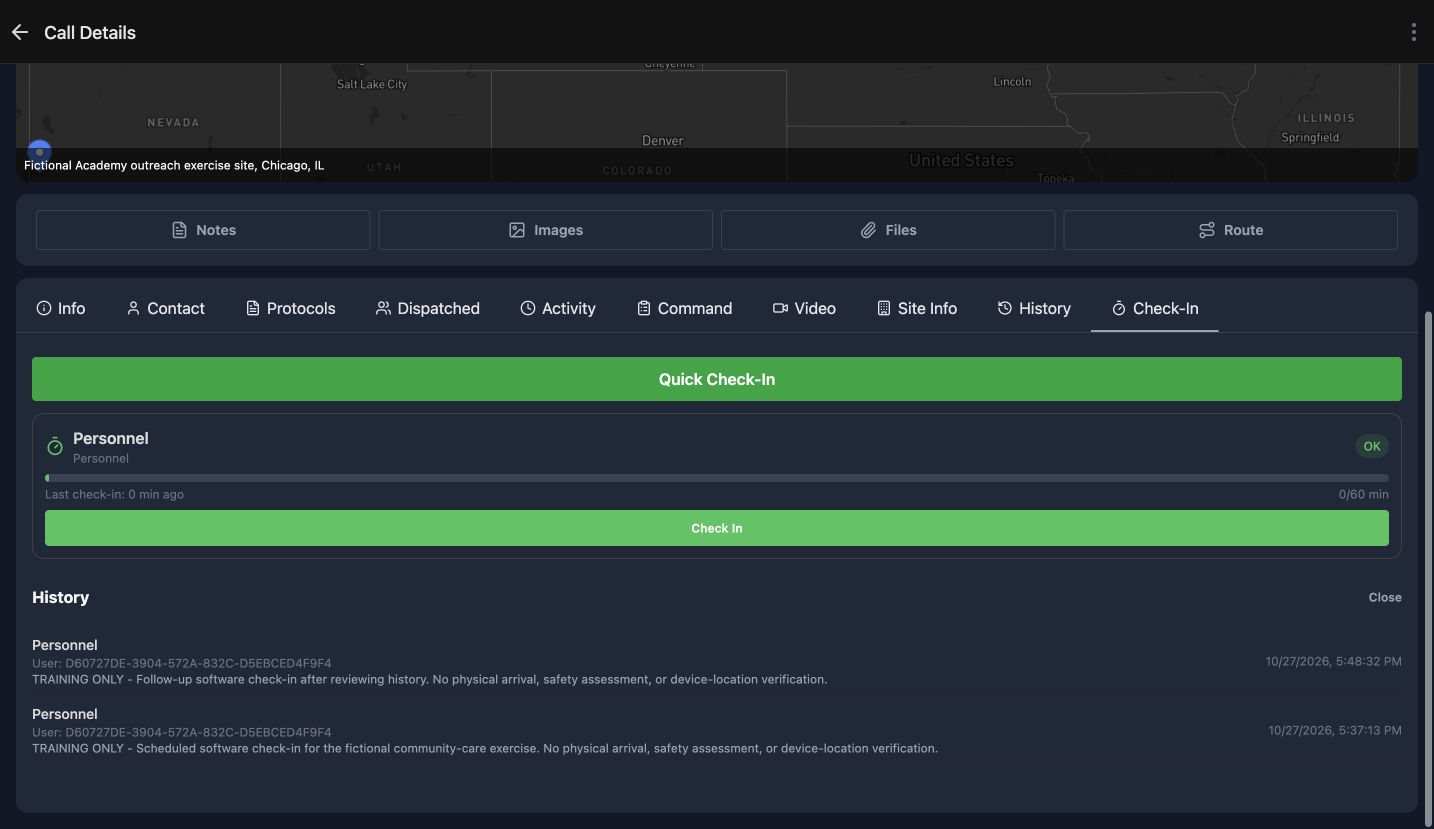
Practice
Reopen History and verify the new note and timestamp alongside the earlier entry.
Examples for your department
- Fire / EMS
- Use a configured Personnel timer during a training response and confirm the saved update.
- Community response
- Coordinate scheduled reports during a community paramedicine or mental health outreach visit.
- Search and rescue
- Use an agreed reporting schedule for a search-team assignment.
- Security
- Review updates during a patrol or security assignment.
- Wildland
- Keep a record of scheduled crew updates during a contractor assignment.
- Industrial
- Record a support team’s agreed progress report during an exercise.
Transcript
Download transcriptRead the complete transcript
Unit: confirm personnel check-ins and review their history
Audience: Unit app operators, Department coordinators

Find the right call
Open Calls and choose the community care check-in exercise. Confirm its training title and department call number before you continue. The left panel identifies Engine 51, the apparatus selected in Unit. No Active Call means that opening a call to read it has not itself assigned that call as the unit's response. This example uses a fictional community paramedicine and mental health outreach visit. The same check-in tools can support other department workflows.
Practice: Open an authorized practice call and confirm the unit, call number, and title.

Read the check-in timer
In Call Details, open Check-In. The Personnel card shows the check-in type, the time since the last entry, and its current state. Here the last check-in was ten minutes ago, the counter reads ten of sixty minutes, and the state is OK. These values help a coordinator see when a scheduled update is due. The sixty-minute interval comes from department configuration; it is not a duration that the crew sets on this card.
Practice: Identify the timer type, current elapsed time, configured interval, and state.

Read the previous saved note
Open History below the timer. The saved Personnel entry includes its timestamp and note, so you can distinguish an earlier check-in from an update you are about to enter. In this exercise the note identifies a scheduled software check-in for the community care visit. Check the history before repeating an update, especially when a crew changes or another team member may already have checked in. A saved software entry does not establish someone's physical location.
Practice: Open History and read the existing entry before adding another one.

Add a note and confirm the check-in
Select Check In on the Personnel card. In the form, confirm Personnel under Select check-in type, then use Add note to explain the update. Our note says this is a follow-up software check-in after reviewing history. Review the wording and select Confirm Check-In. Use a short, useful note that follows your department's procedures. For search and rescue or security patrols, describe the agreed reporting update without adding unnecessary personal details.
Practice: Prepare a concise training note, review its type, and confirm it once.

Verify the timer reset
After confirmation, review the Personnel card again. The displayed age is now zero minutes, the counter reads zero of sixty minutes, and the state remains OK. This is the observed reset for this check-in. A timer reset and a unit status change are separate operations. Wildland contractors and industrial response teams can use the same distinction when coordinating regular reports during a longer assignment.
Practice: Compare the elapsed value before and after the confirmed check-in.

Verify the new saved history entry
Open History again and read the newest entry. The follow-up note appears above the earlier scheduled check-in, with its own timestamp. This is how you verify that the note was stored, rather than simply left in the form. Check both the timer and history when learning this workflow. Your department decides the reporting interval and escalation procedure; the app supplies the check-in controls and a record of the updates.
Practice: Reopen History and verify the new note and timestamp alongside the earlier entry.

Examples for your department
Fire / EMS: Use a configured Personnel timer during a training response and confirm the saved update.
Community response: Coordinate scheduled reports during a community paramedicine or mental health outreach visit.
Search and rescue: Use an agreed reporting schedule for a search-team assignment.
Security: Review updates during a patrol or security assignment.
Wildland: Keep a record of scheduled crew updates during a contractor assignment.
Industrial: Record a support team’s agreed progress report during an exercise.