
Unit · Video walkthrough
Unit: create, select, respond to and close a call
Use the native Unit call workflow, distinguish unit status from active-call selection, and verify closeout through fresh readback.
Before you begin
- A permitted Unit sign-in and selected training unit
- A fictional local call and reviewed audience
- Department authority for call creation, status changes and closeout
Chapters
- Confirm the unit and open a new call
- Give the call a useful identity
- Review location inputs
- Check the actual dispatch audience
- Create once and inspect the returned call
- Read details before selecting the call
- Choose the intended response status
- Associate the update with the right destination
- Review the note and submit the status
- Read unit status and active selection separately
- Confirm deselection
- Open the incident closeout action
- Read closeout defaults before submitting
- Finish the practice call deliberately
- Verify the final state and apply the workflow
Watch the walkthrough
Step 1
Confirm the unit and open a new call
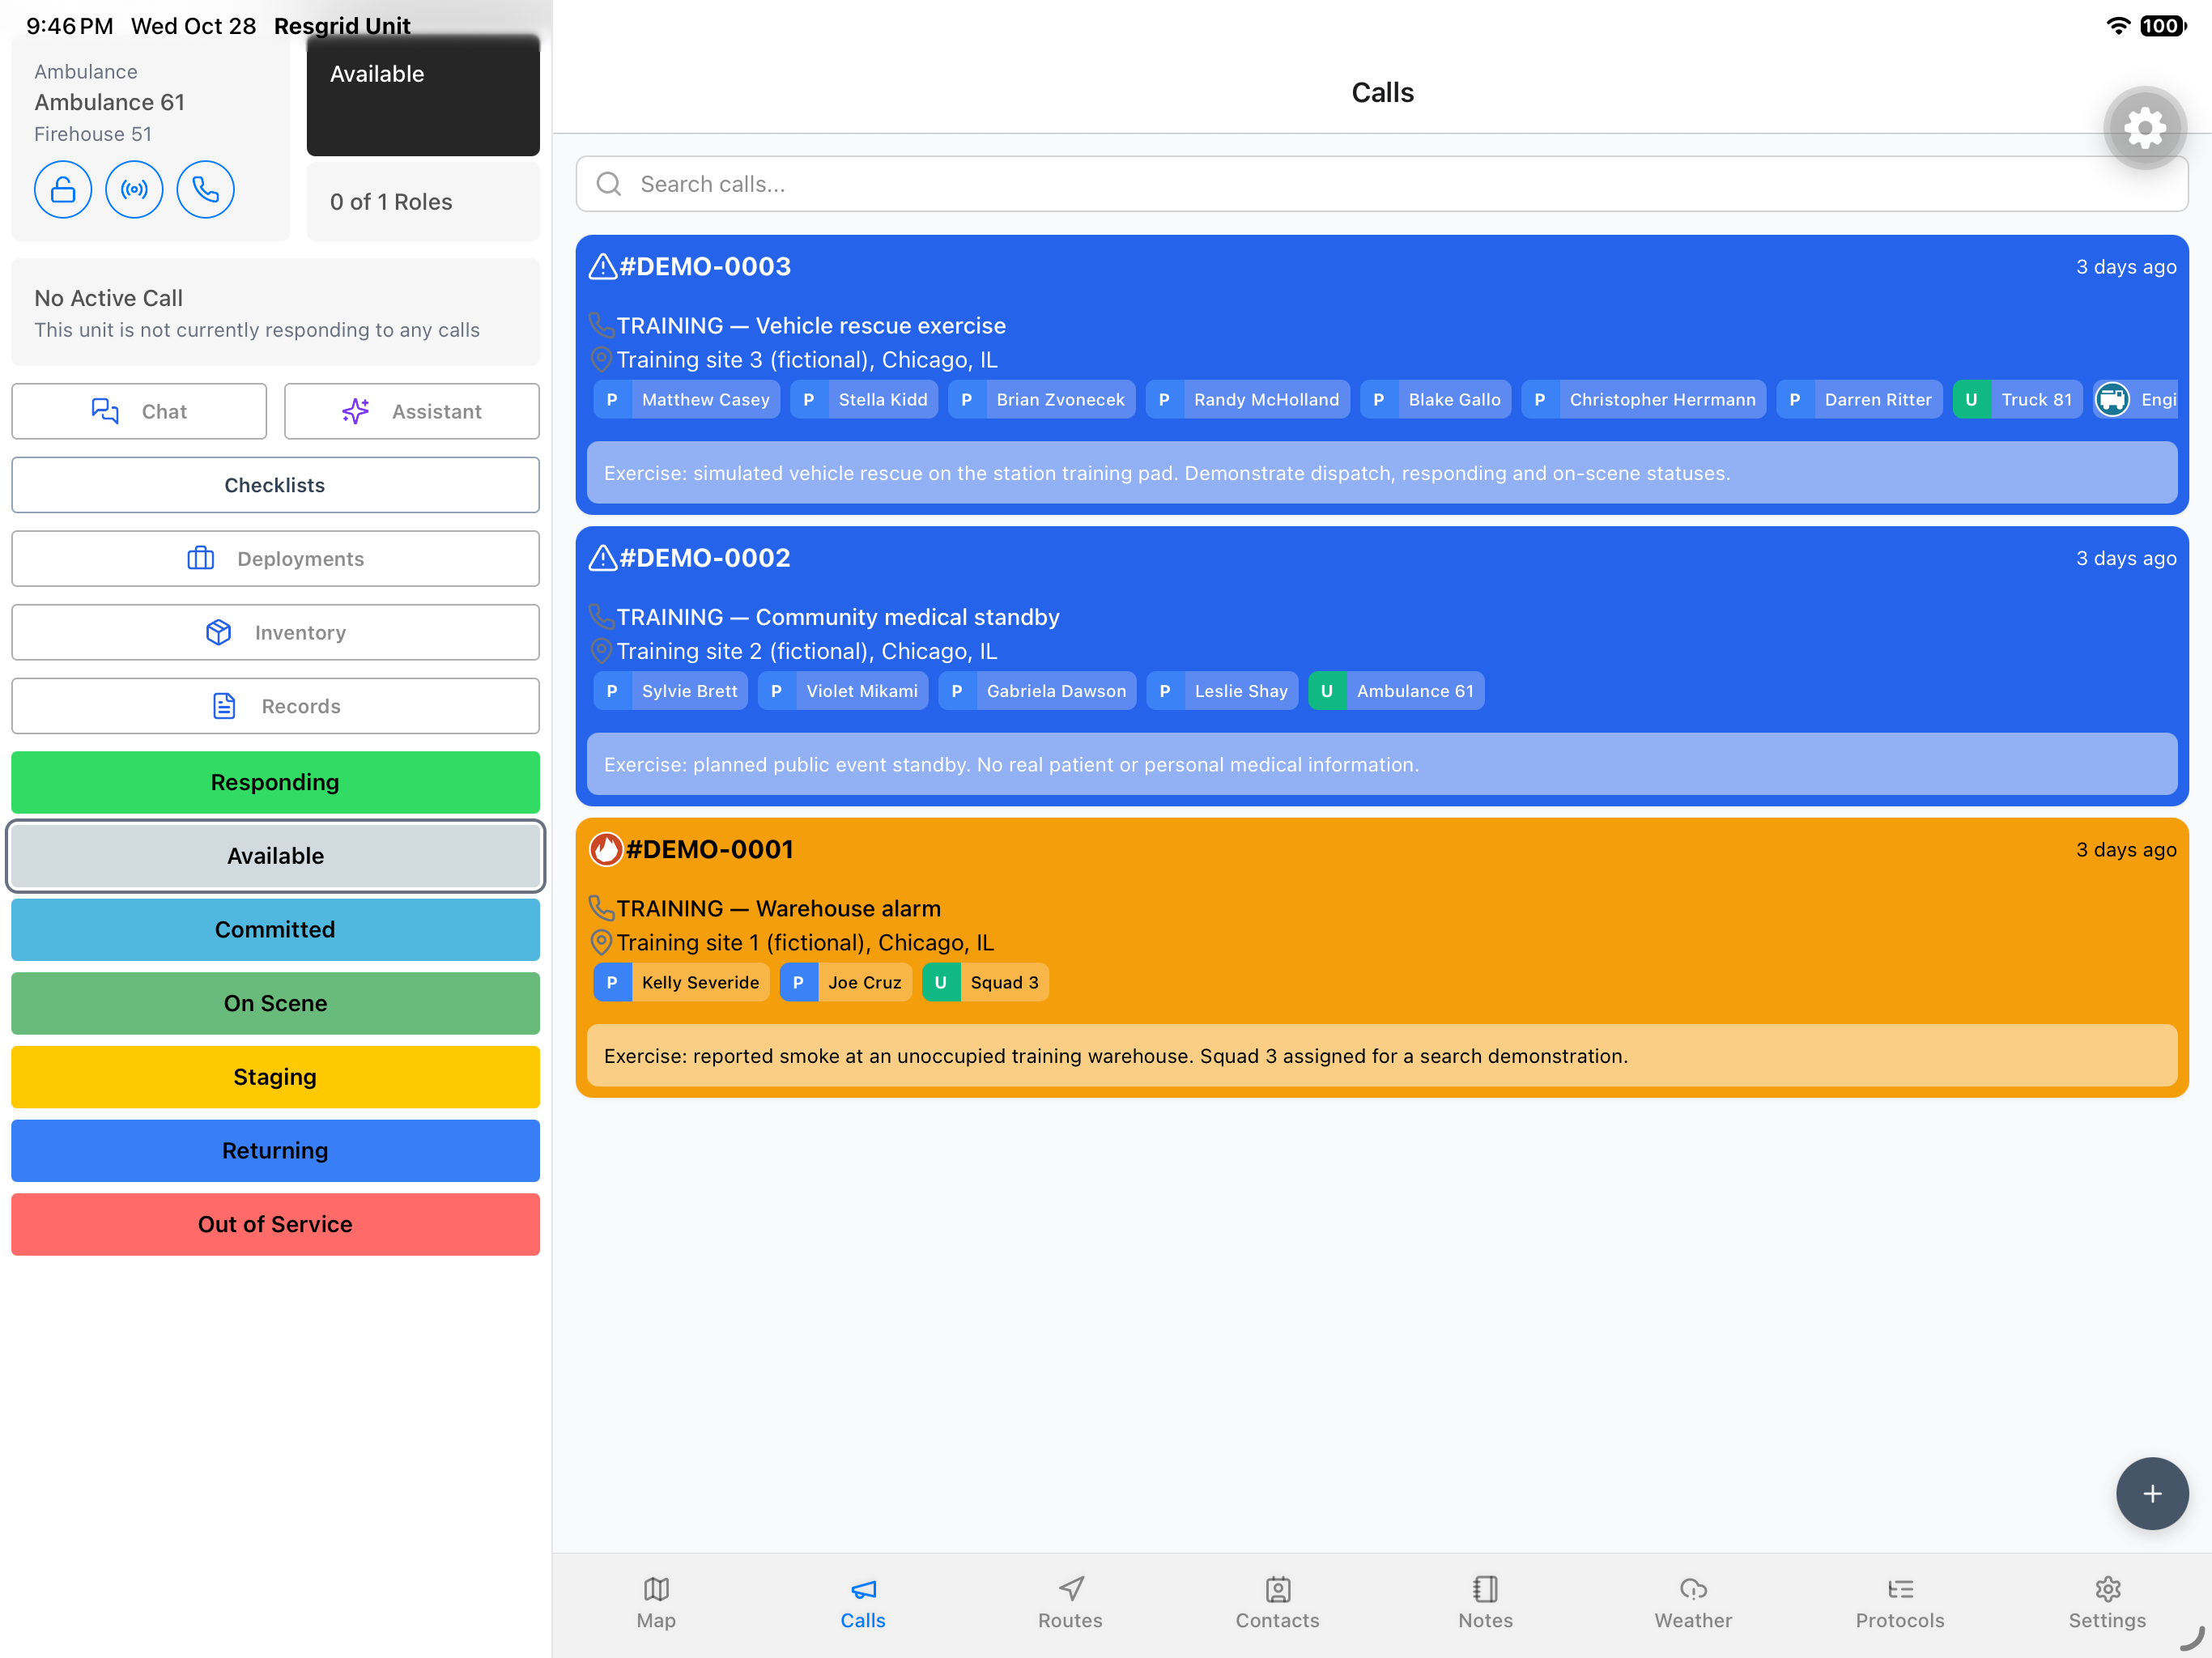
The Unit app keeps a vehicle or operational team in view while you work its calls. Here, the Calls screen shows Ambulance Sixty-one and No Active Call. The roles card reads zero of one, so this recording does not establish a staffed crew. Use the circular plus button at the lower right to open a new call when your department permits you to create one.
Practice
Confirm your selected training unit, active-call state and crew display, then open the plus control for a permitted new training call.
Step 2
Give the call a useful identity
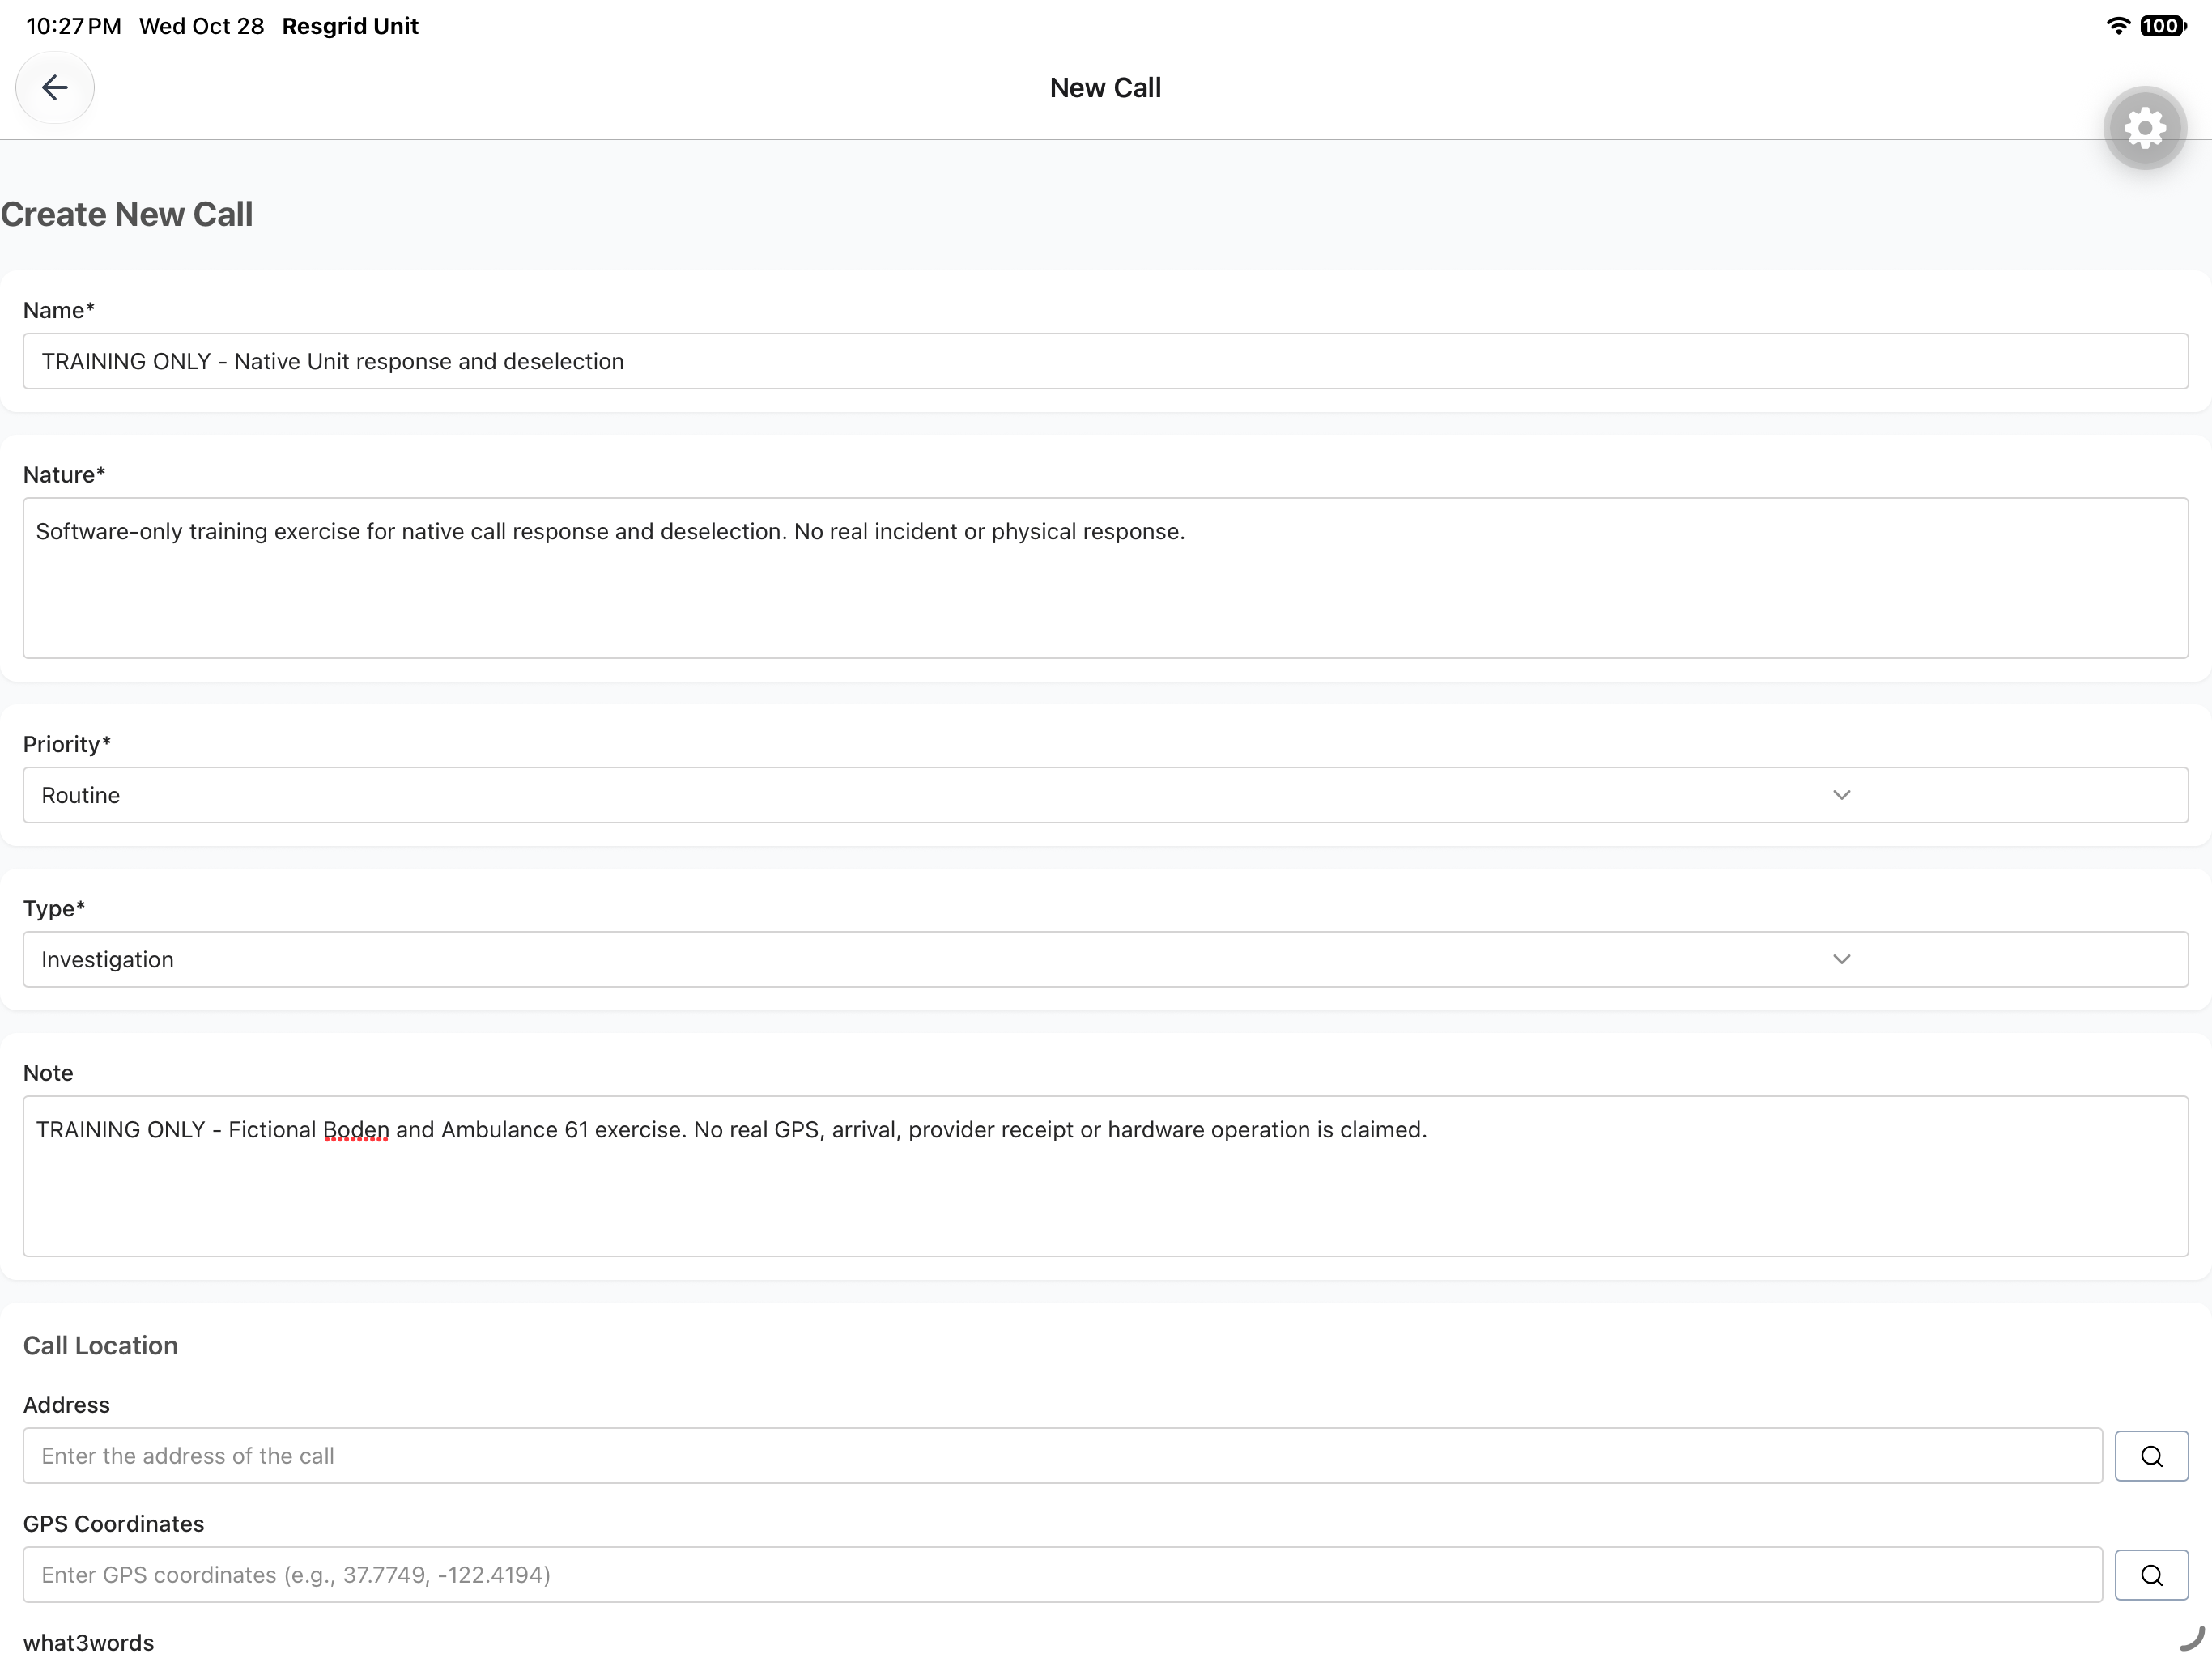
In New Call, enter a clear Name and a useful Nature description. Our example is explicitly labeled training only and describes a software exercise. Review Priority and Type; this practice call uses Routine and Investigation. Use Note for additional context that belongs with the call. Choose names and classifications that make sense to your own operation rather than copying a firehouse example into live work.
Practice
Enter a useful training name and nature, then check the department priority, call type and supporting note before continuing.
Step 3
Review location inputs
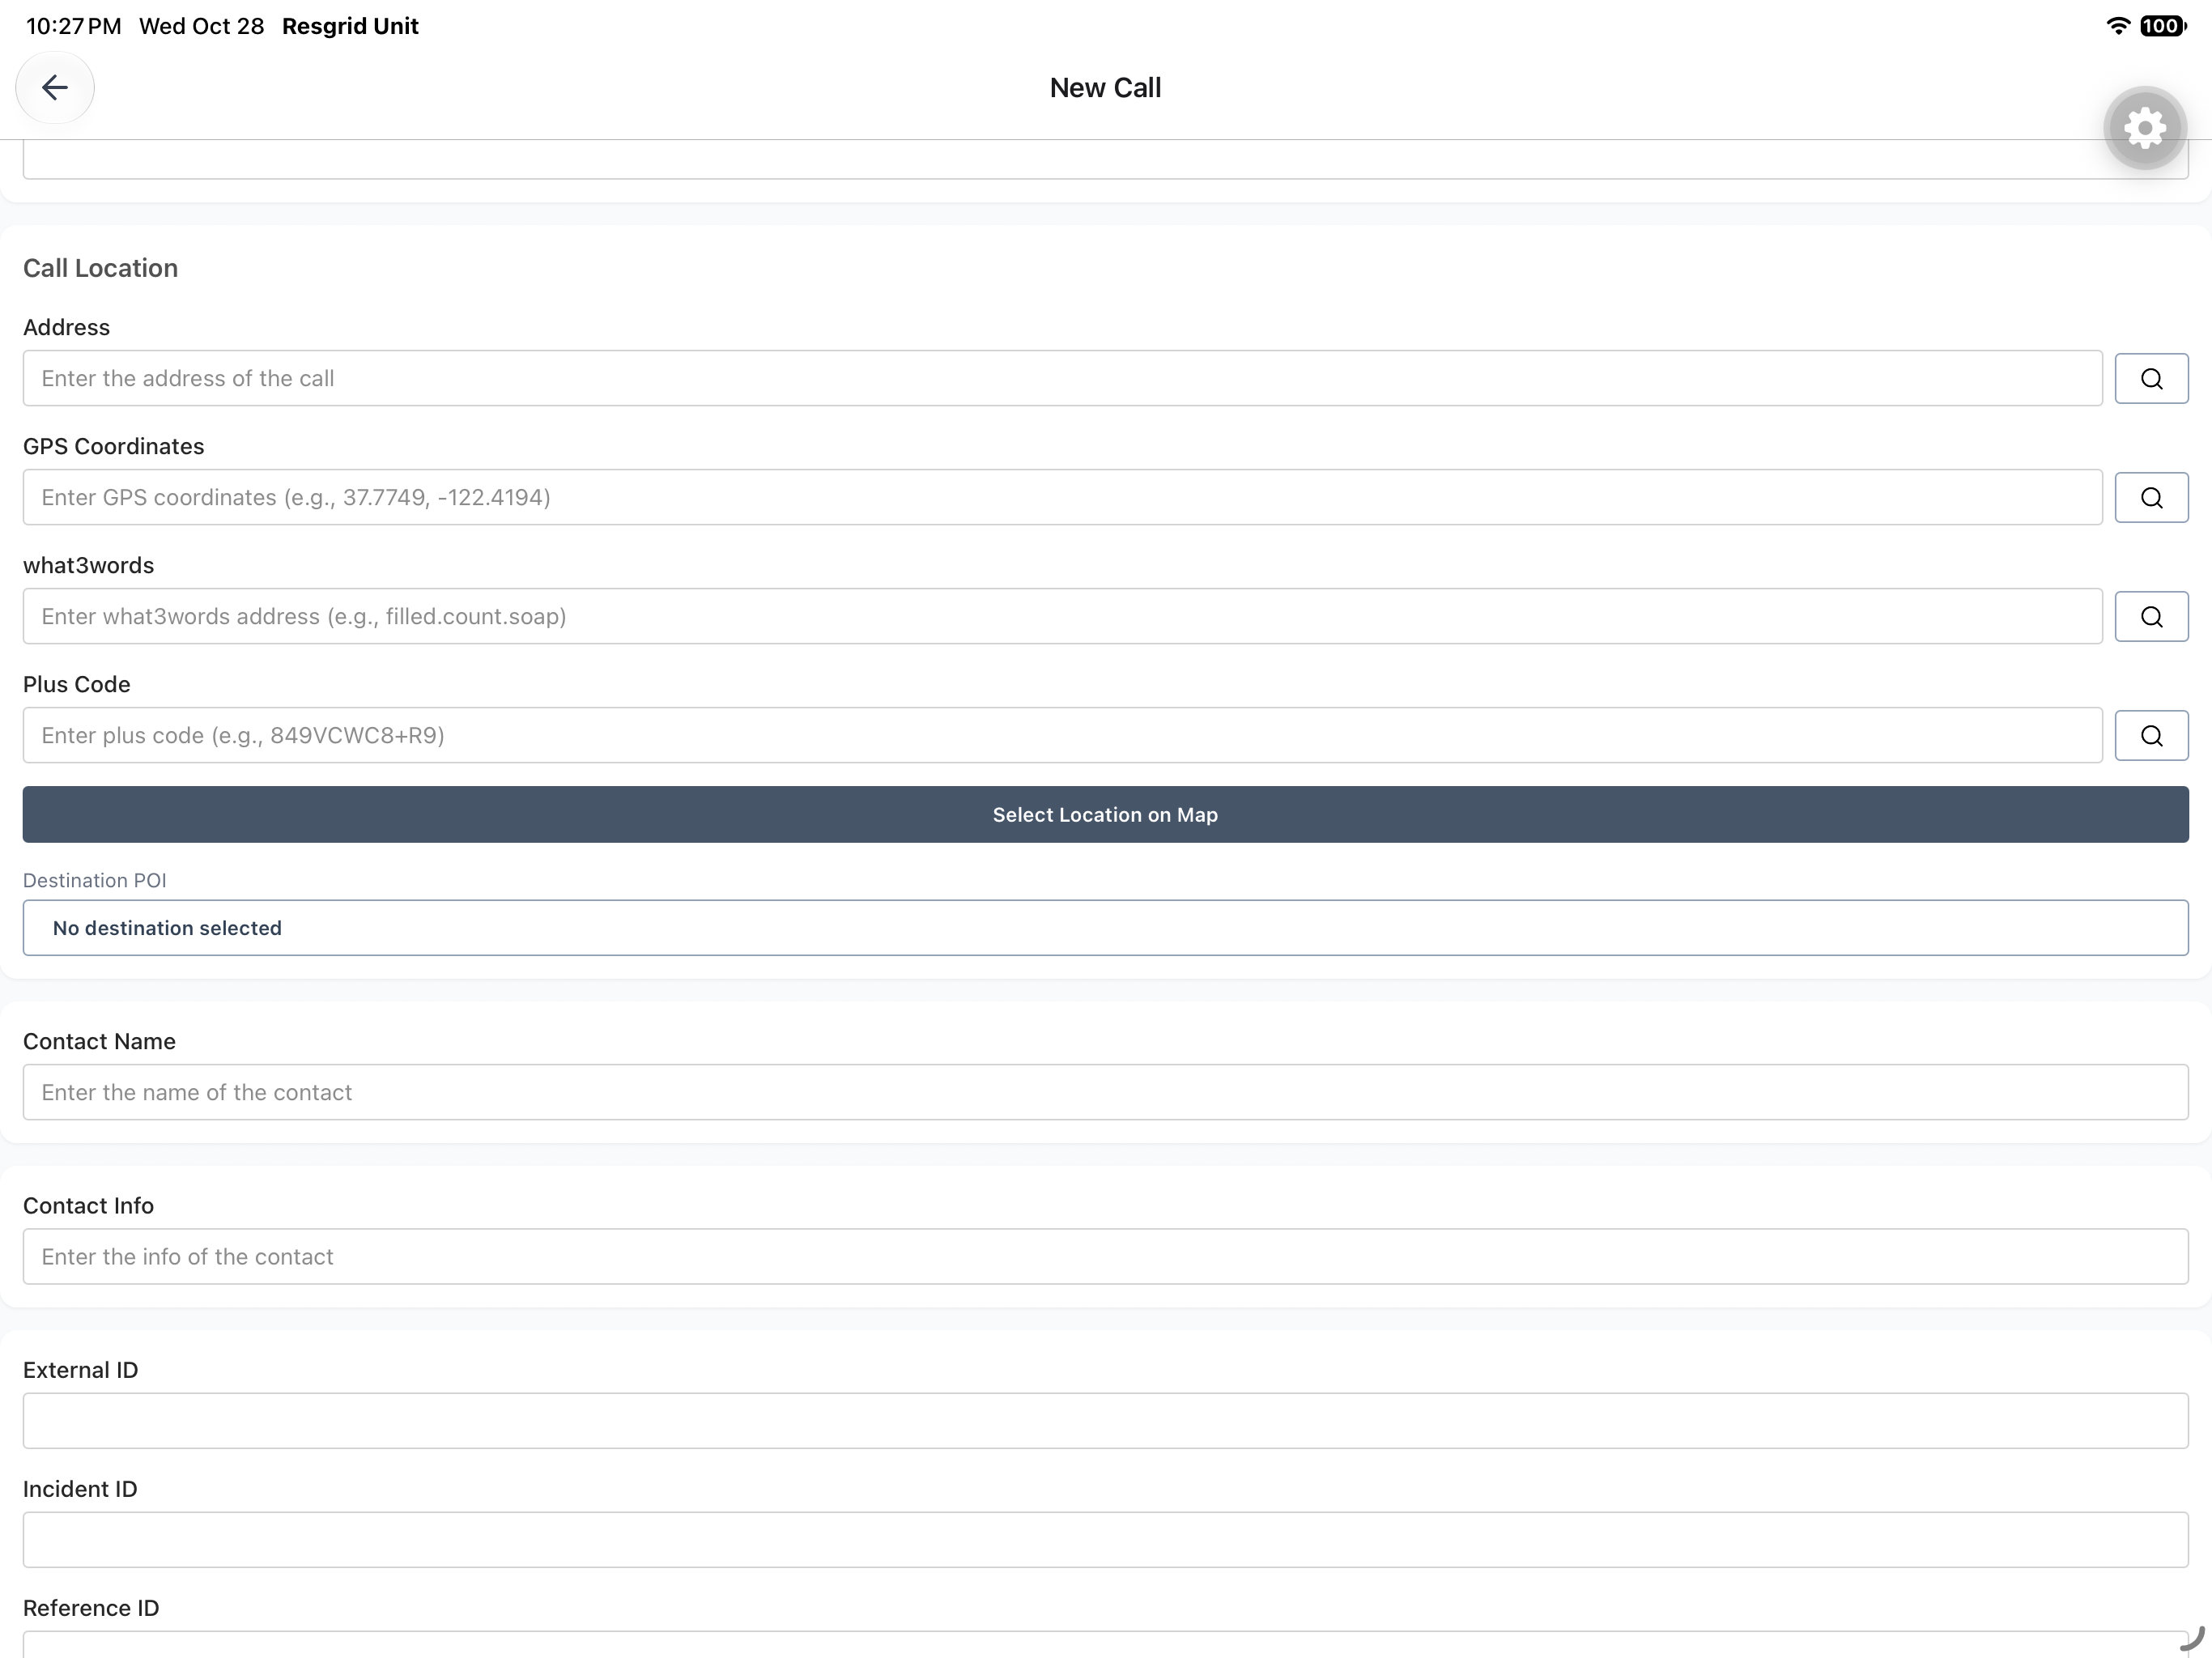
Call Location provides Address, GPS Coordinates, what3words and Plus Code fields, along with Select Location on Map. Destination POI is a separate choice and currently reads No destination selected. This software-only exercise leaves the location and contact inputs empty; a real assignment needs the location information required by your operating procedure. A visible location field does not establish that a device has supplied GPS coordinates or that an address lookup has succeeded.
Practice
Identify each location and contact input. For a real assignment, follow your department location procedure; this exercise does not demonstrate a successful lookup or device GPS.
Step 4
Check the actual dispatch audience
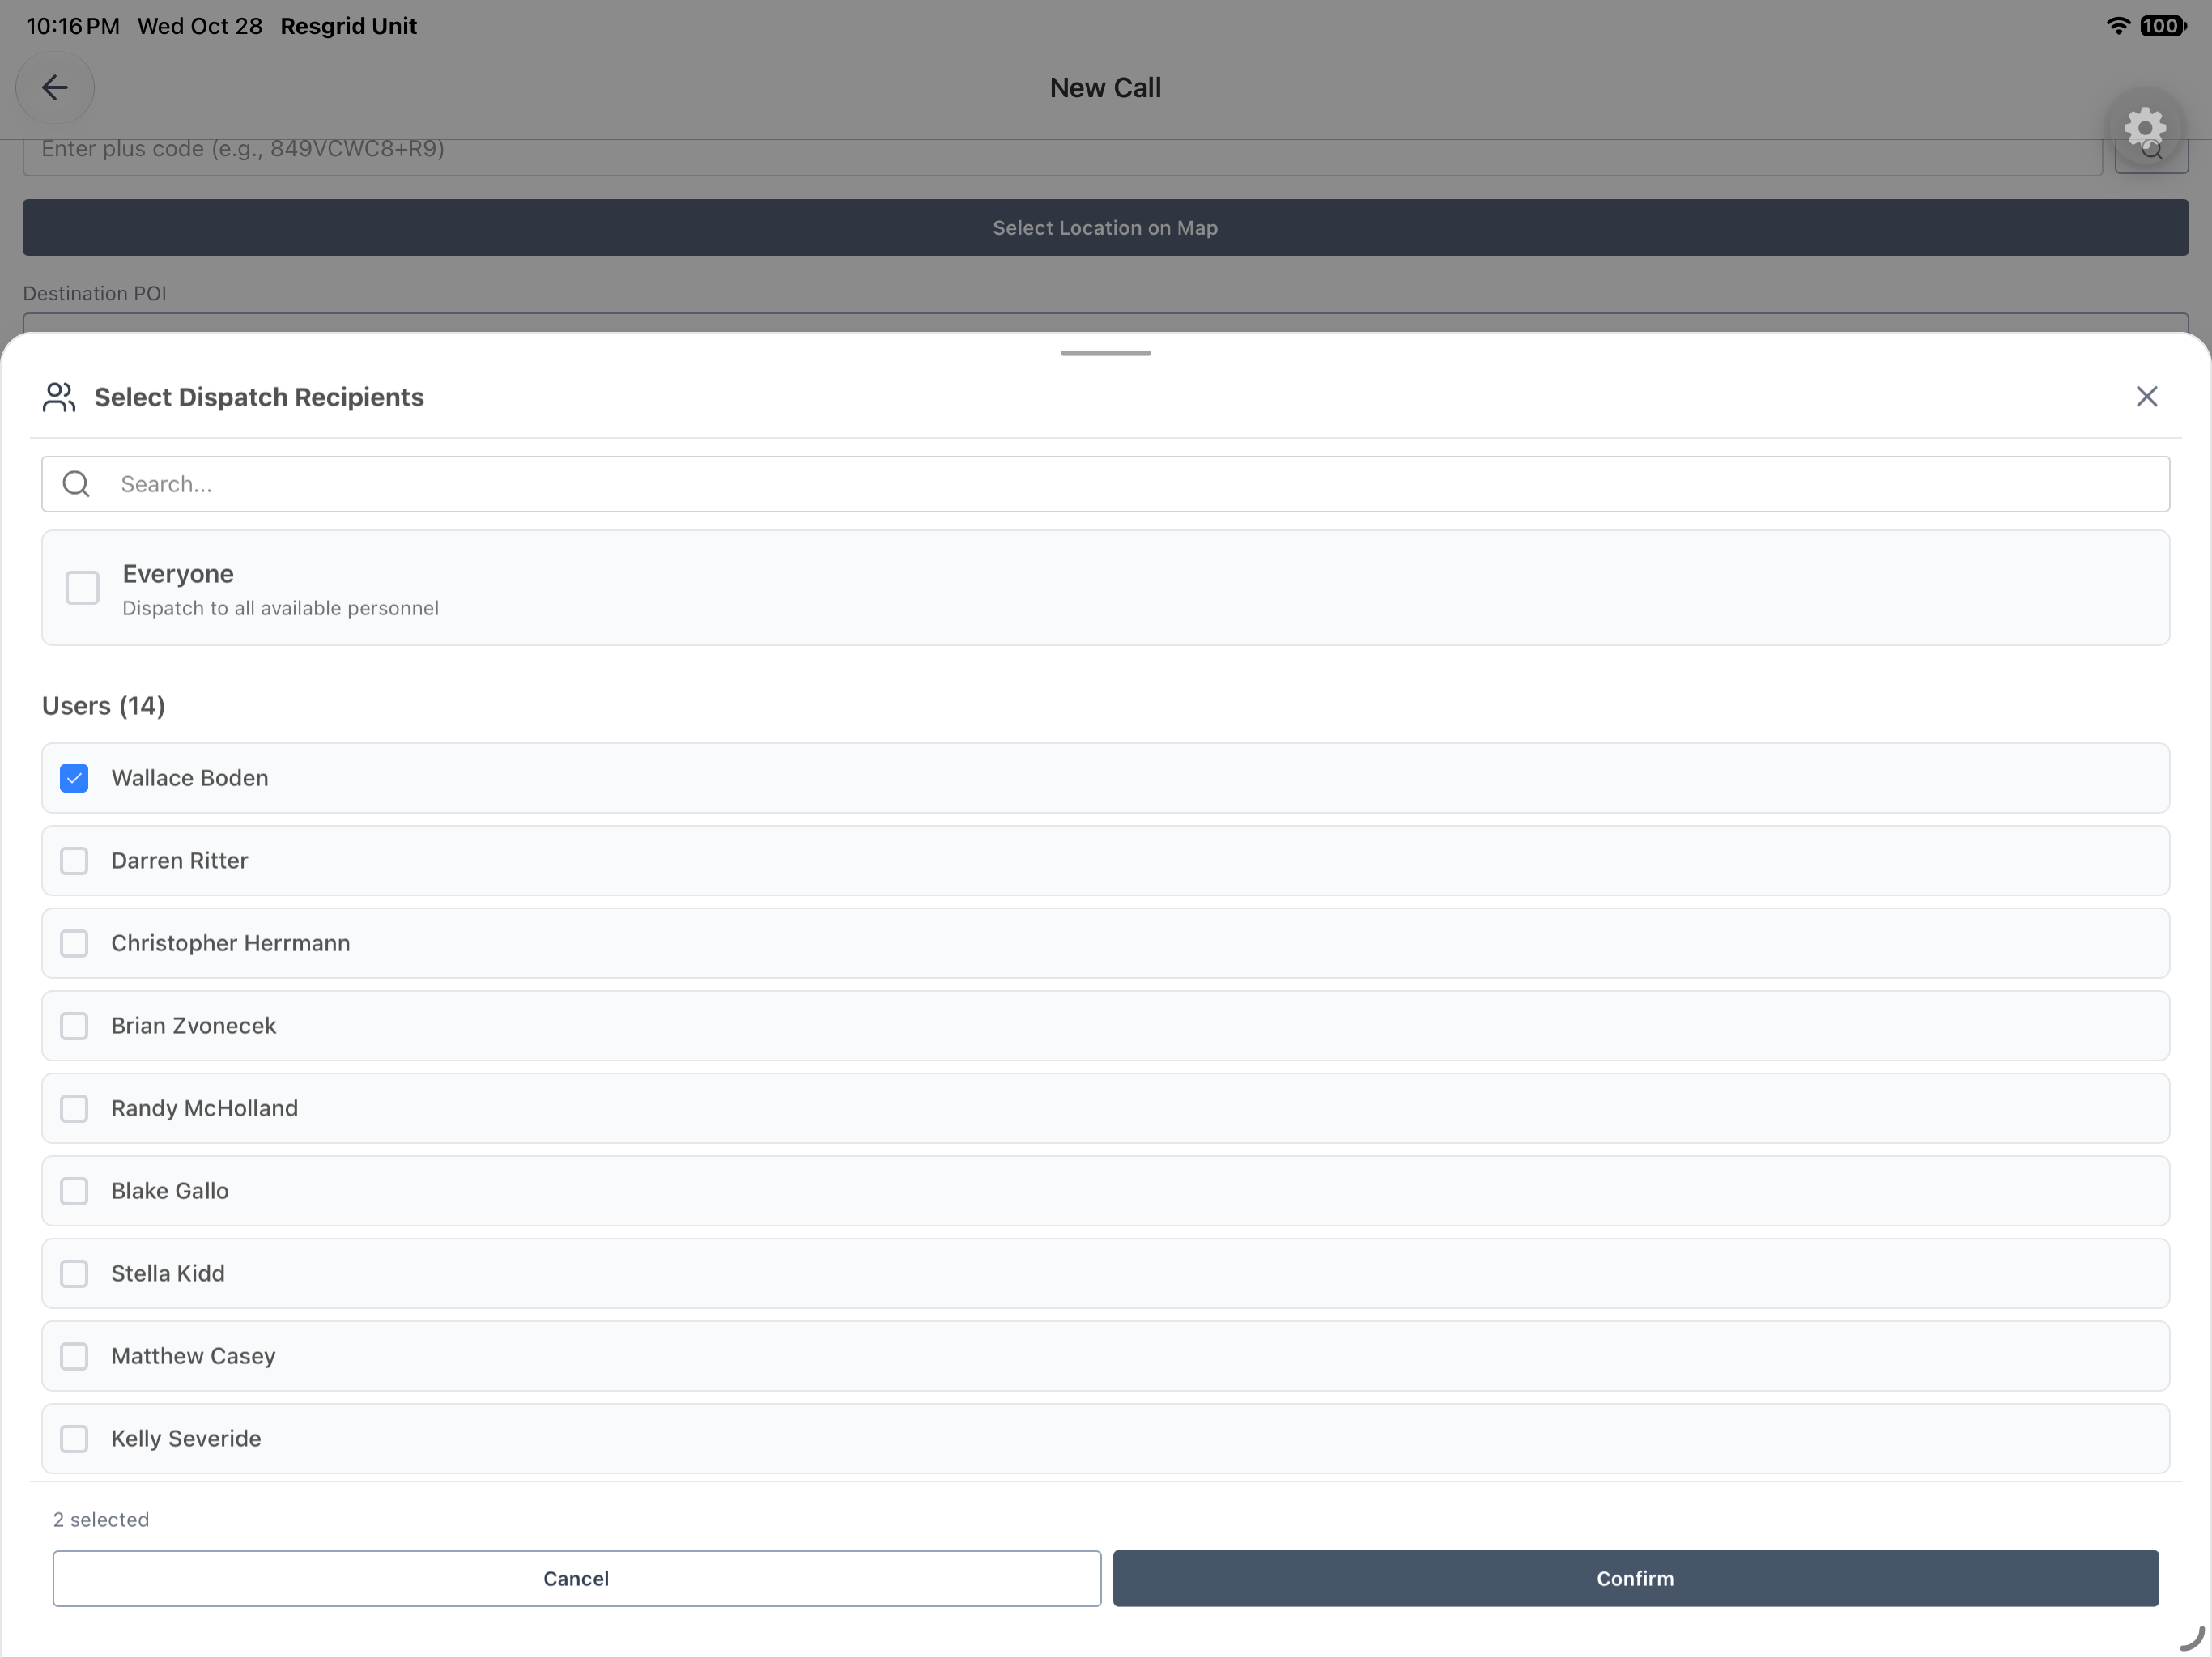
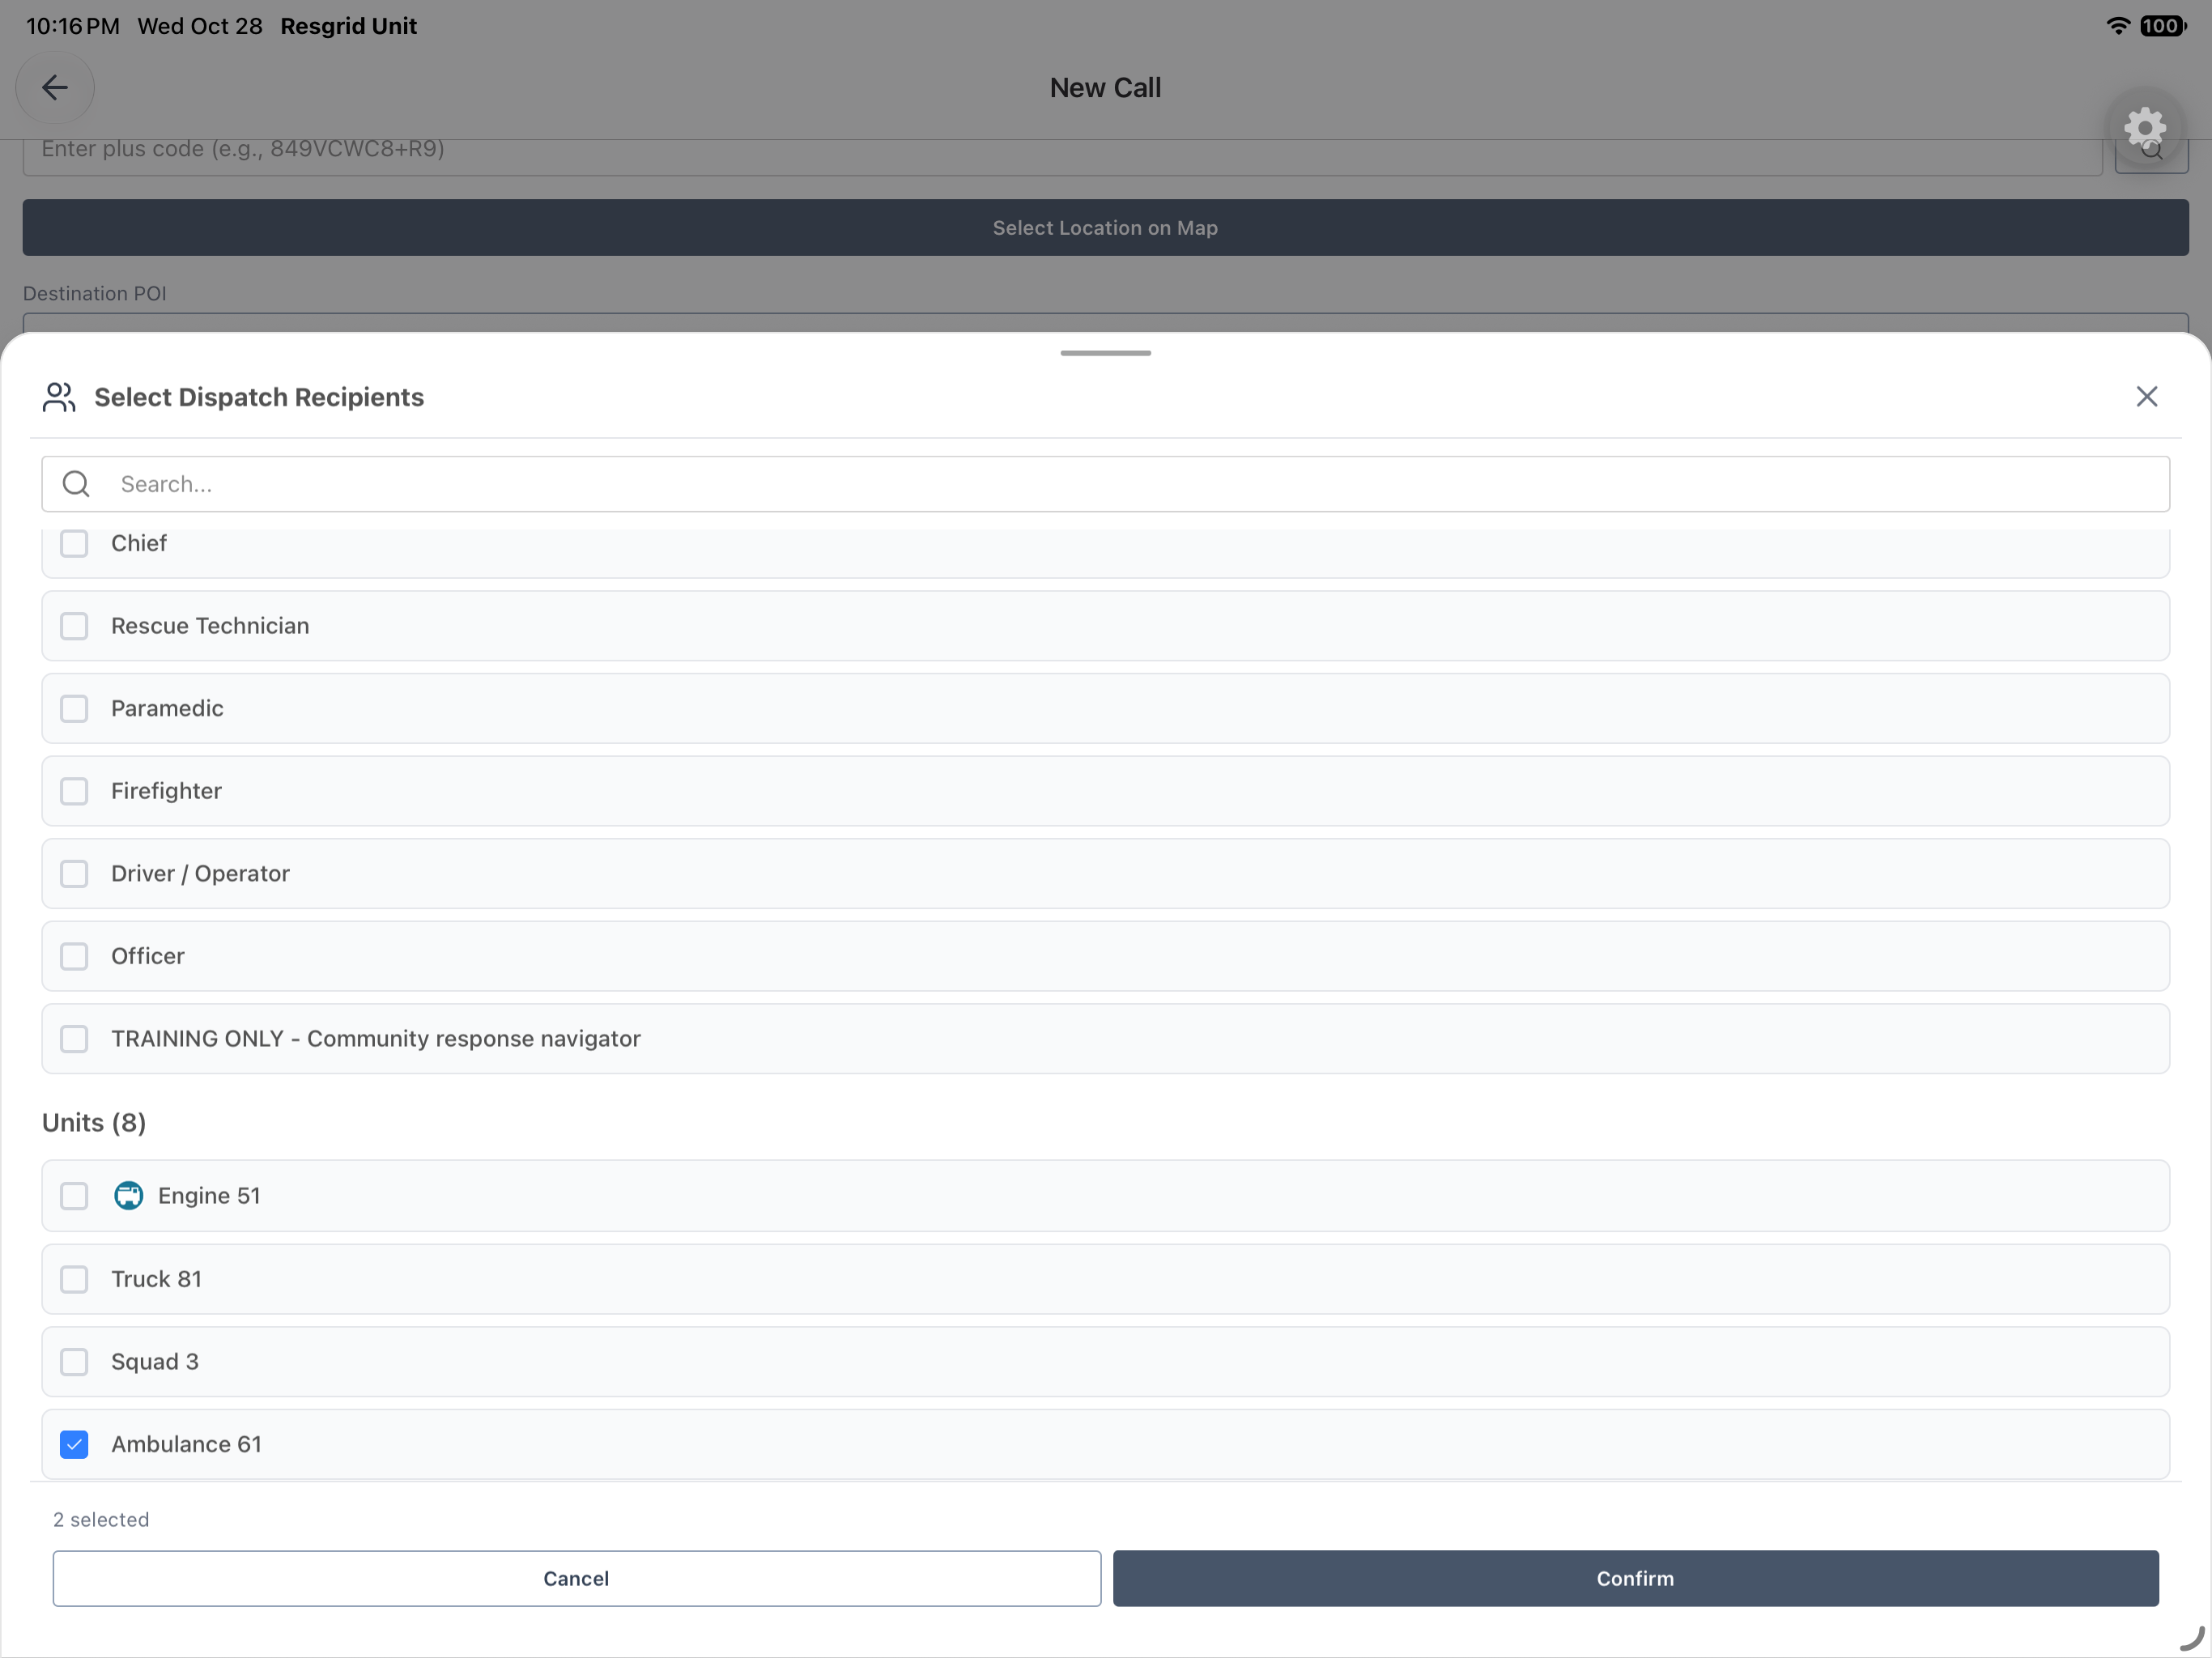
In Select Dispatch Recipients, review individual users as well as the broad Everyone option. Wallace Boden is checked here, while Everyone remains unchecked. In the Units section, Ambulance Sixty-one is also selected, bringing this exercise to two selected recipients. Confirm retains that reviewed audience; it does not demonstrate that a recipient has received a notification.
Practice
Review the actual checked users and units. Confirm the intended audience instead of assuming Everyone is selected or a notification was received.
Step 5
Create once and inspect the returned call
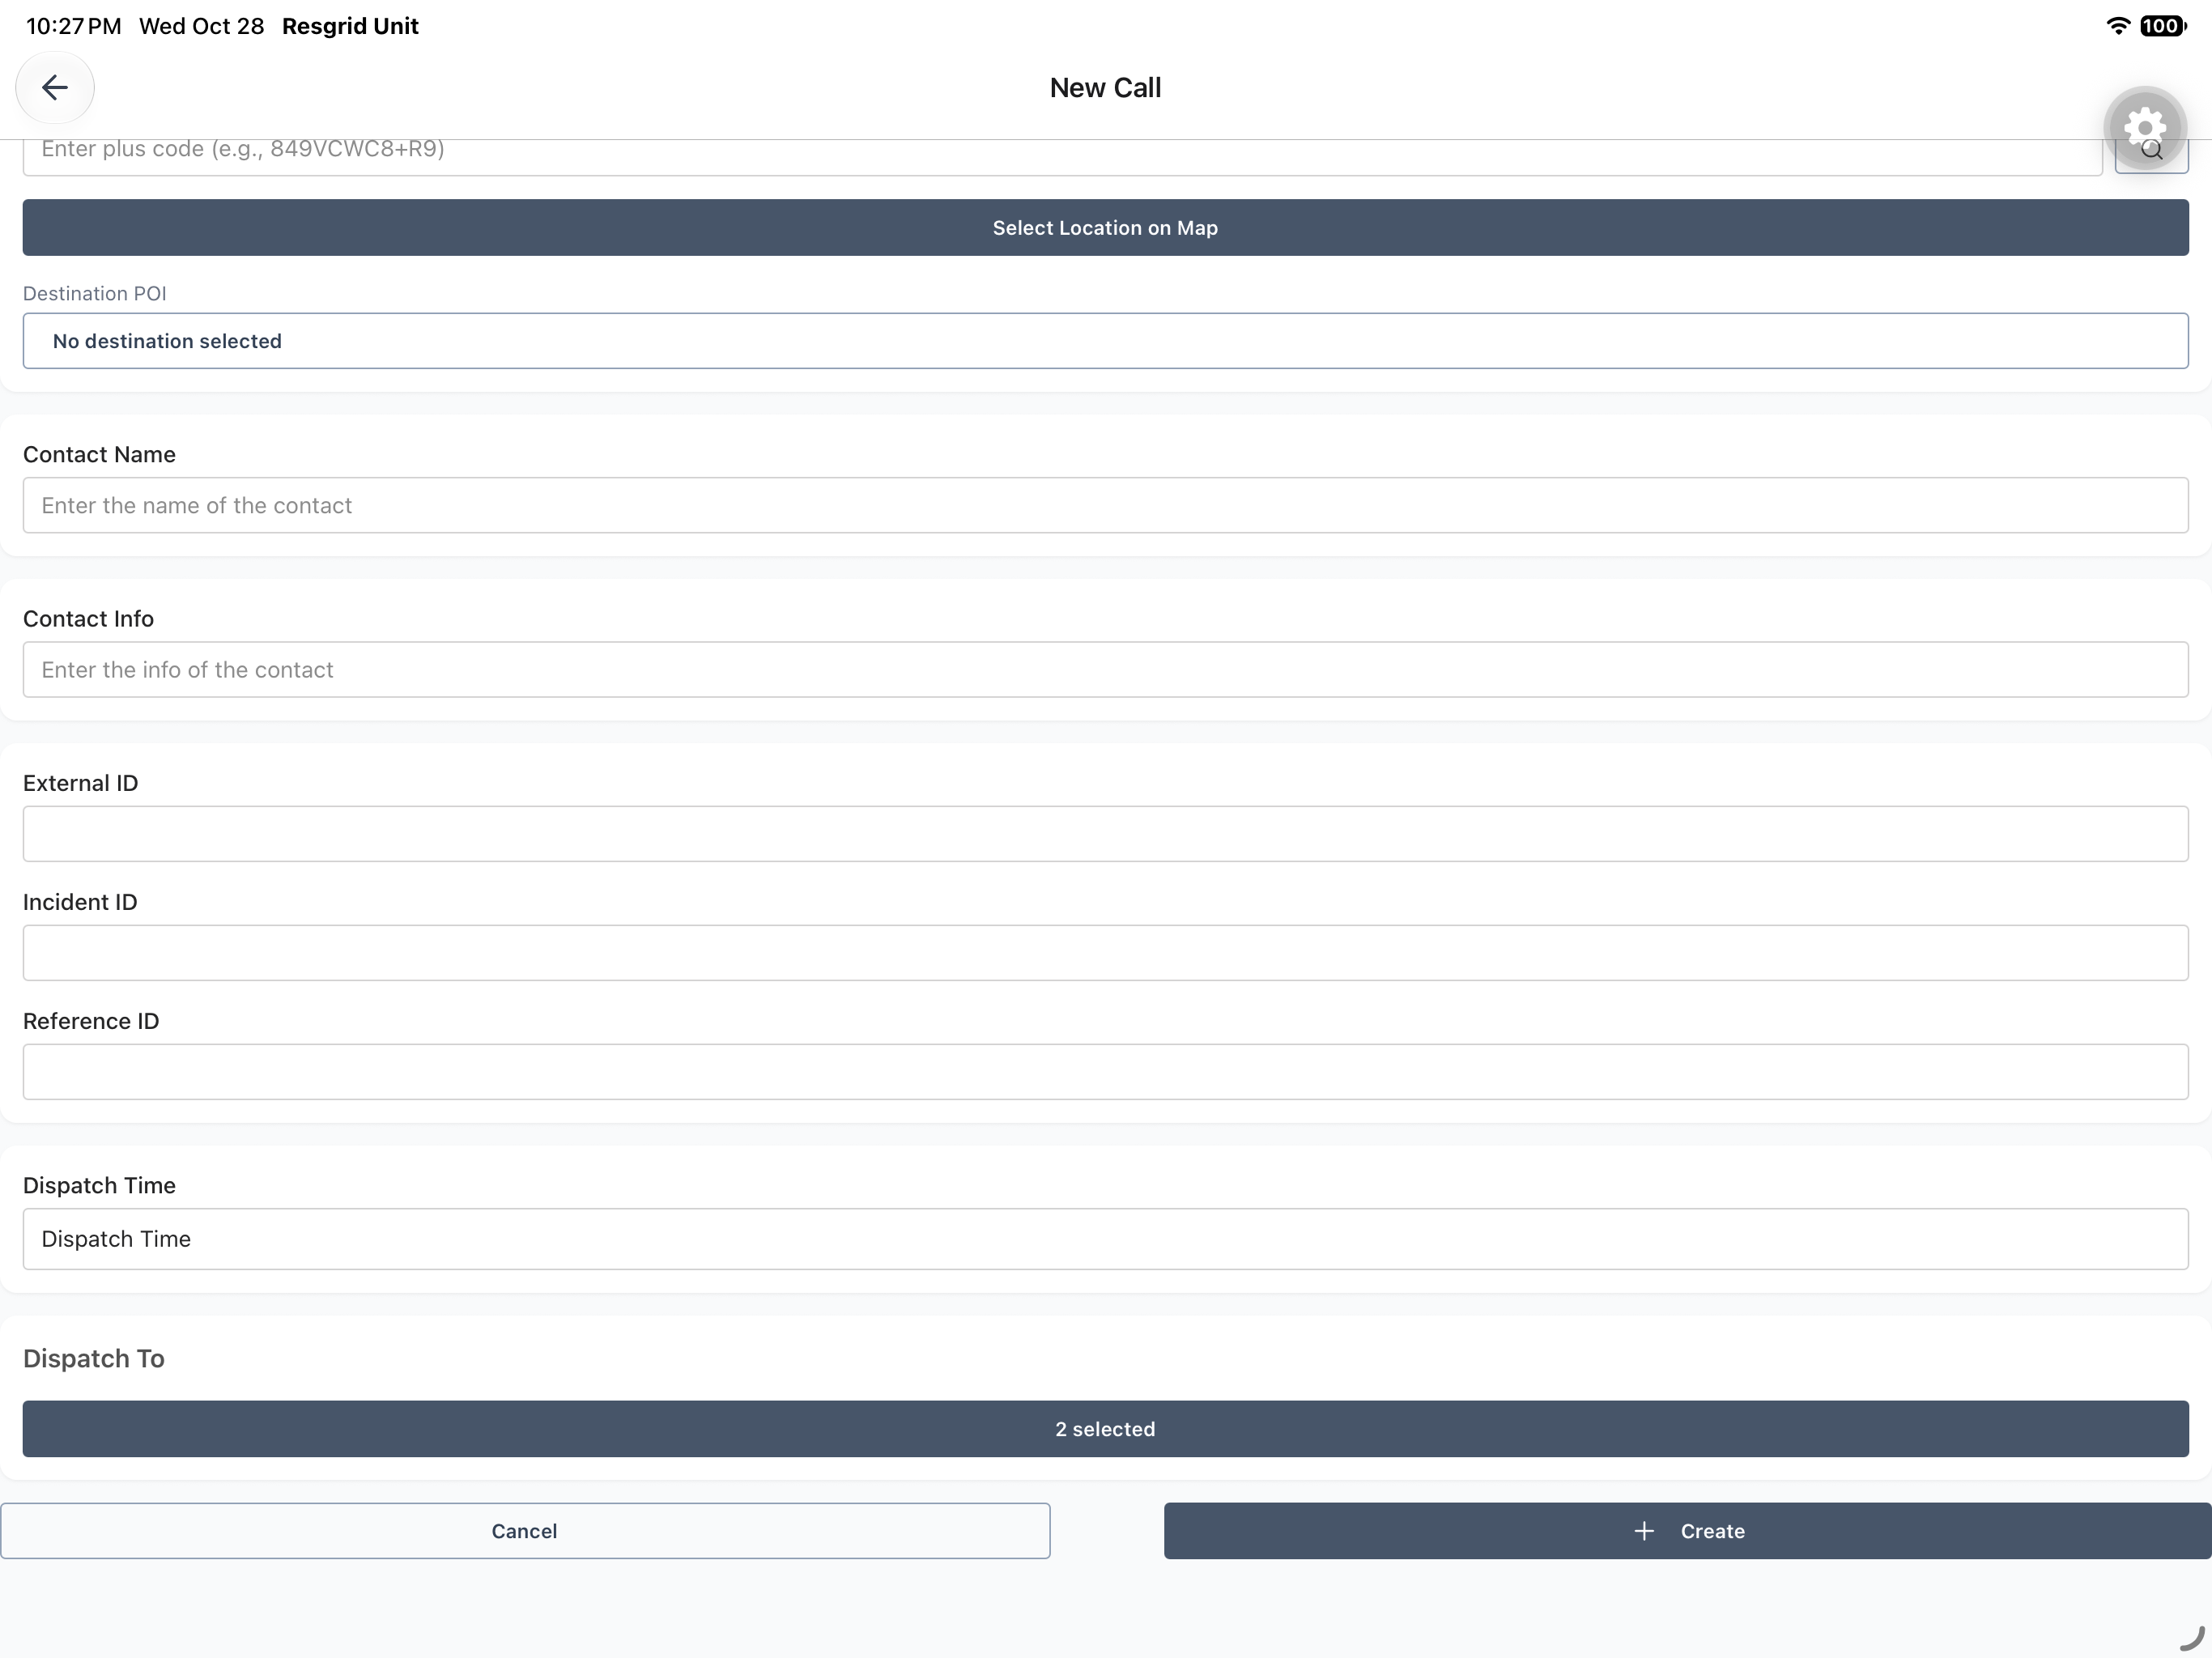
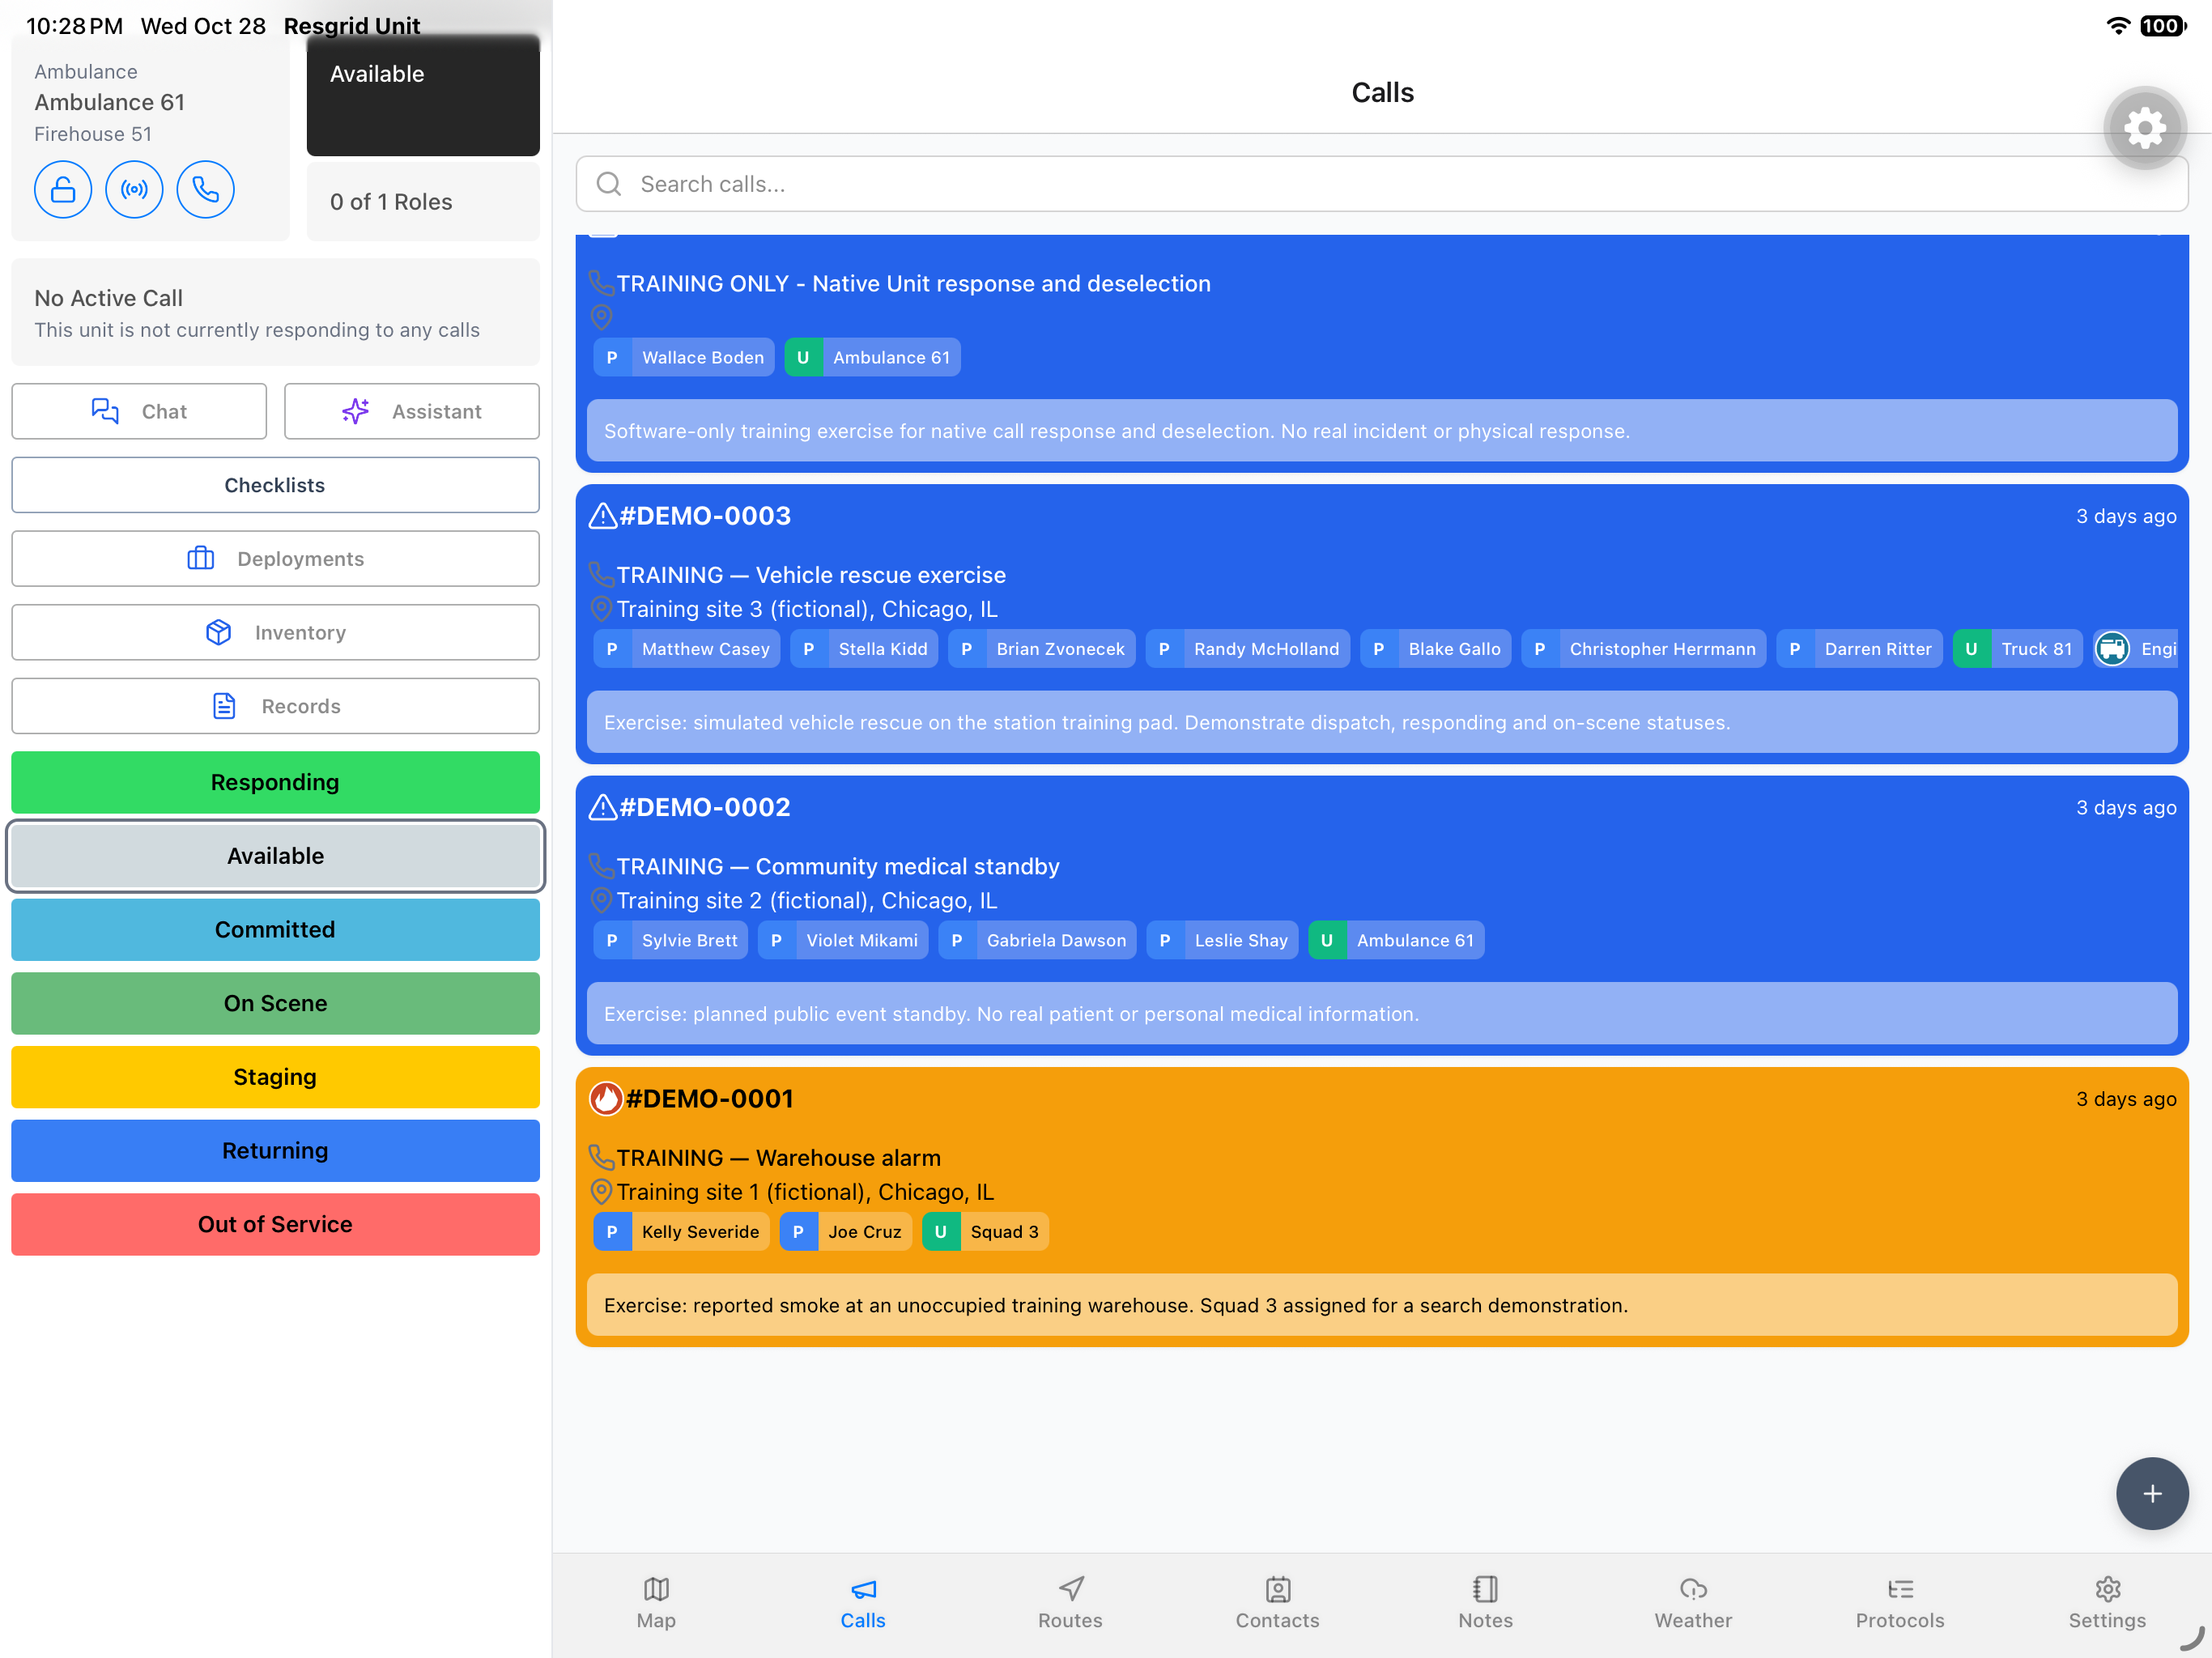
Back on New Call, verify Dispatch To and its two selected recipients. Dispatch Time is blank in this exercise; no future schedule is entered. After reviewing the form, use Create once. The Calls list now contains the new training exercise with Boden and Ambulance Sixty-one shown on its card.
Practice
Check Dispatch To and Dispatch Time, create the reviewed training call once, and identify its returned card in Calls.
Step 6
Read details before selecting the call
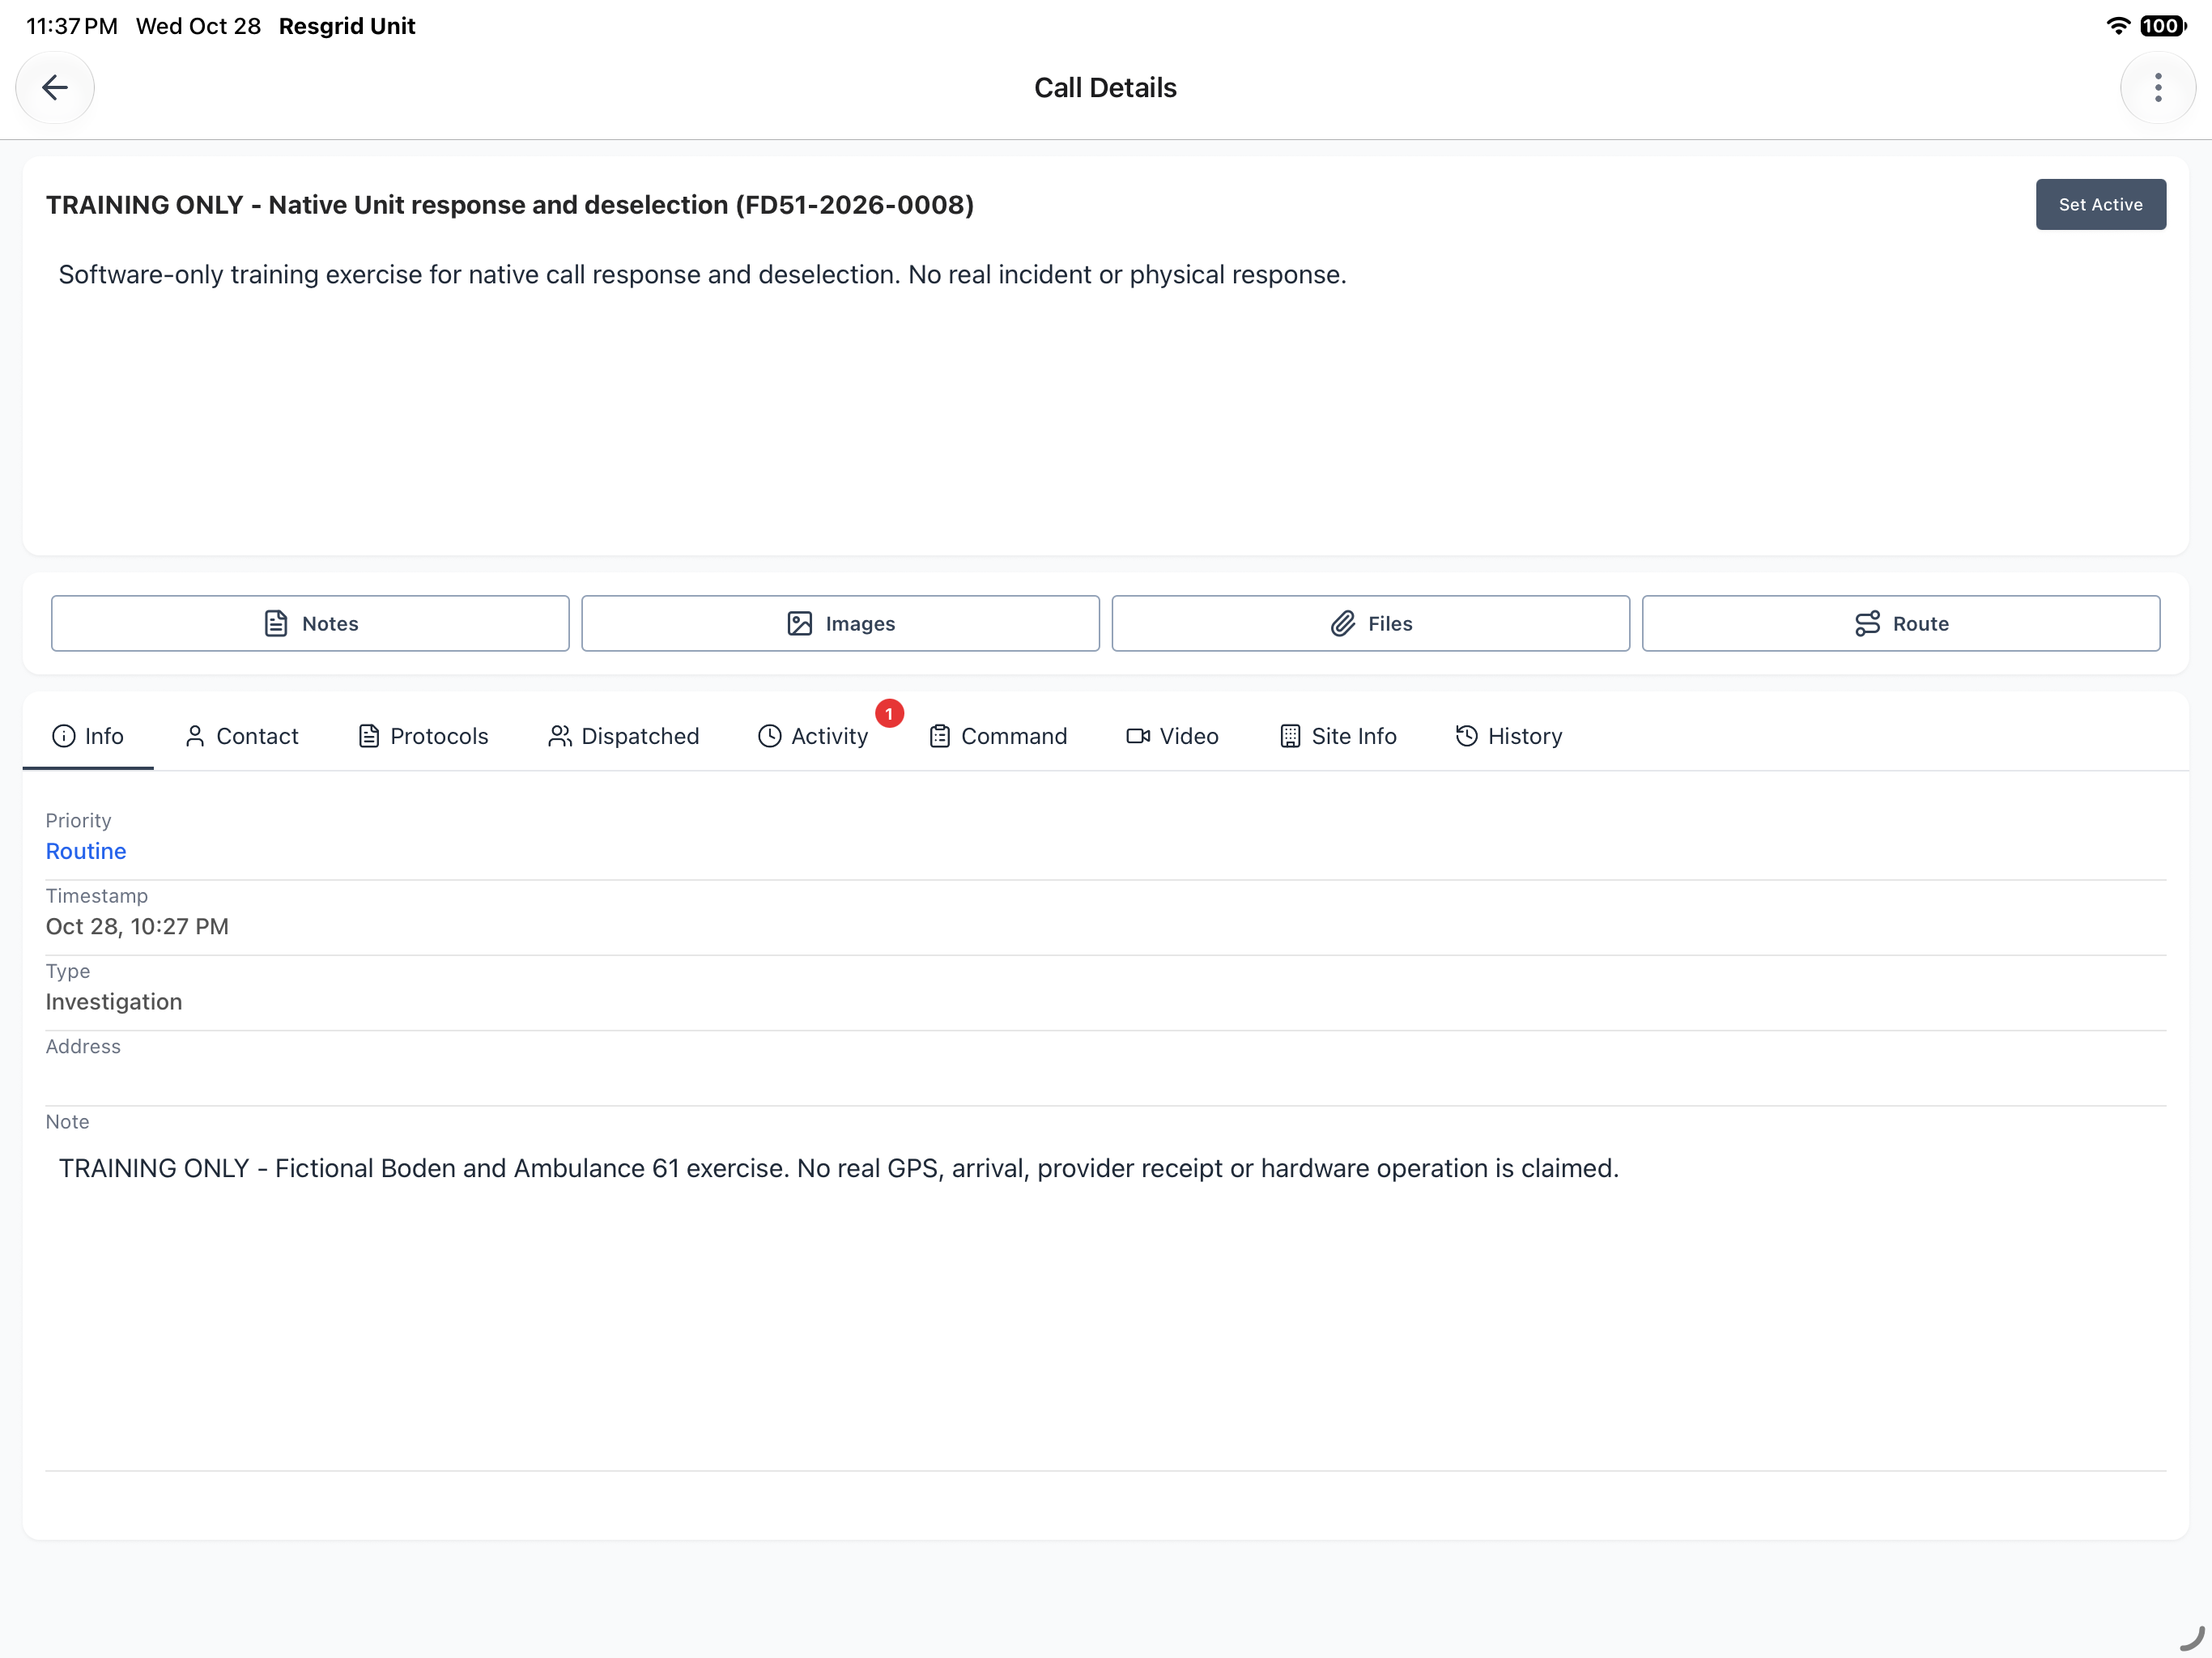
Open the training call and check its identity in Call Details. This saved exercise has a department call number ending in eight, and its Info view retains Routine, Investigation and the original note. Choose Set Active for the incident you intend to work. The app reports Call set as active and opens Select Status.
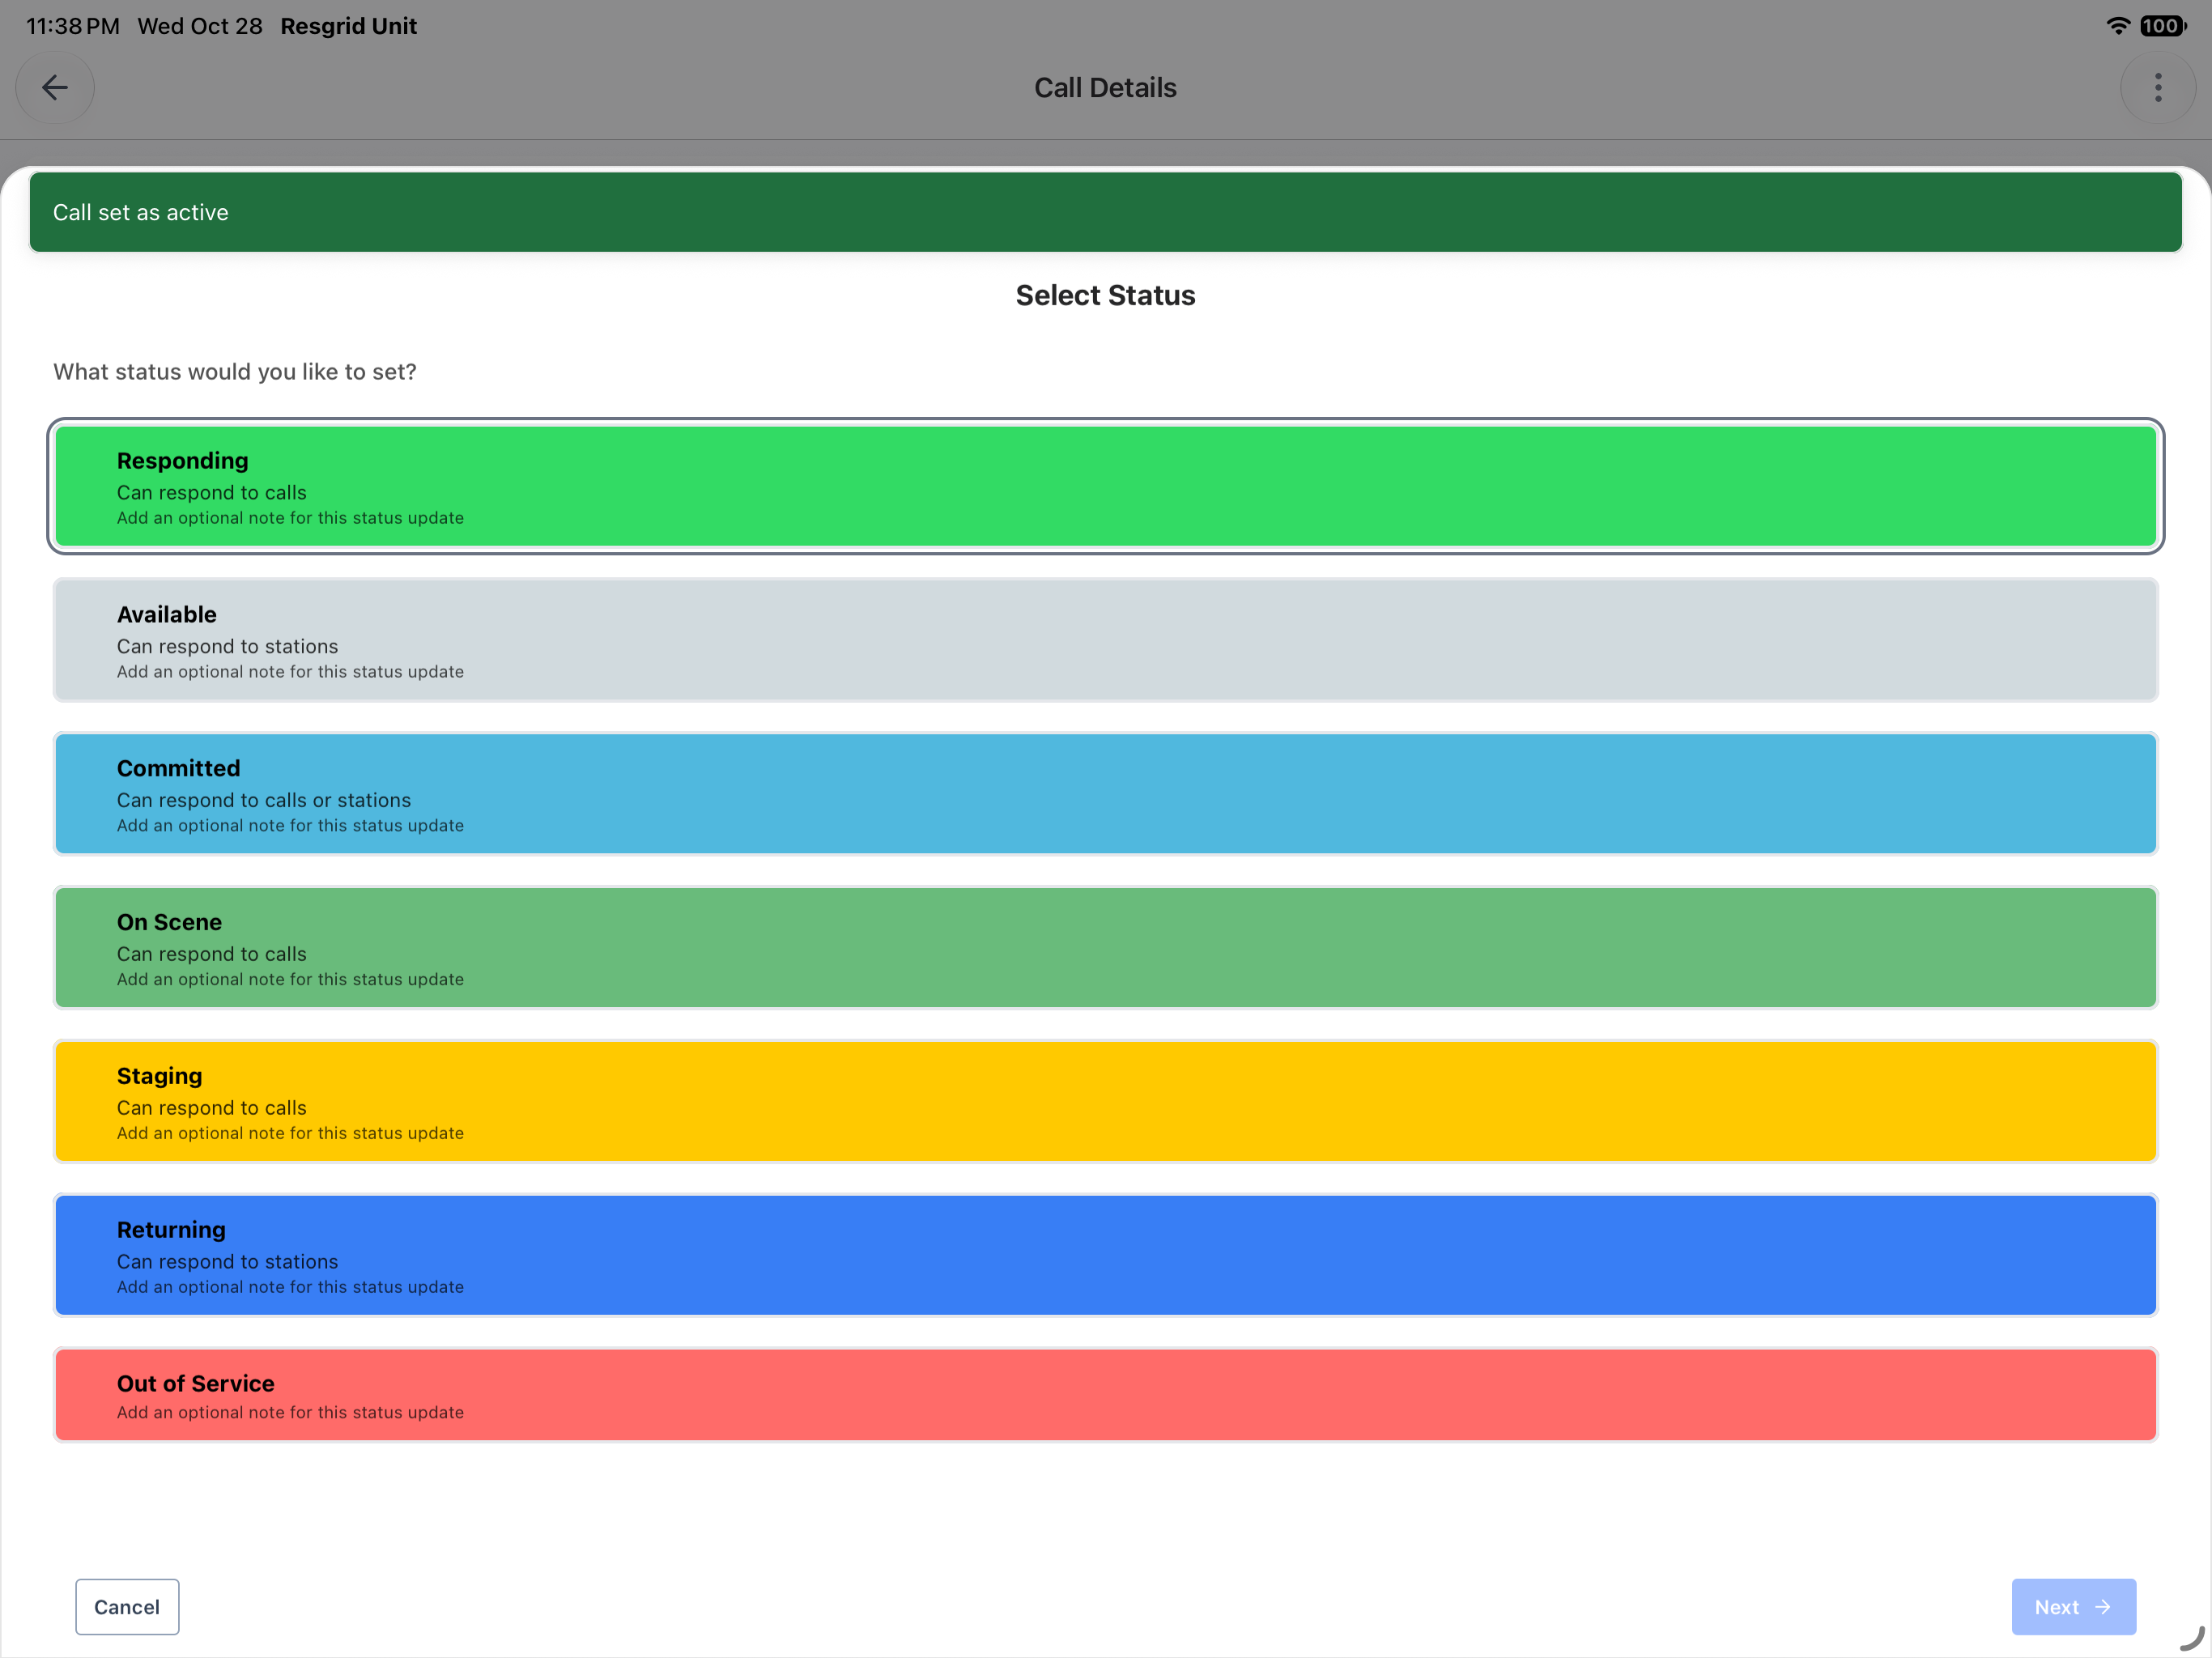
Practice
Read the saved call title and number, priority, type and note before choosing Set Active for the intended incident.
Step 7
Choose the intended response status
Select Status is the first of three steps. The configured choices include Responding, Available, Committed, On Scene, Staging, Returning and Out of Service. Here, Responding is selected; use Next to review its destination.
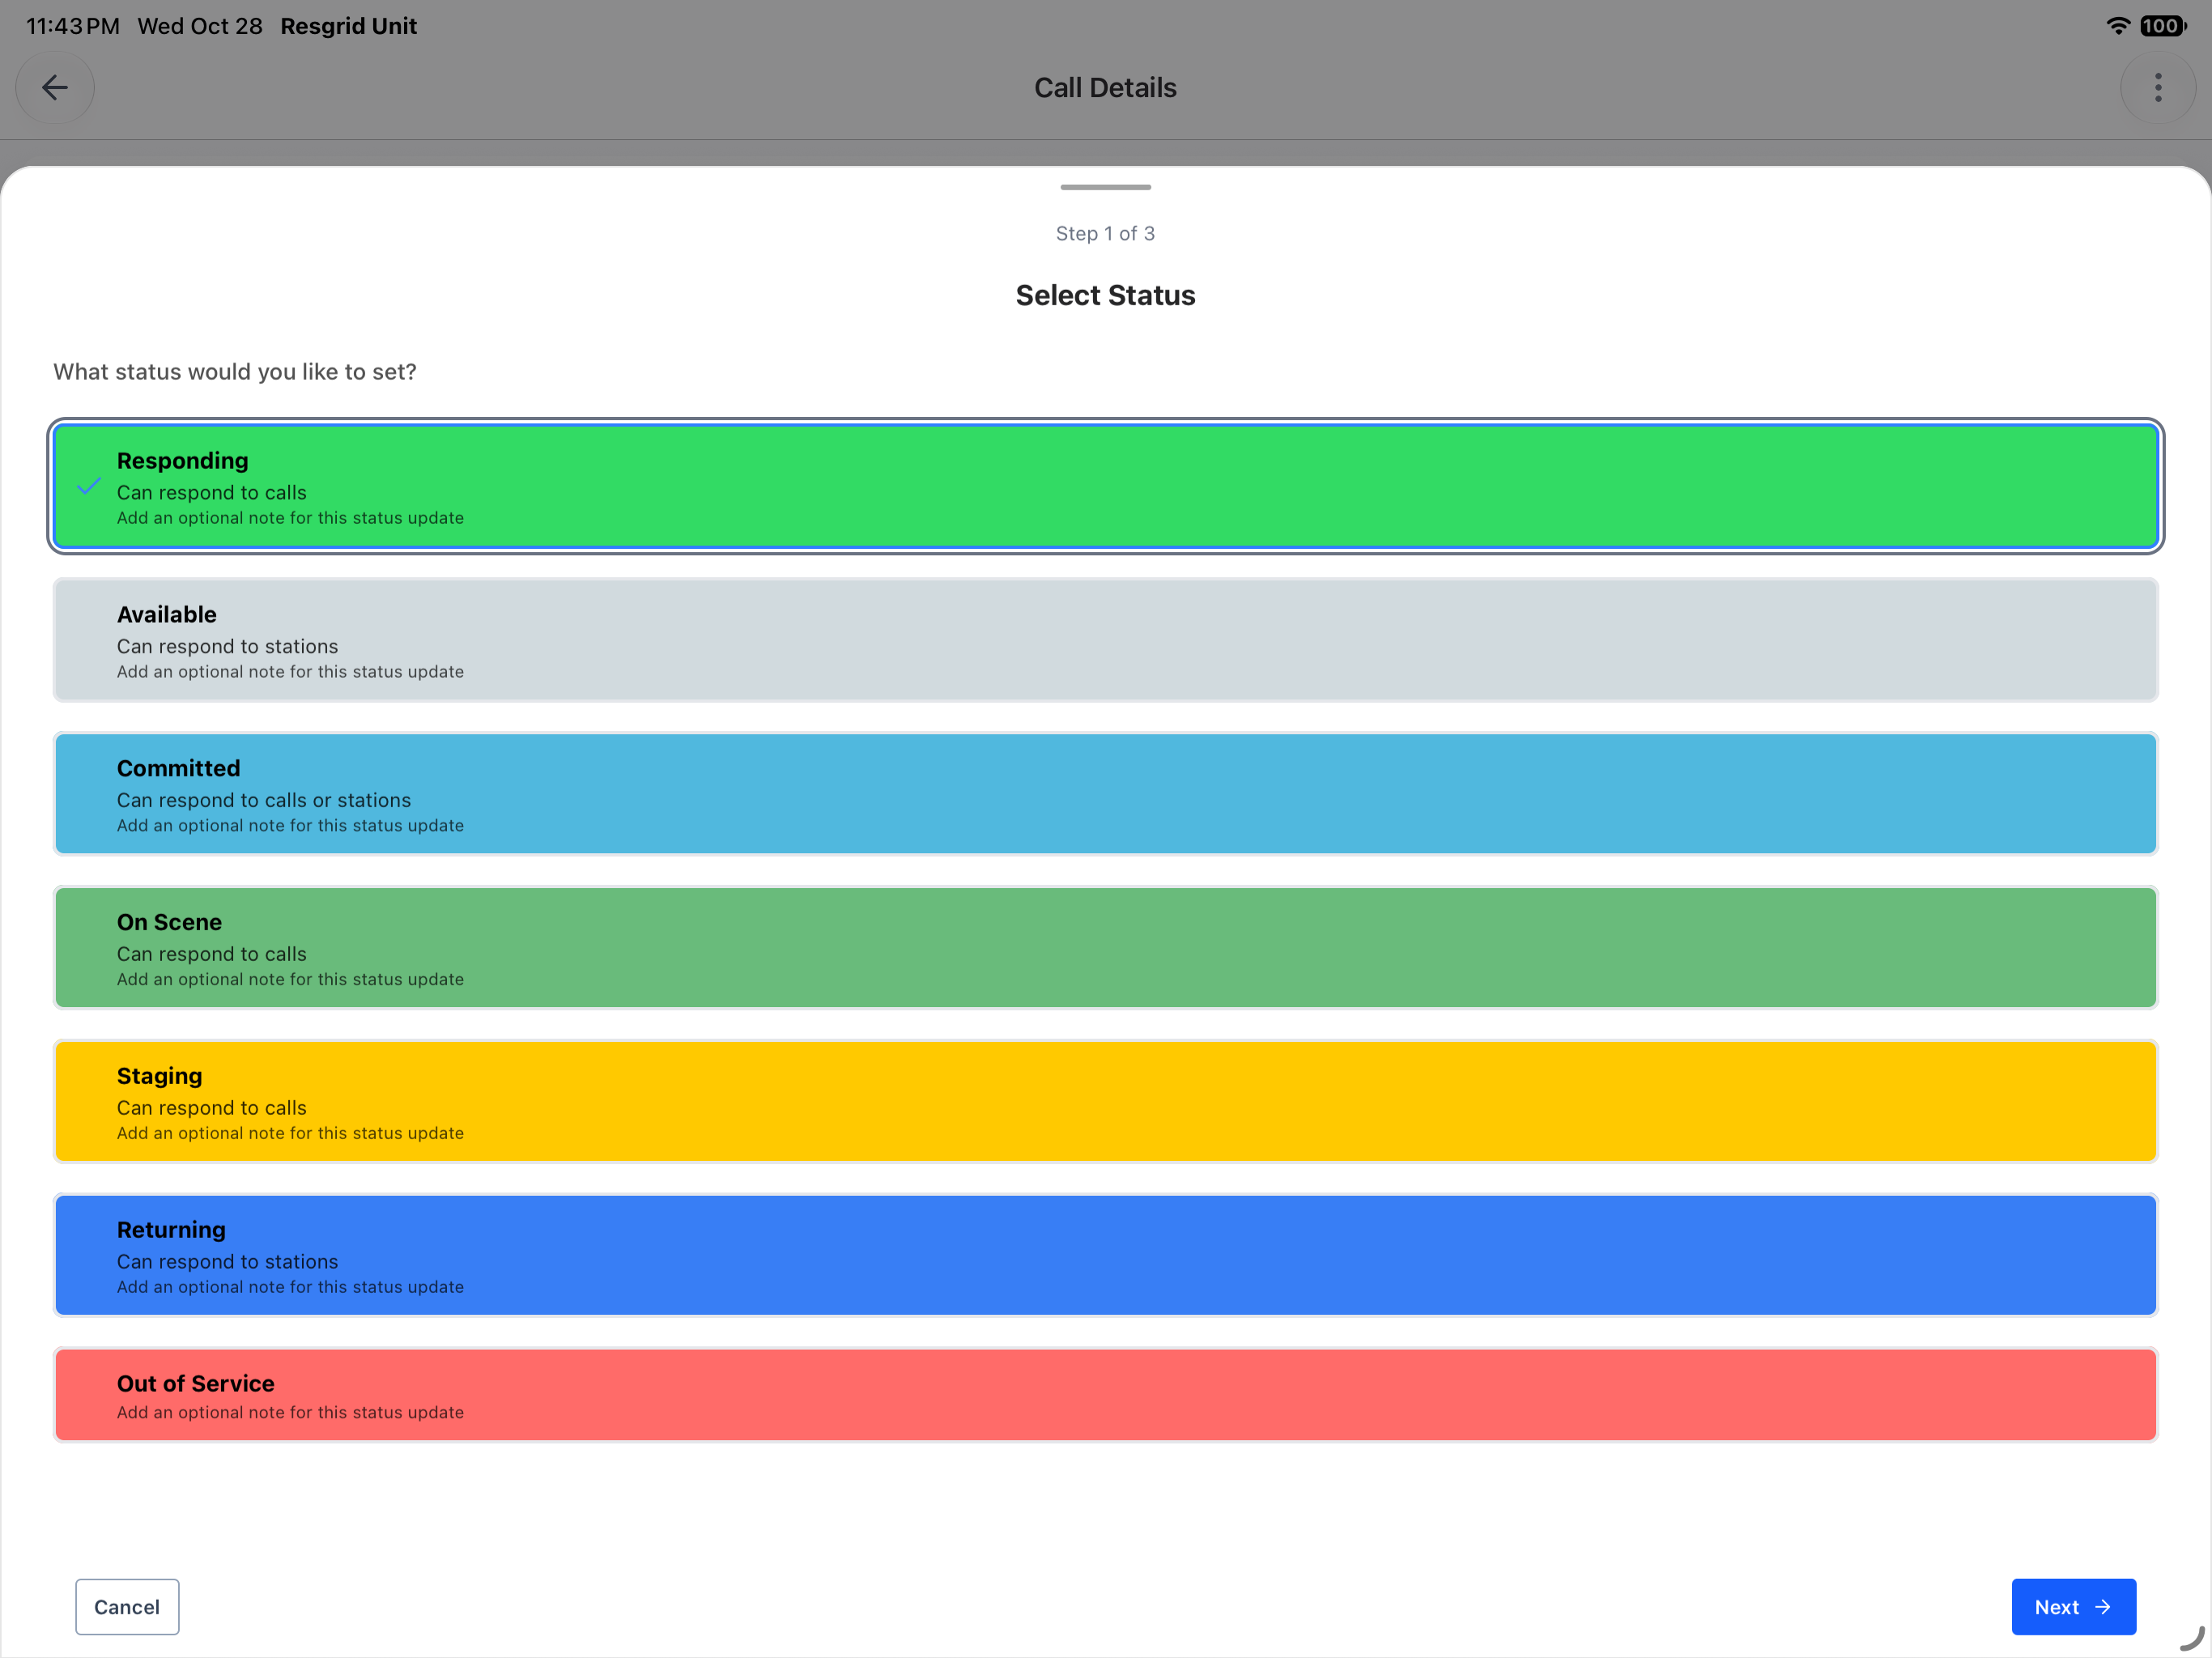
Practice
Read the configured status choices, select the intended training status and use Next to inspect its destination.
Step 8
Associate the update with the right destination
Select Destination for Responding distinguishes Calls, Stations and POIs from No Destination. The selected row is our new training incident, ending in eight. Check that identity before using Next, so the status update is associated with the intended call.
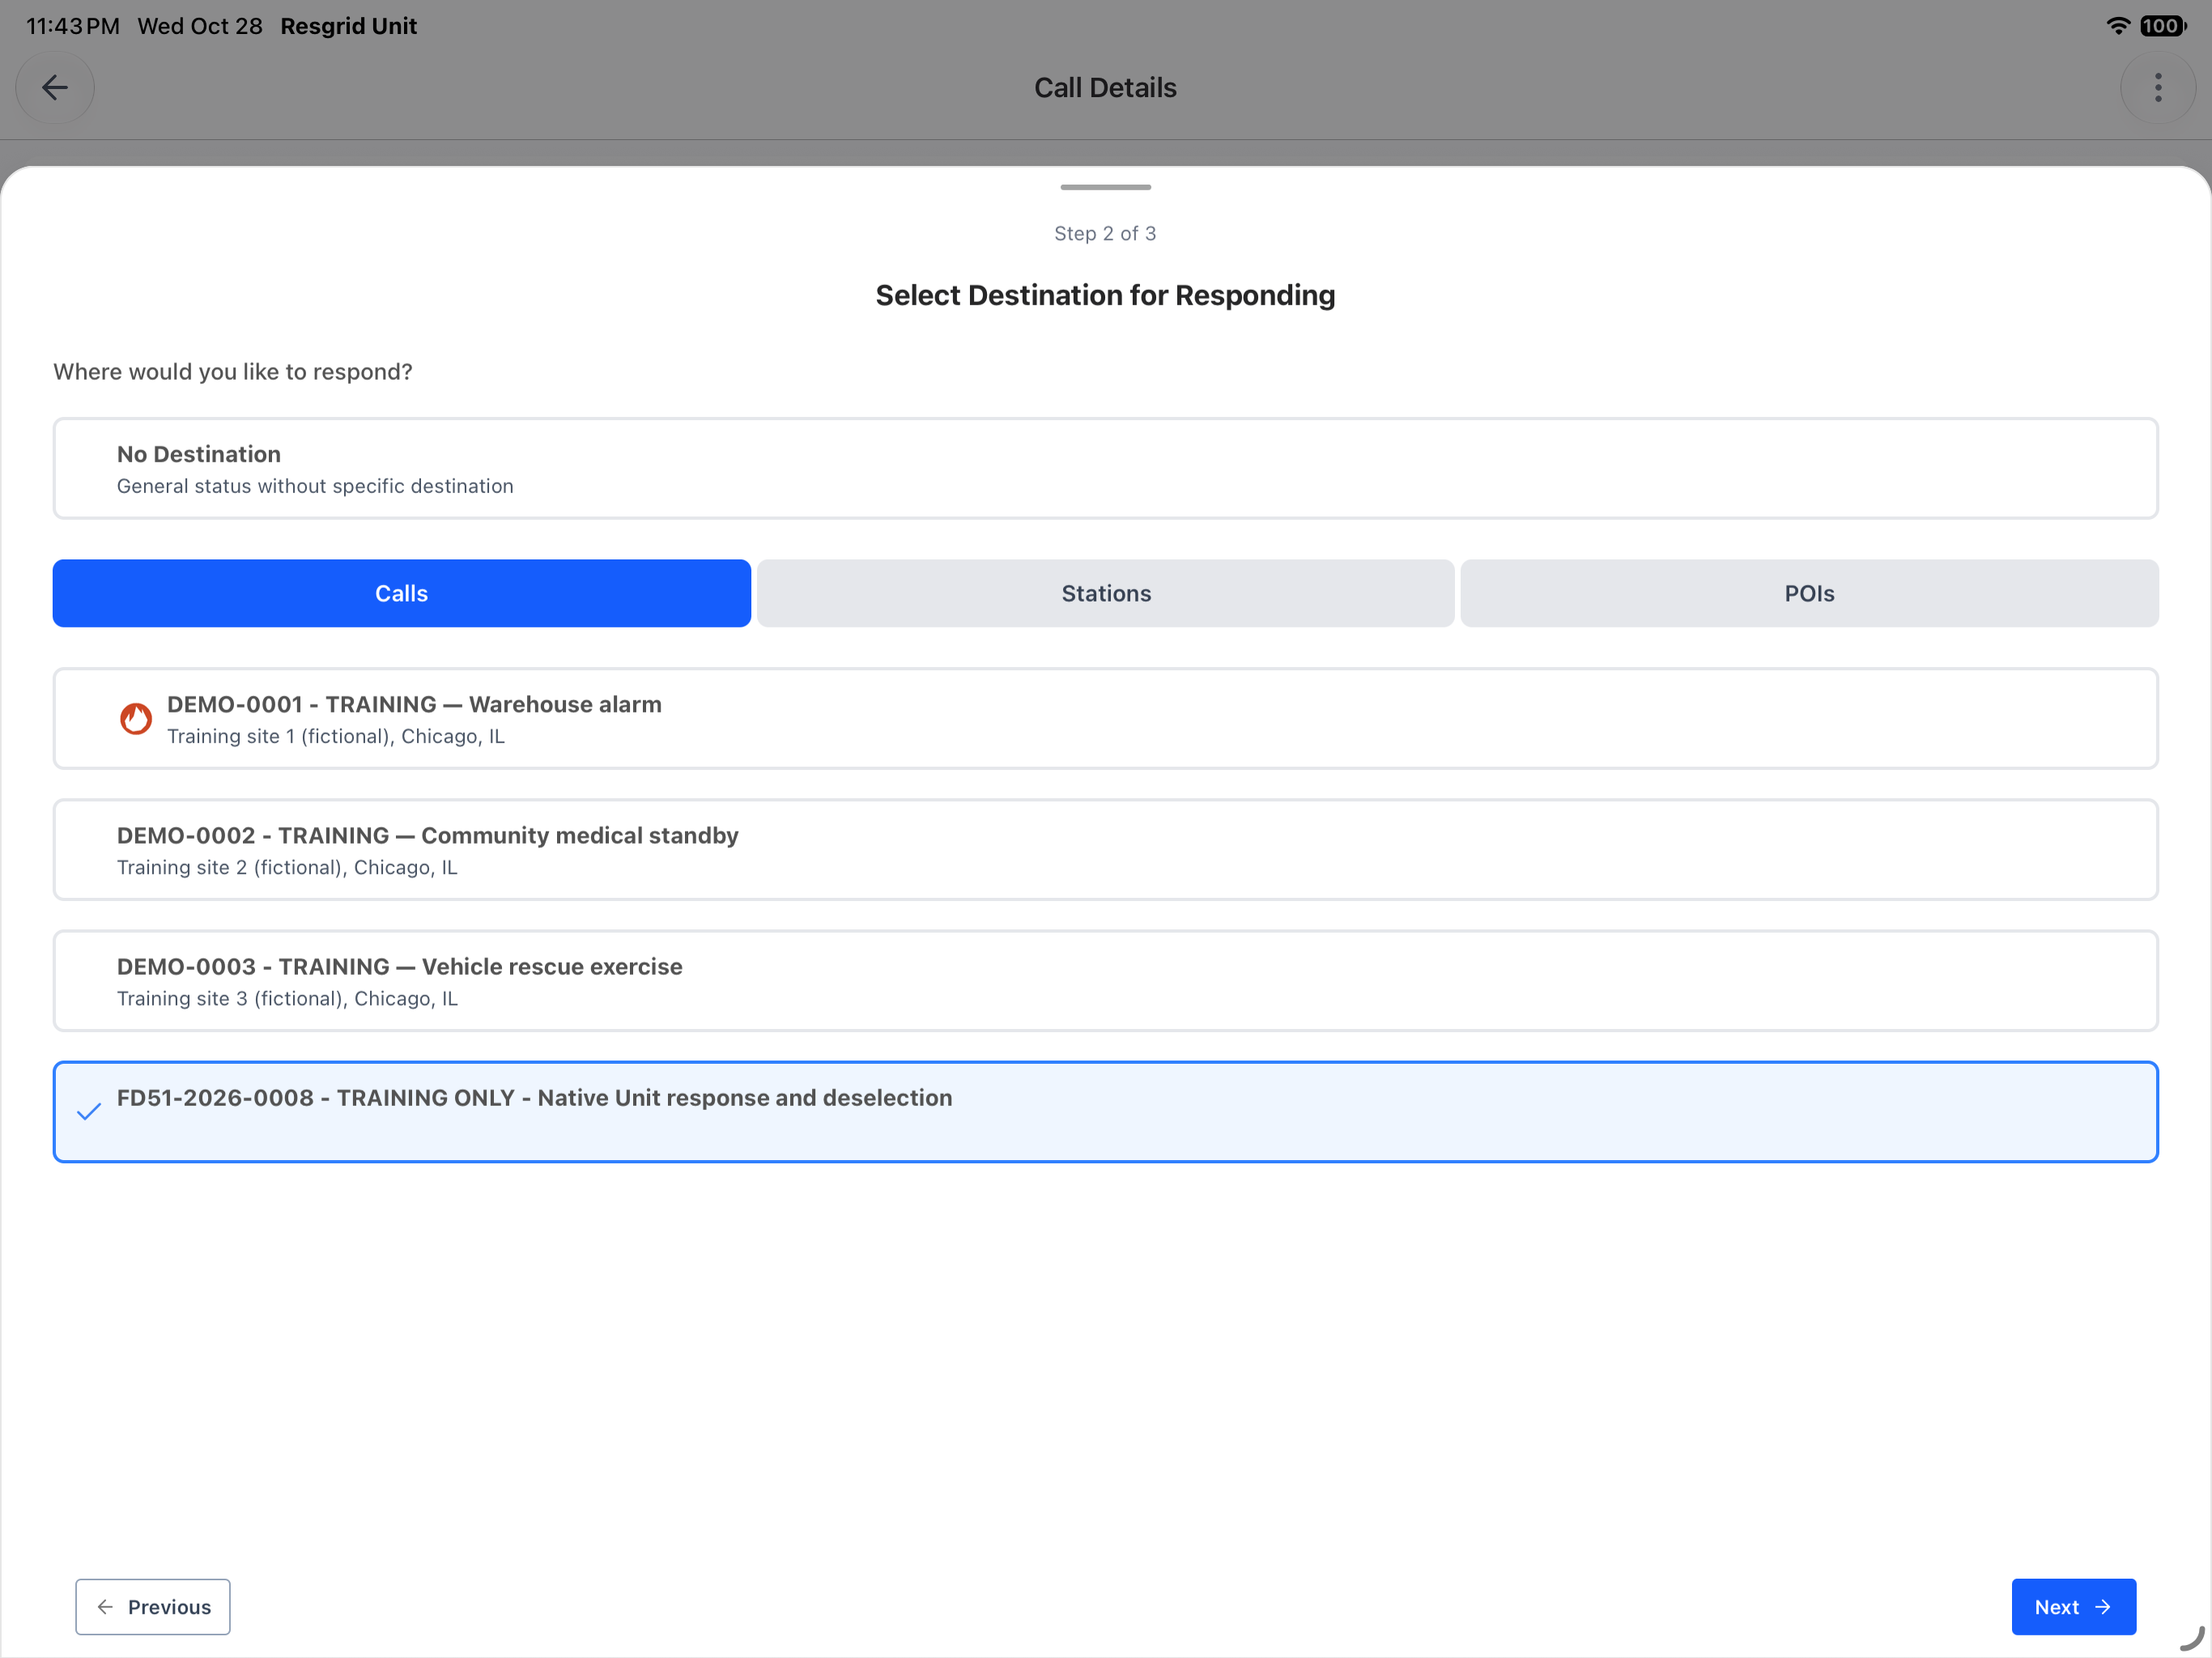
Practice
Compare the selected destination call with the incident you intend to work, then continue only when the identity matches.
Step 9
Review the note and submit the status
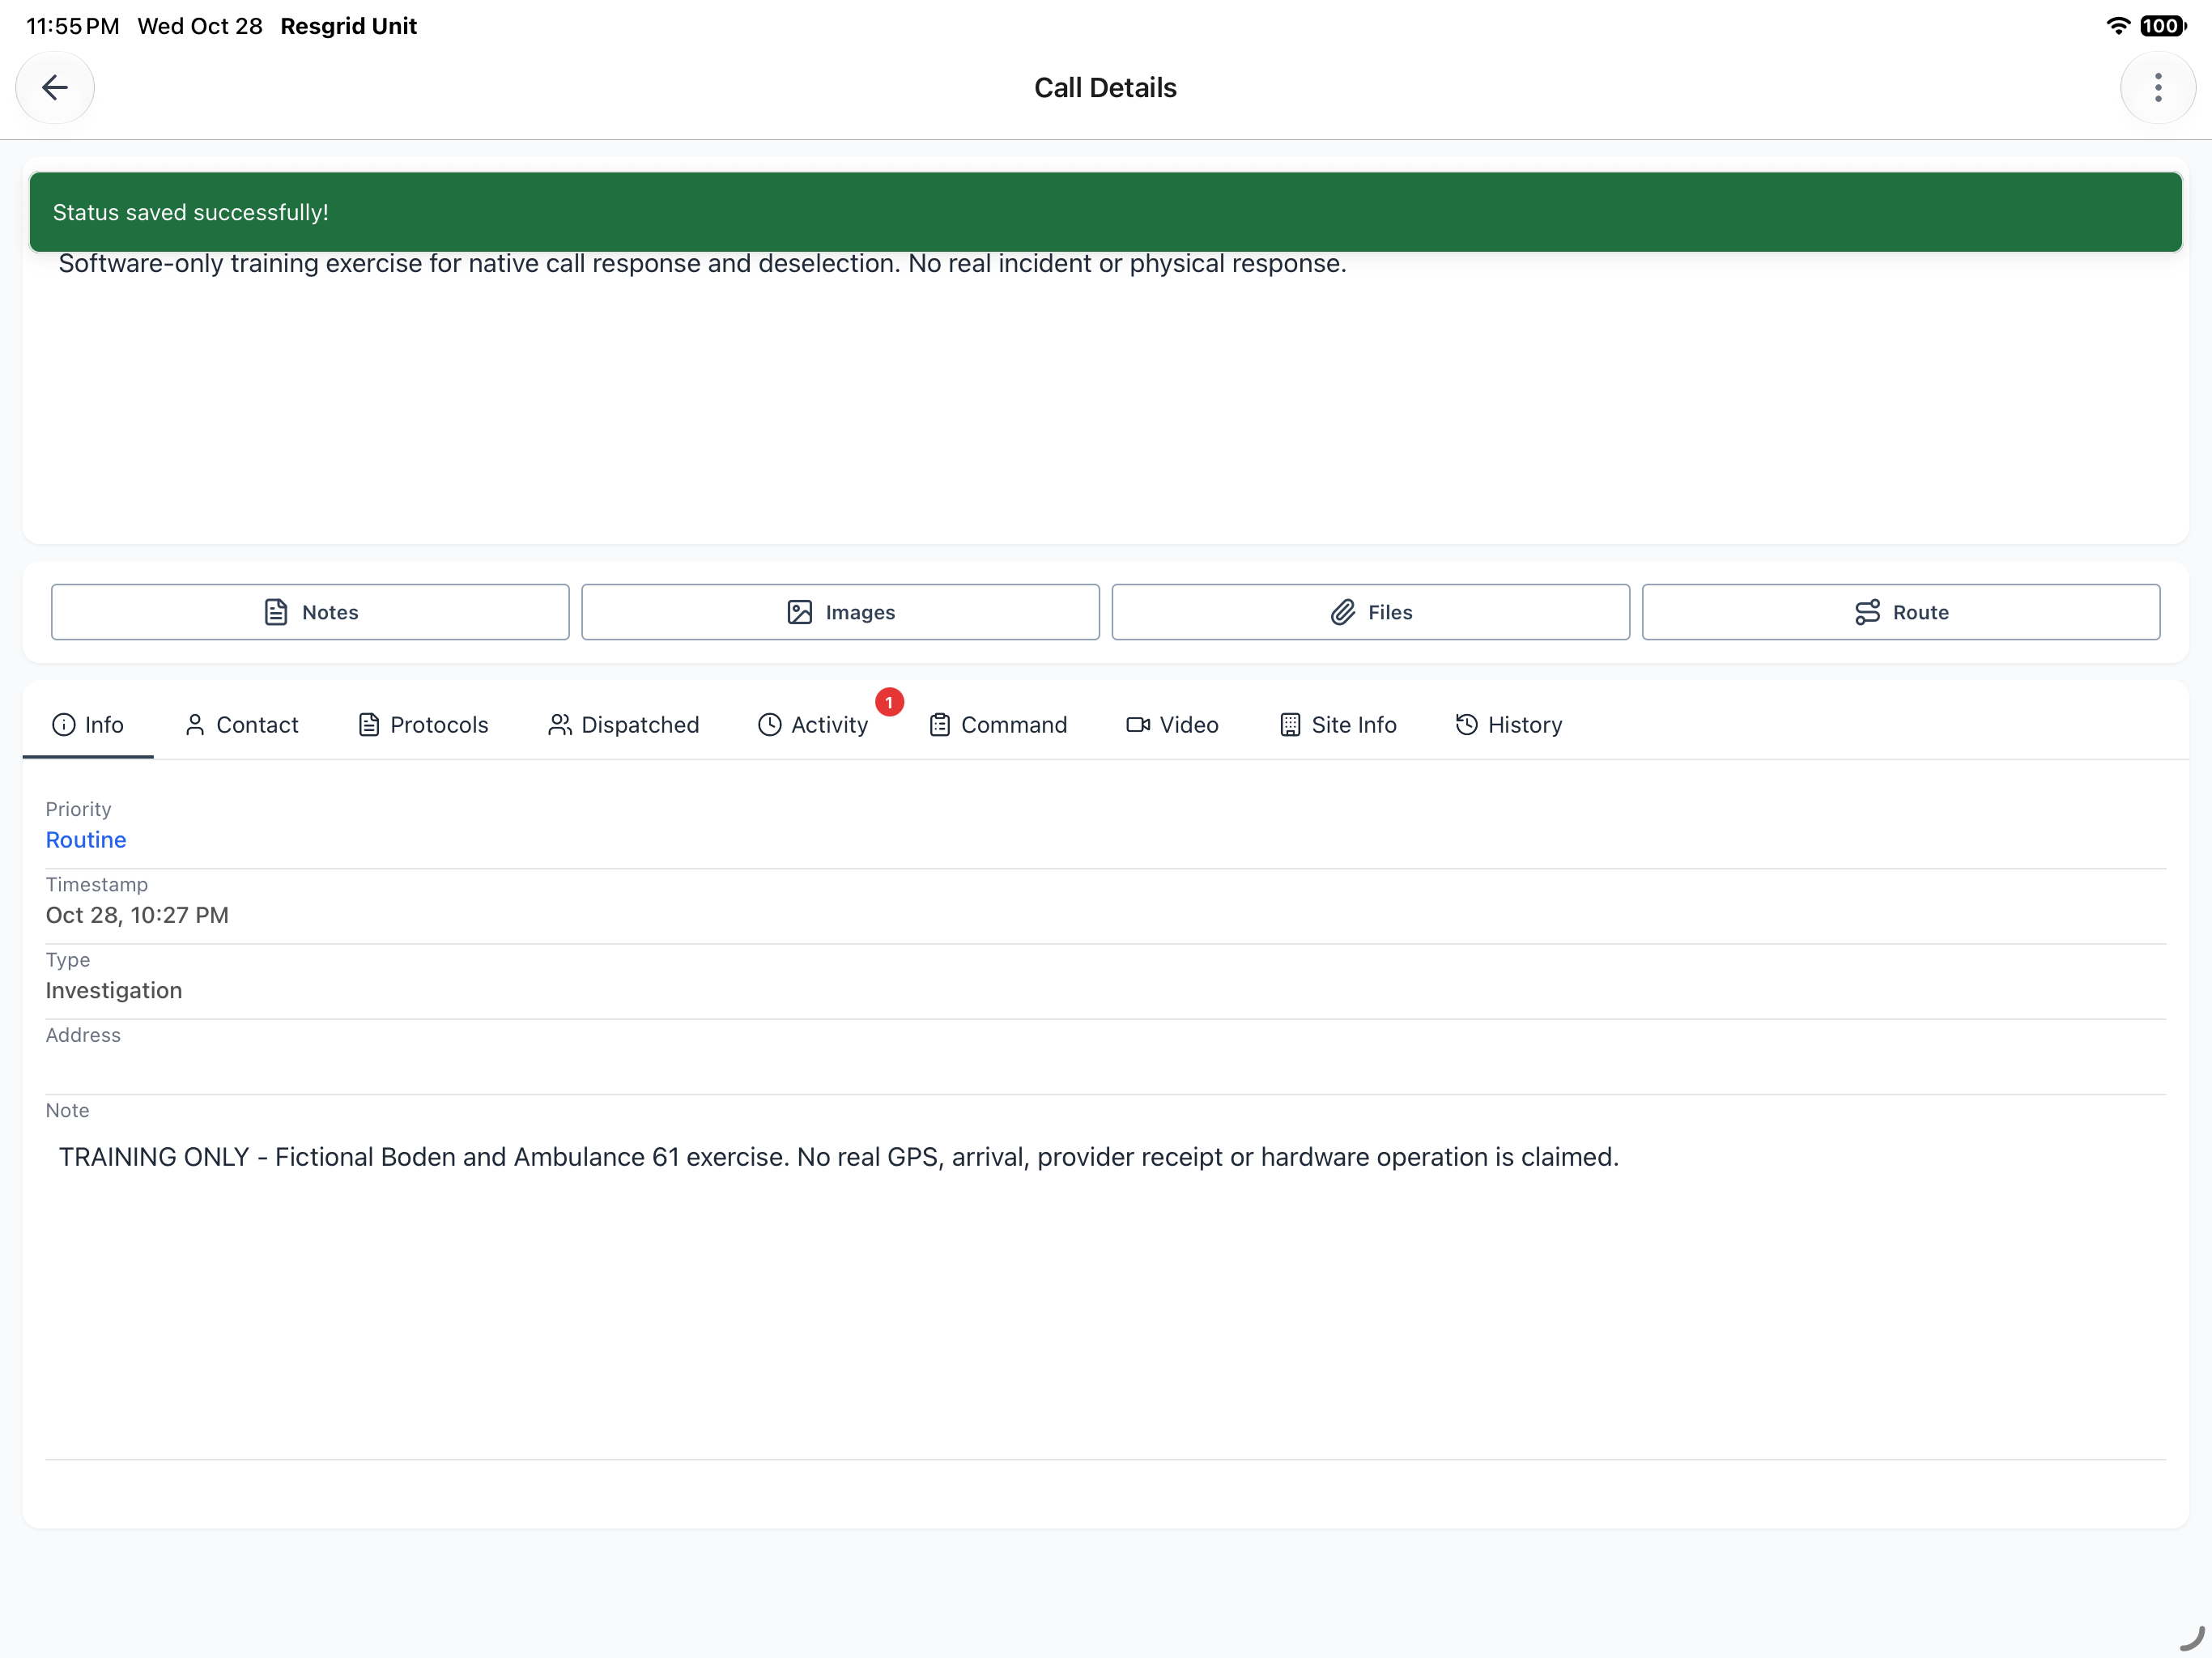
Add Note shows the selected Responding status and the training call together. The optional note makes clear that this is a software exercise. Review the summary, then use Submit to save the update. Status saved successfully is the returned result from that submission.
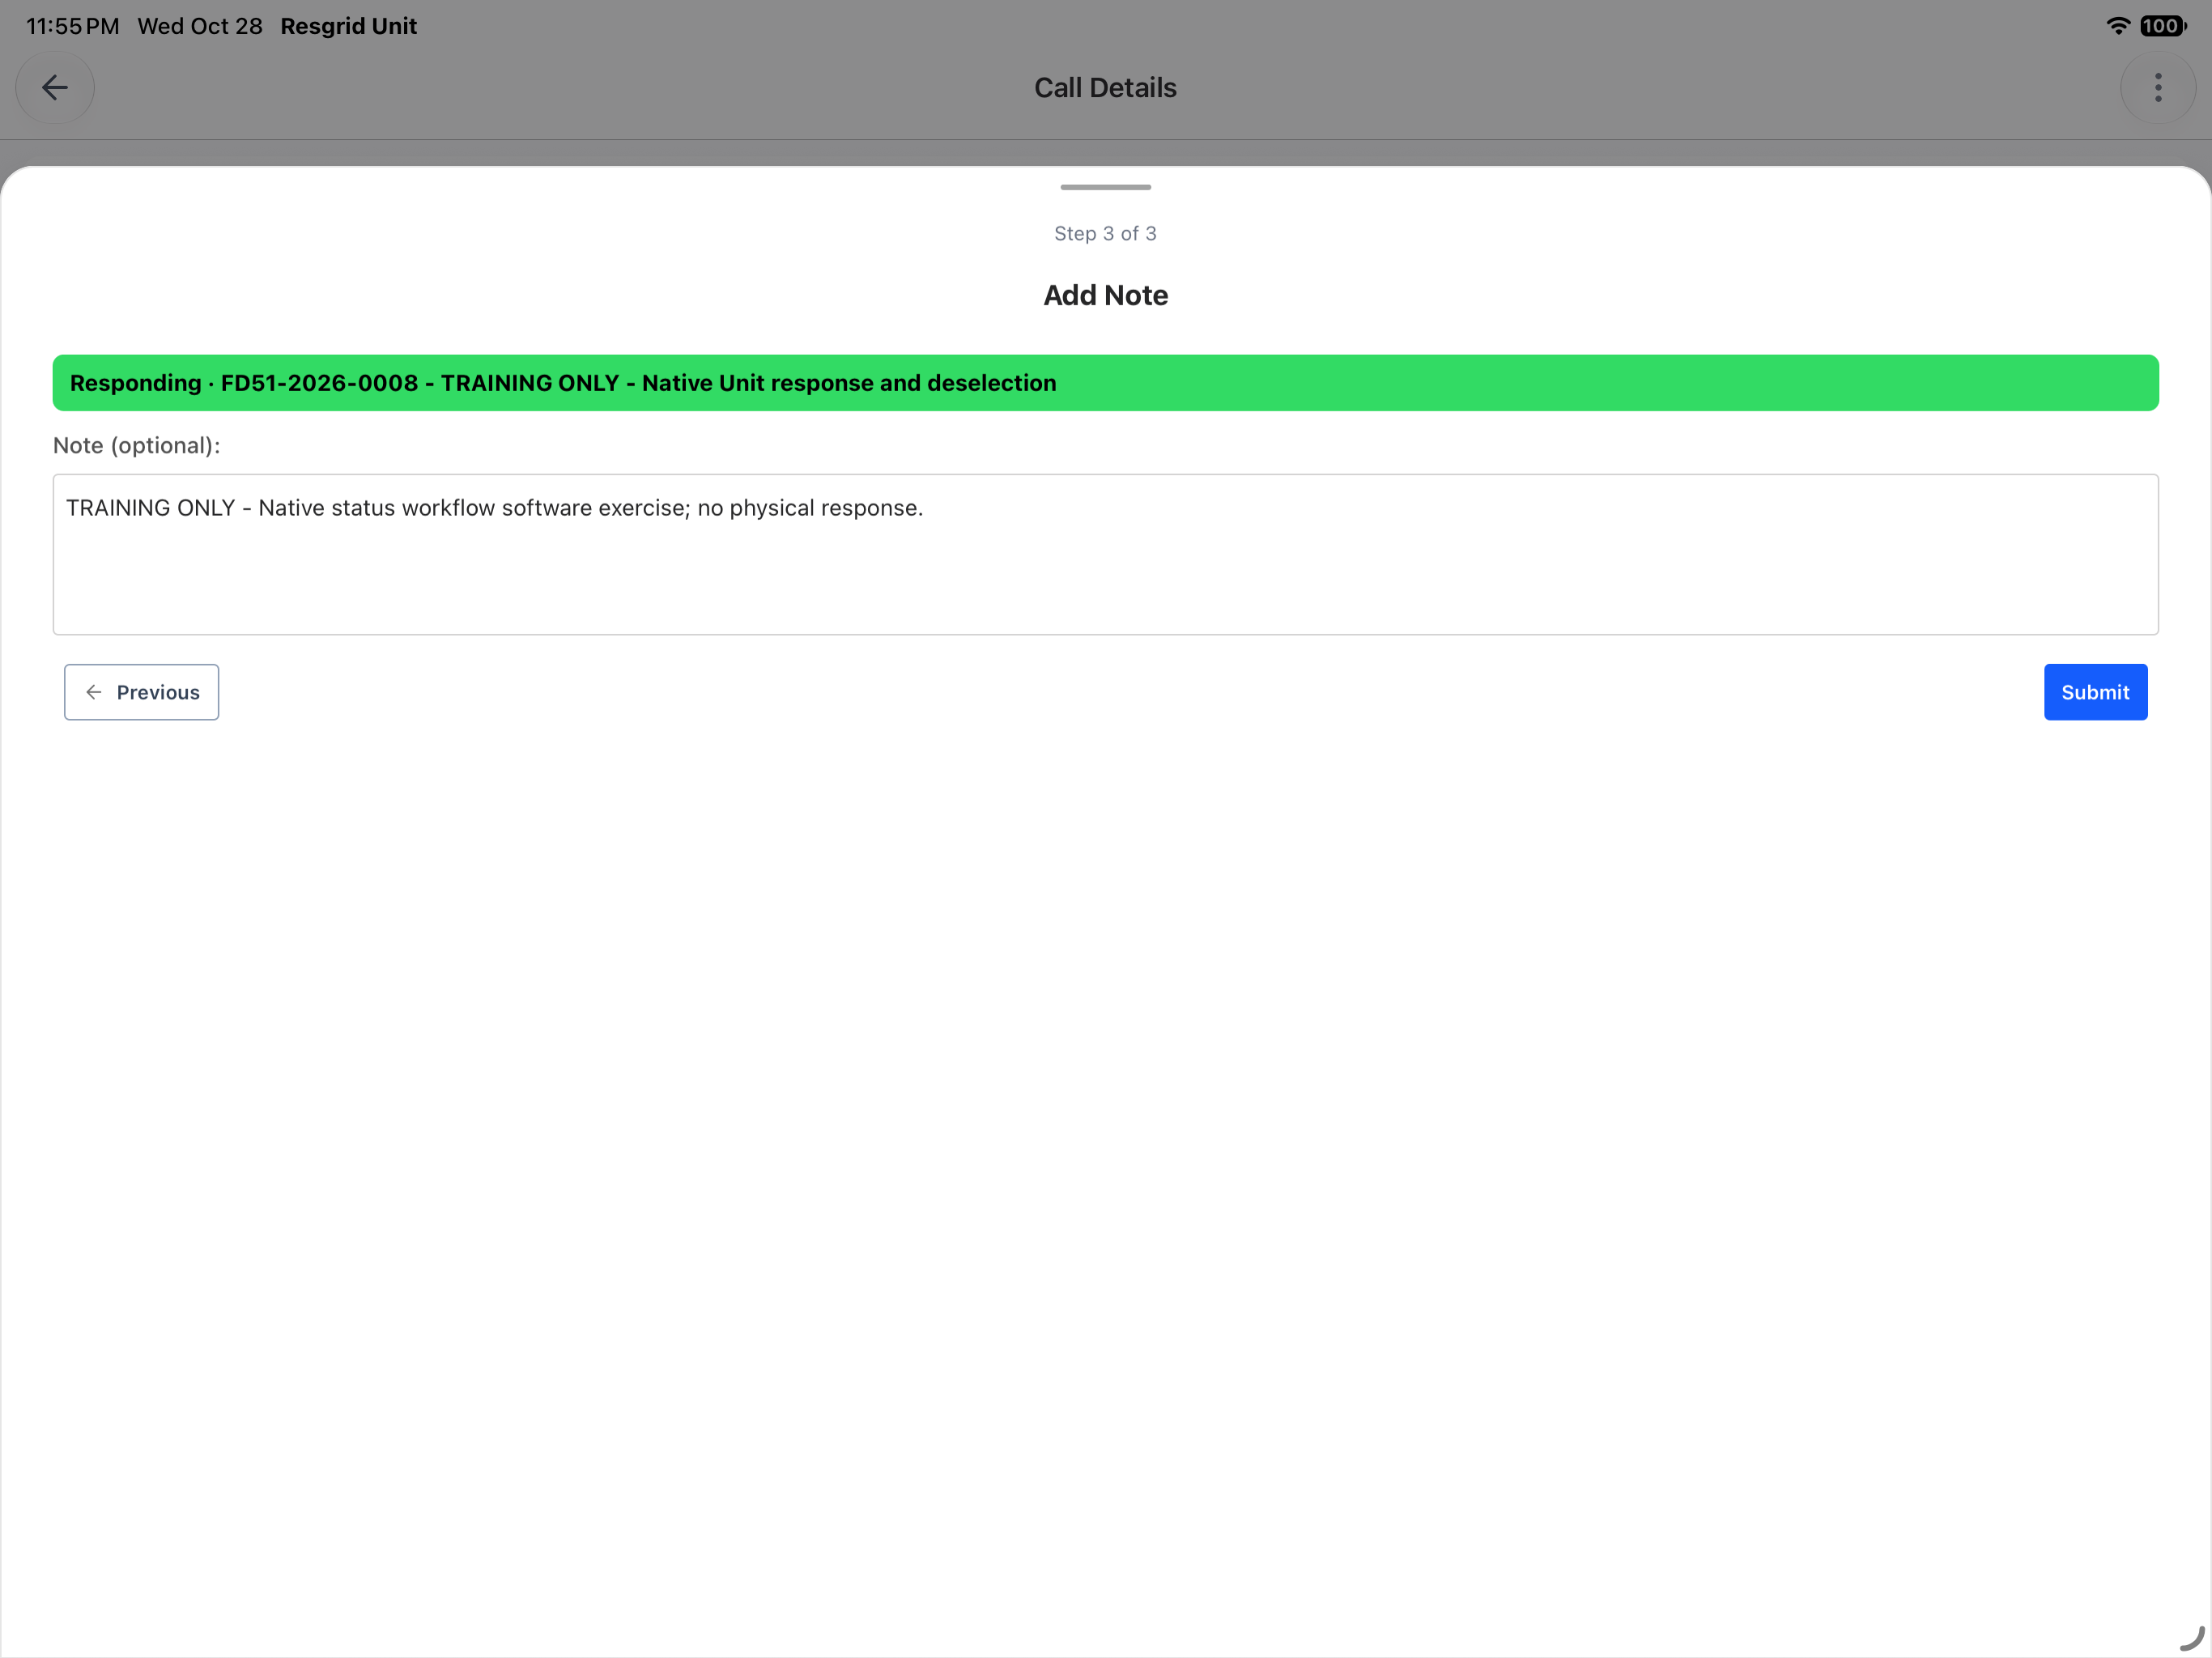
Practice
Review the selected status and incident together, enter an appropriate optional note, submit once and inspect the returned save result.
Step 10
Read unit status and active selection separately
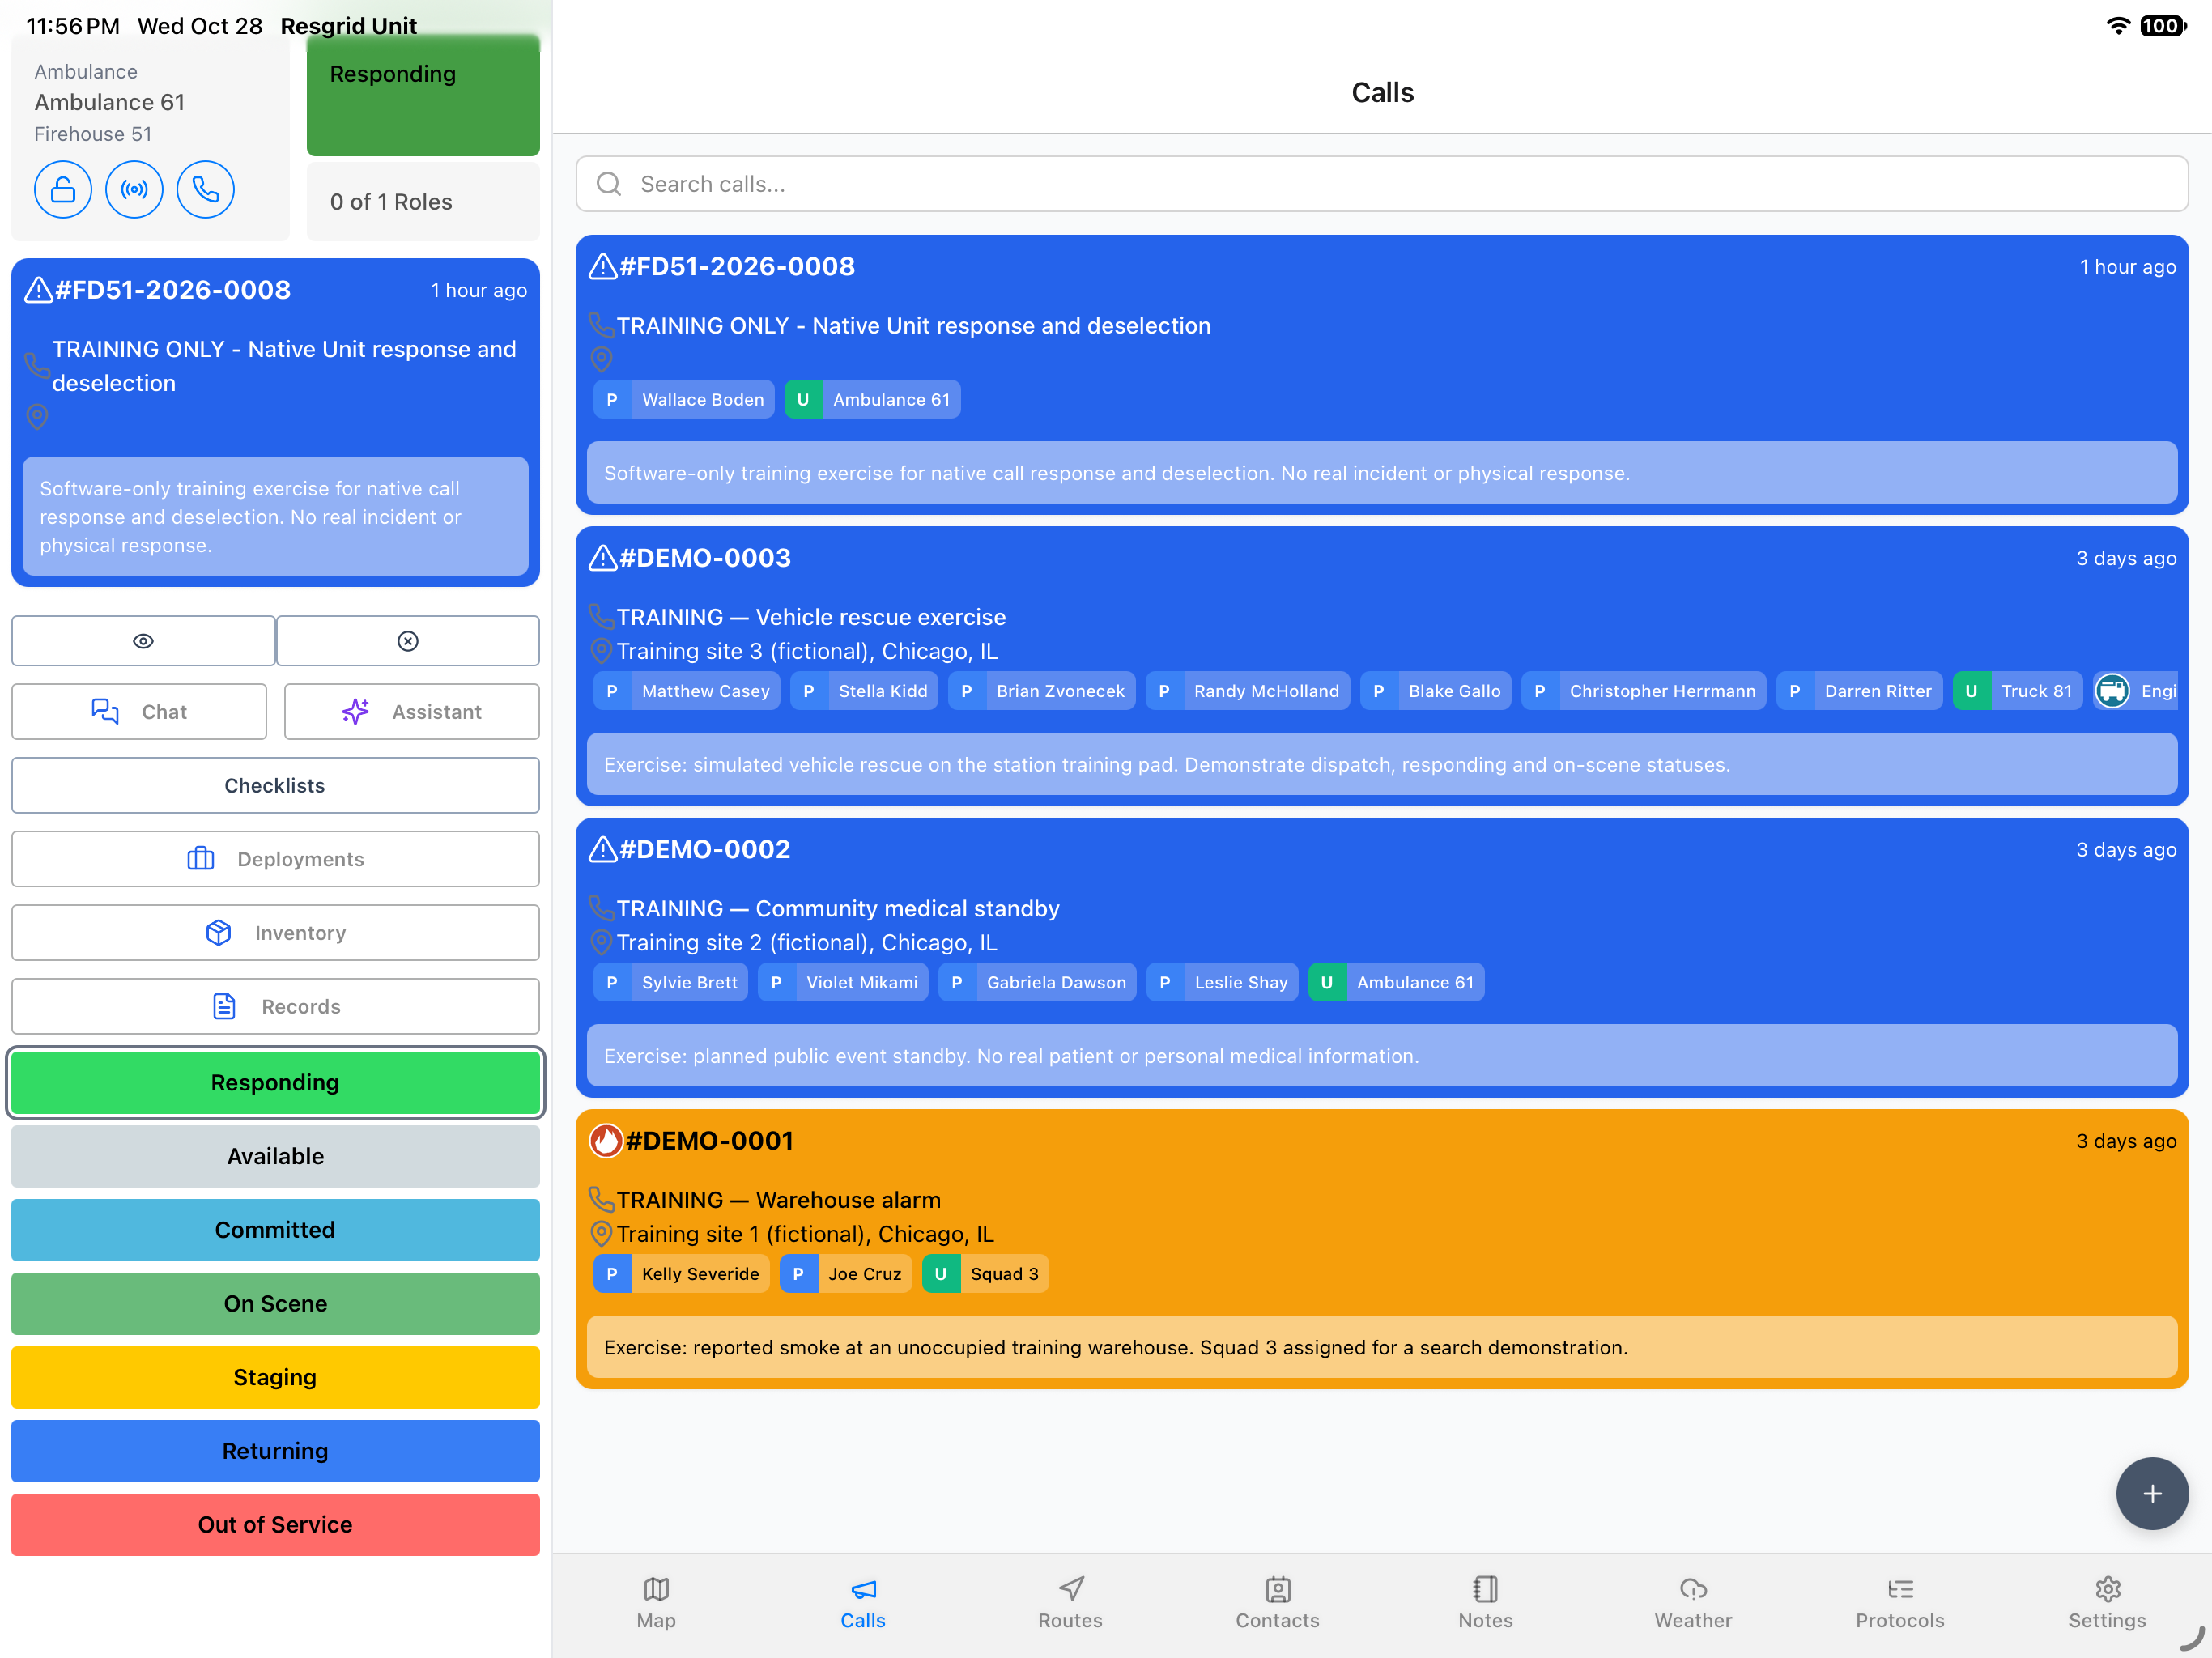
Back in Calls, the sidebar now shows Responding and the selected training call. Keep the unit identity, its status and the active call in view when changing tasks. The circle with an X below the active-call card is the Deselect control.
Practice
Locate the unit status and active-call card separately. Identify the circle-X control beneath the selected call.
Step 11
Confirm deselection
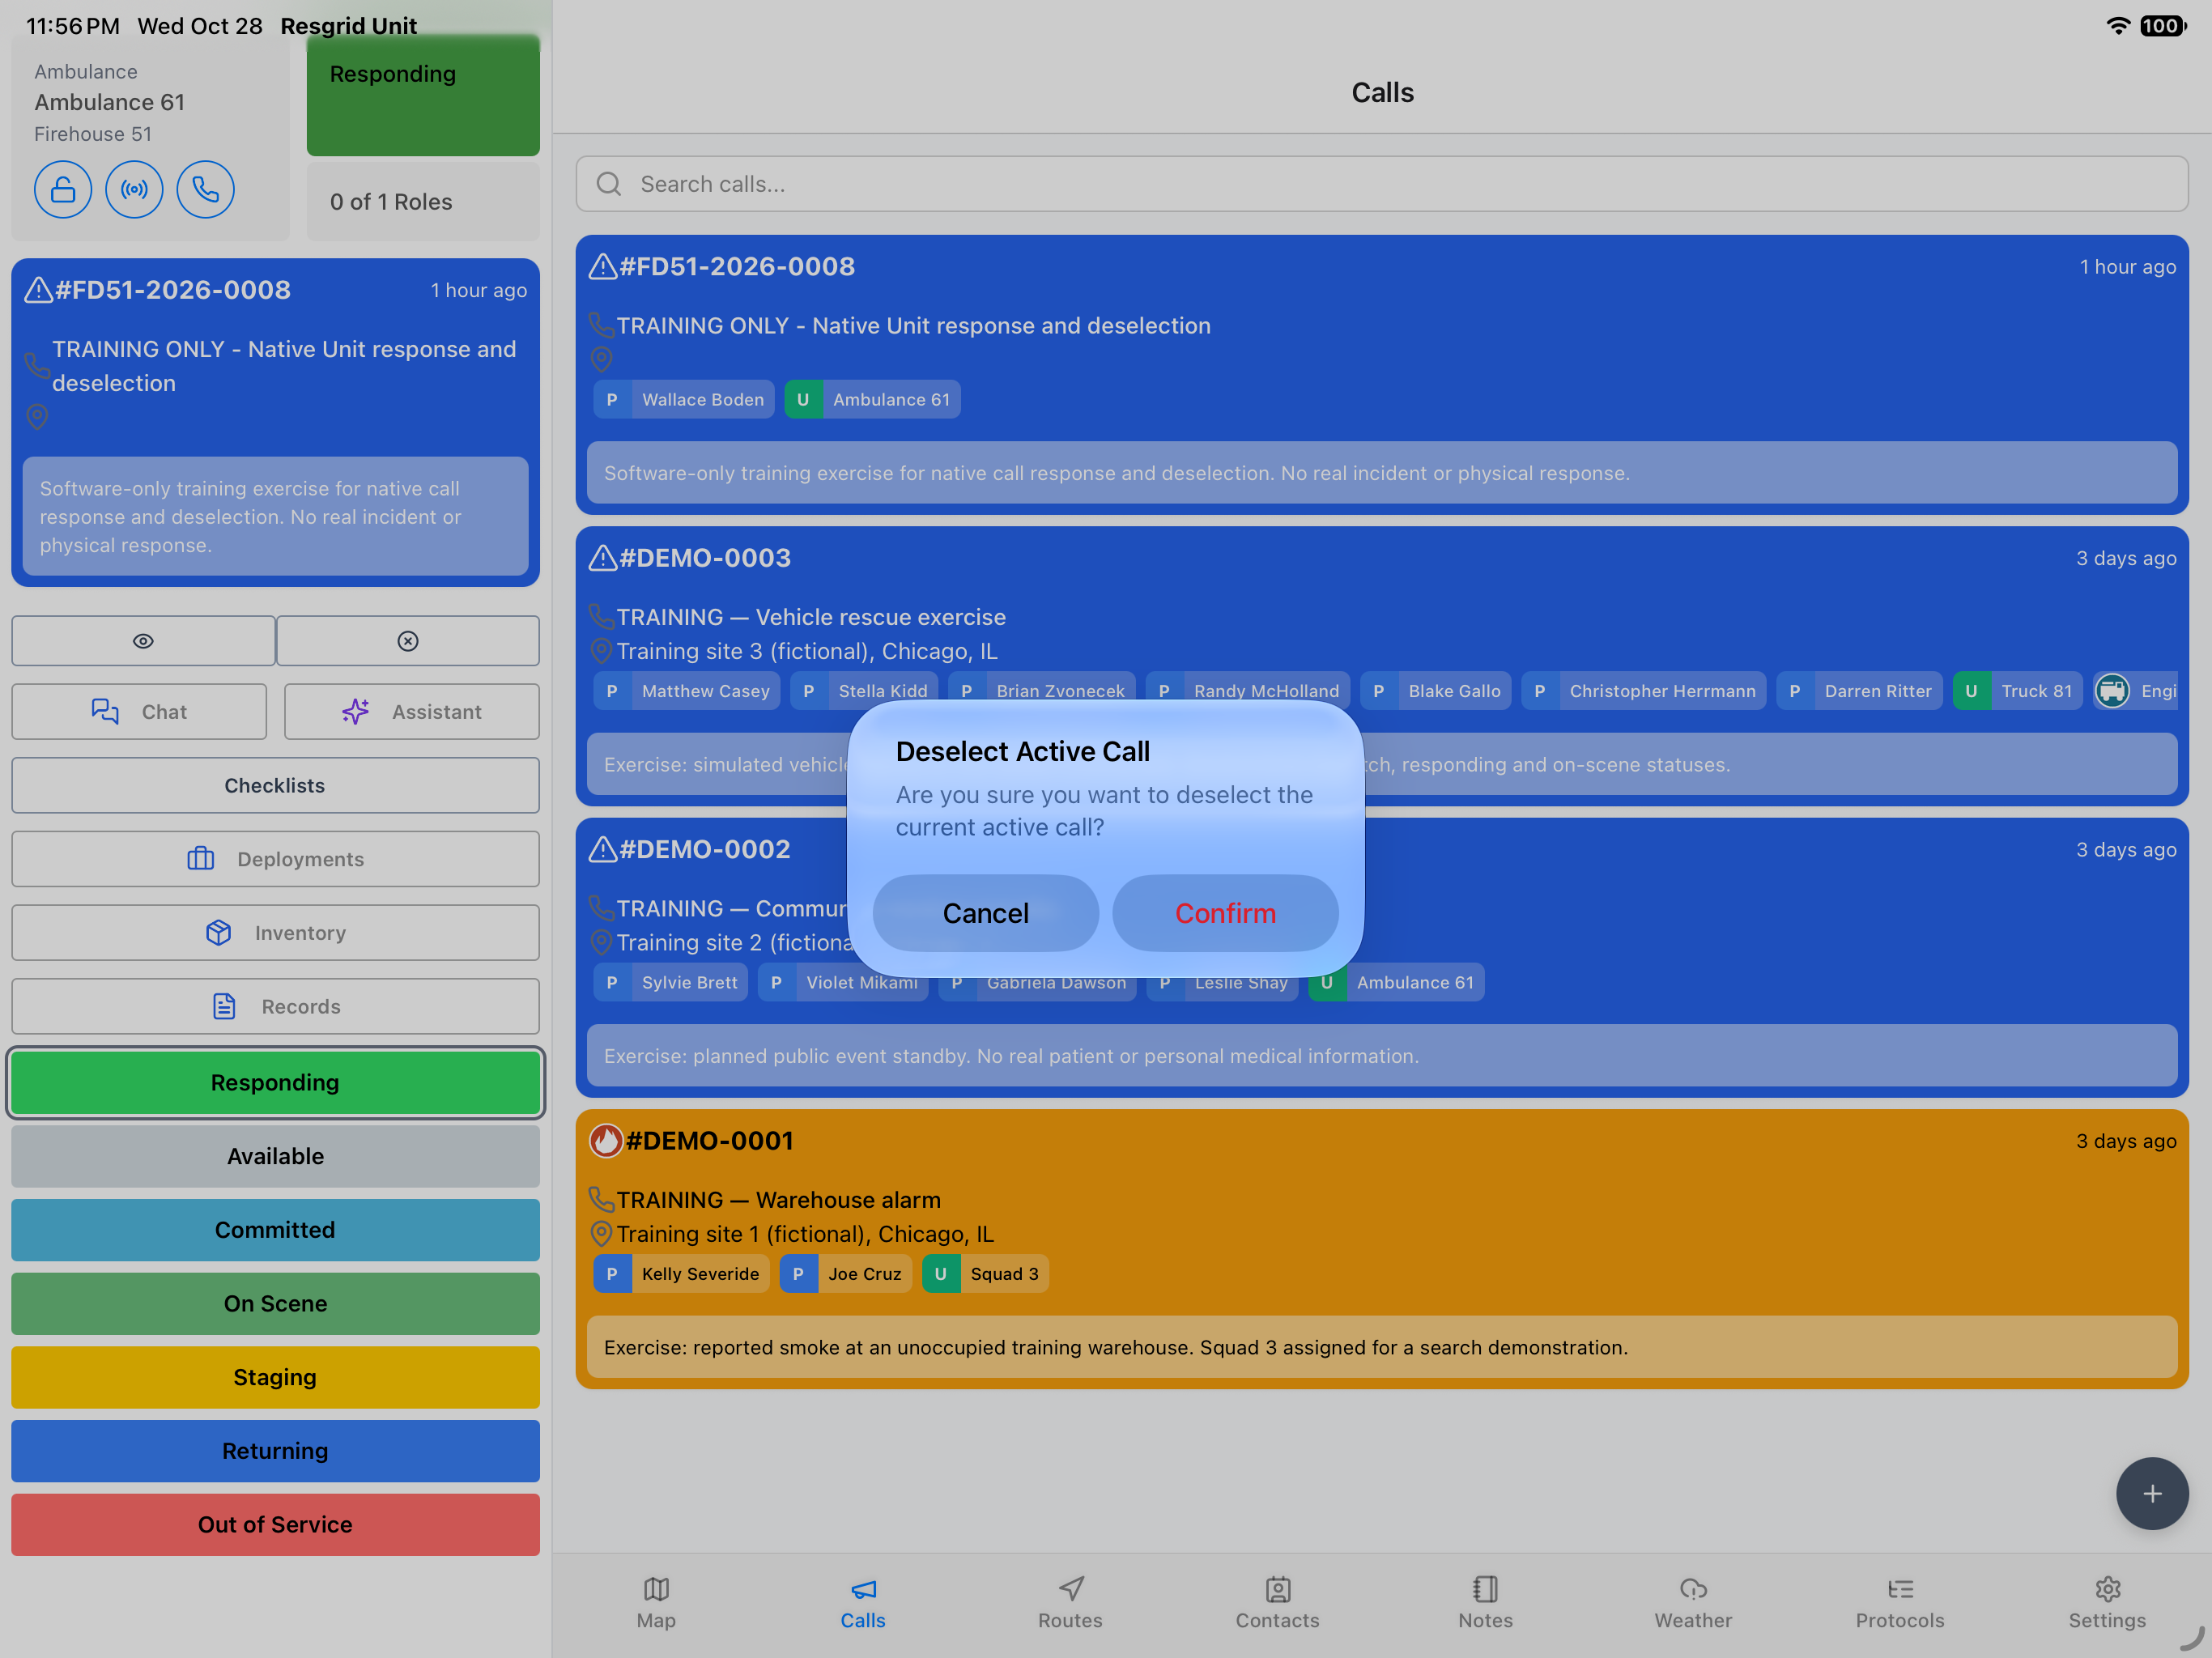
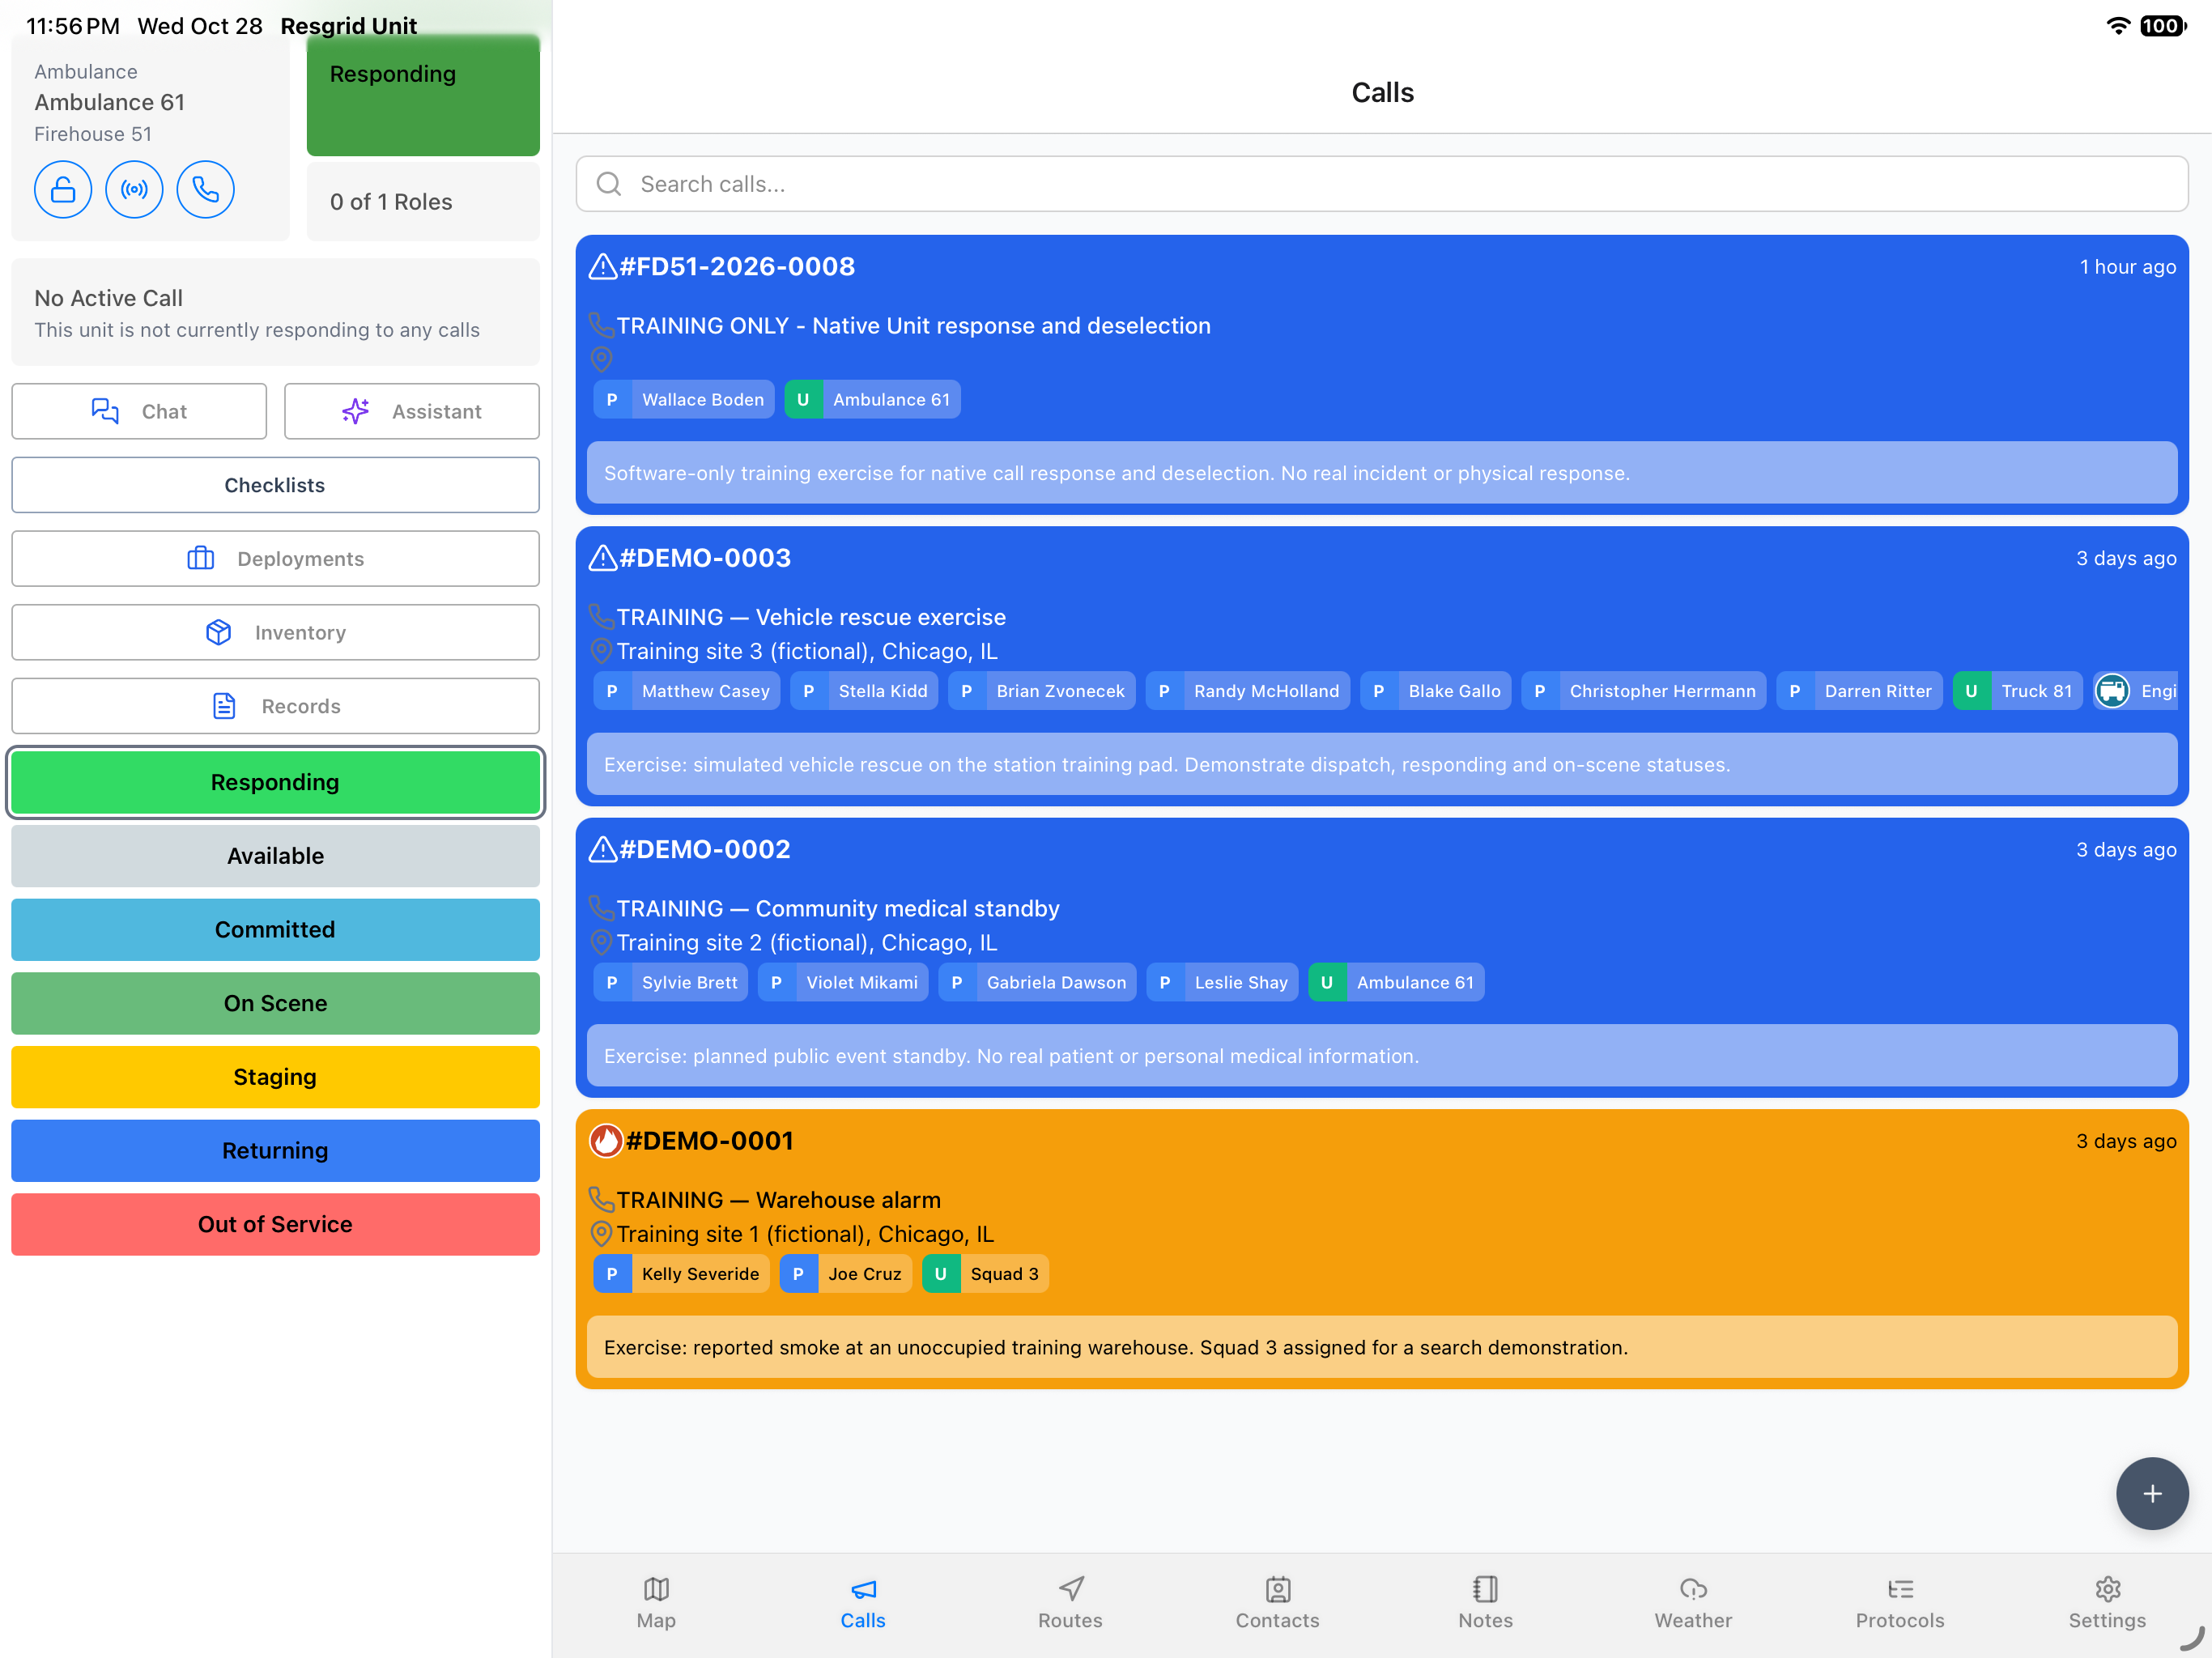
Deselect Active Call asks whether to deselect the current active call. Use Cancel to keep the selection or Confirm to clear it. After Confirm, the sidebar reads No Active Call, while the incident remains in Calls and the unit still reads Responding. Clearing your active selection and closing the department incident are separate operations.
Practice
Read the Deselect Active Call confirmation, choose the appropriate action, and verify that clearing the selection leaves the incident open in Calls.
Step 12
Open the incident closeout action
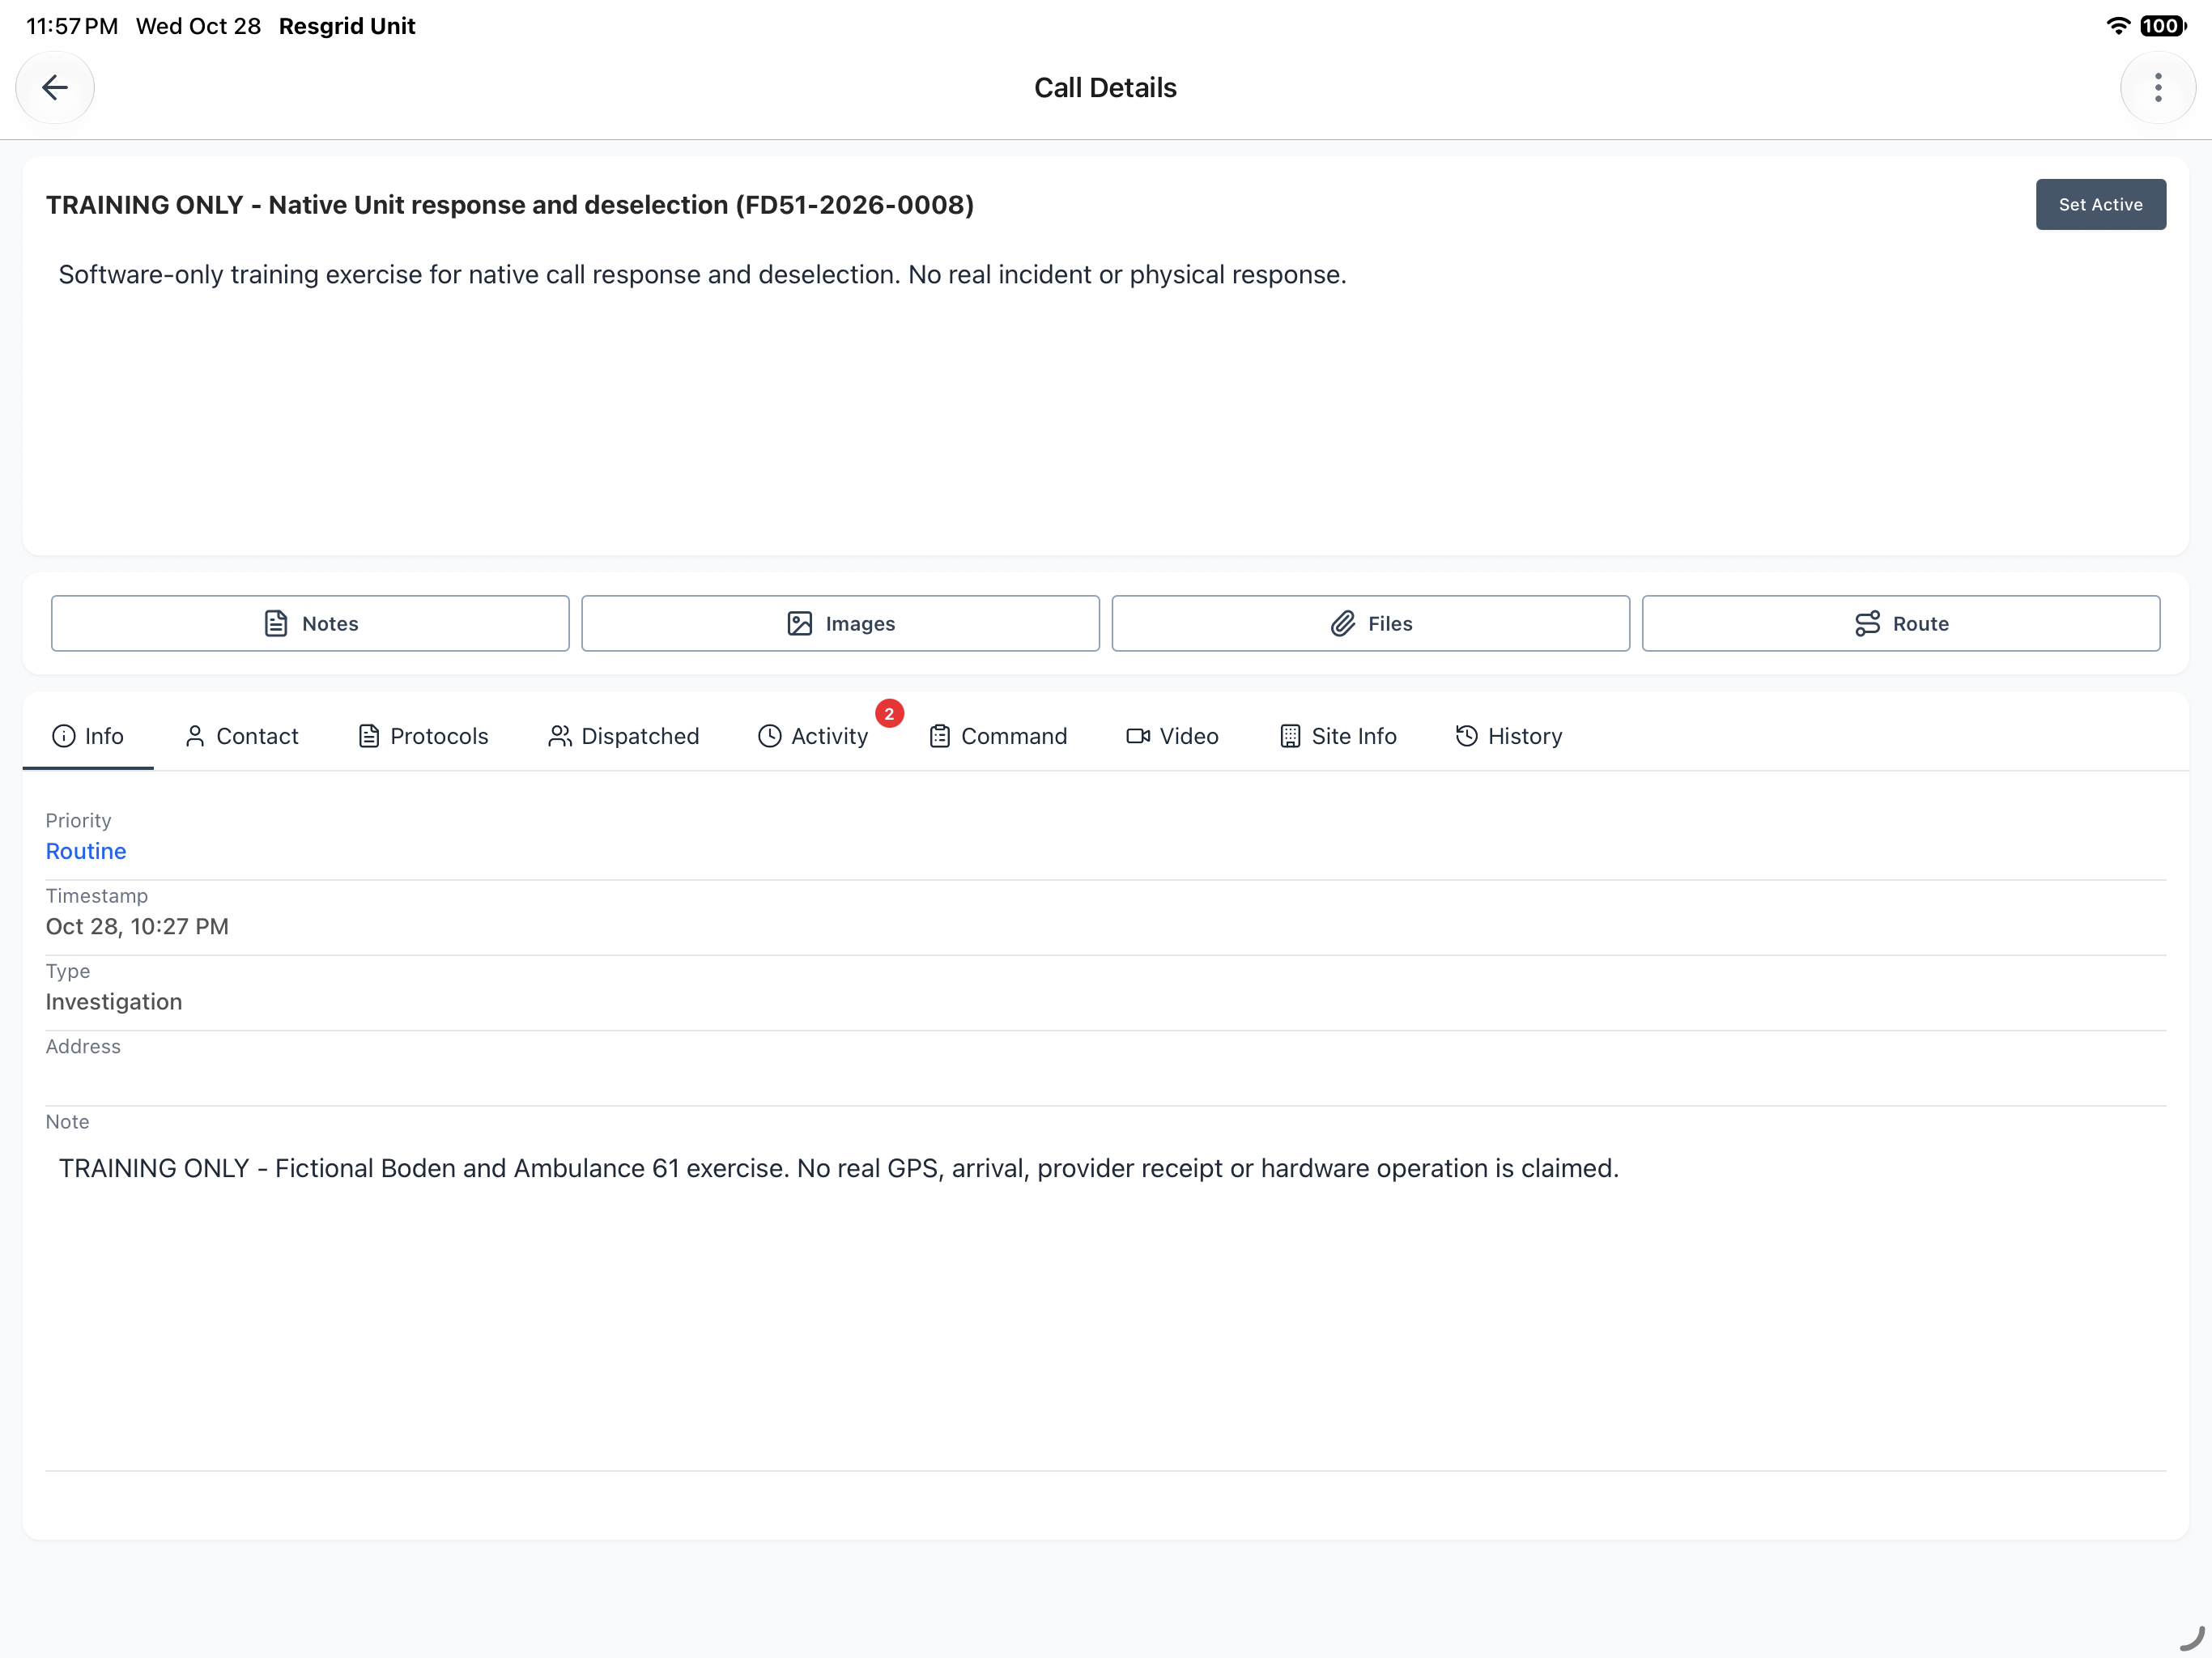
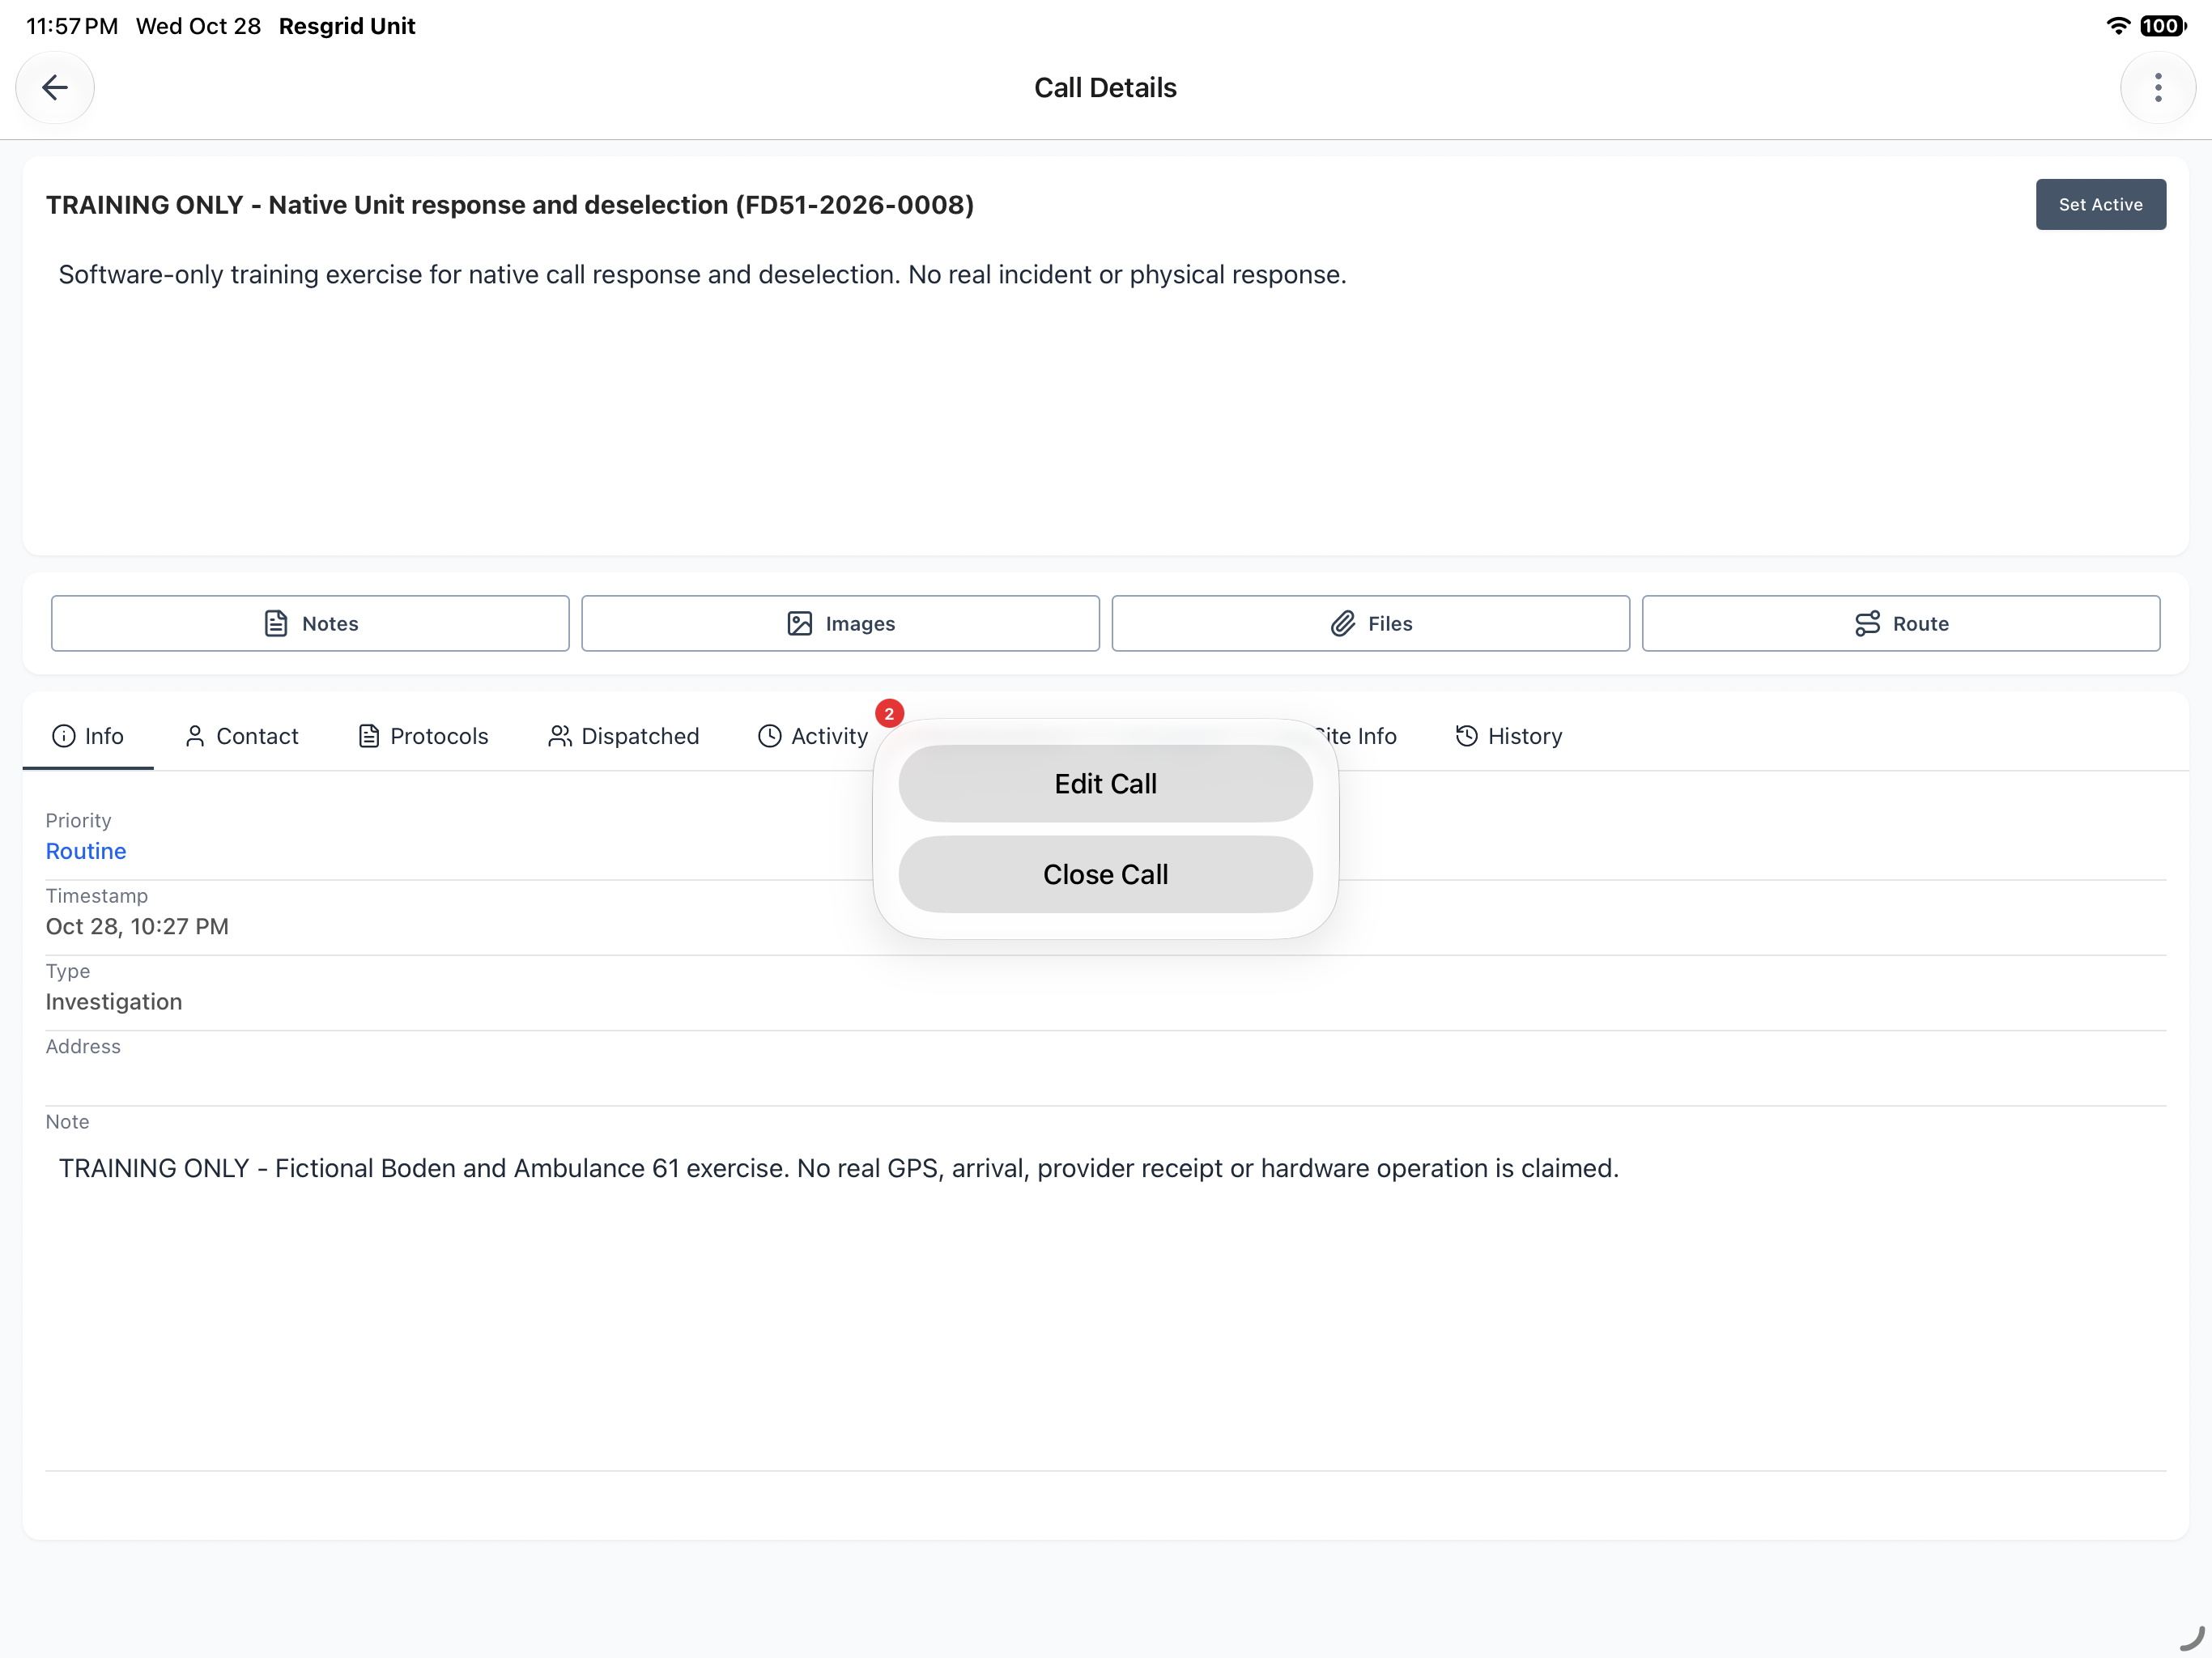
Reopen the same training incident from Calls and confirm its title in Call Details. The three-dot menu at the upper right opens the available incident actions. Edit Call and Close Call are separate choices. Choose Close Call only when you have the authority and the incident is ready for closeout.
Practice
Reopen the intended incident, verify its title and use the three-dot menu to distinguish Edit Call from Close Call.
Step 13
Read closeout defaults before submitting
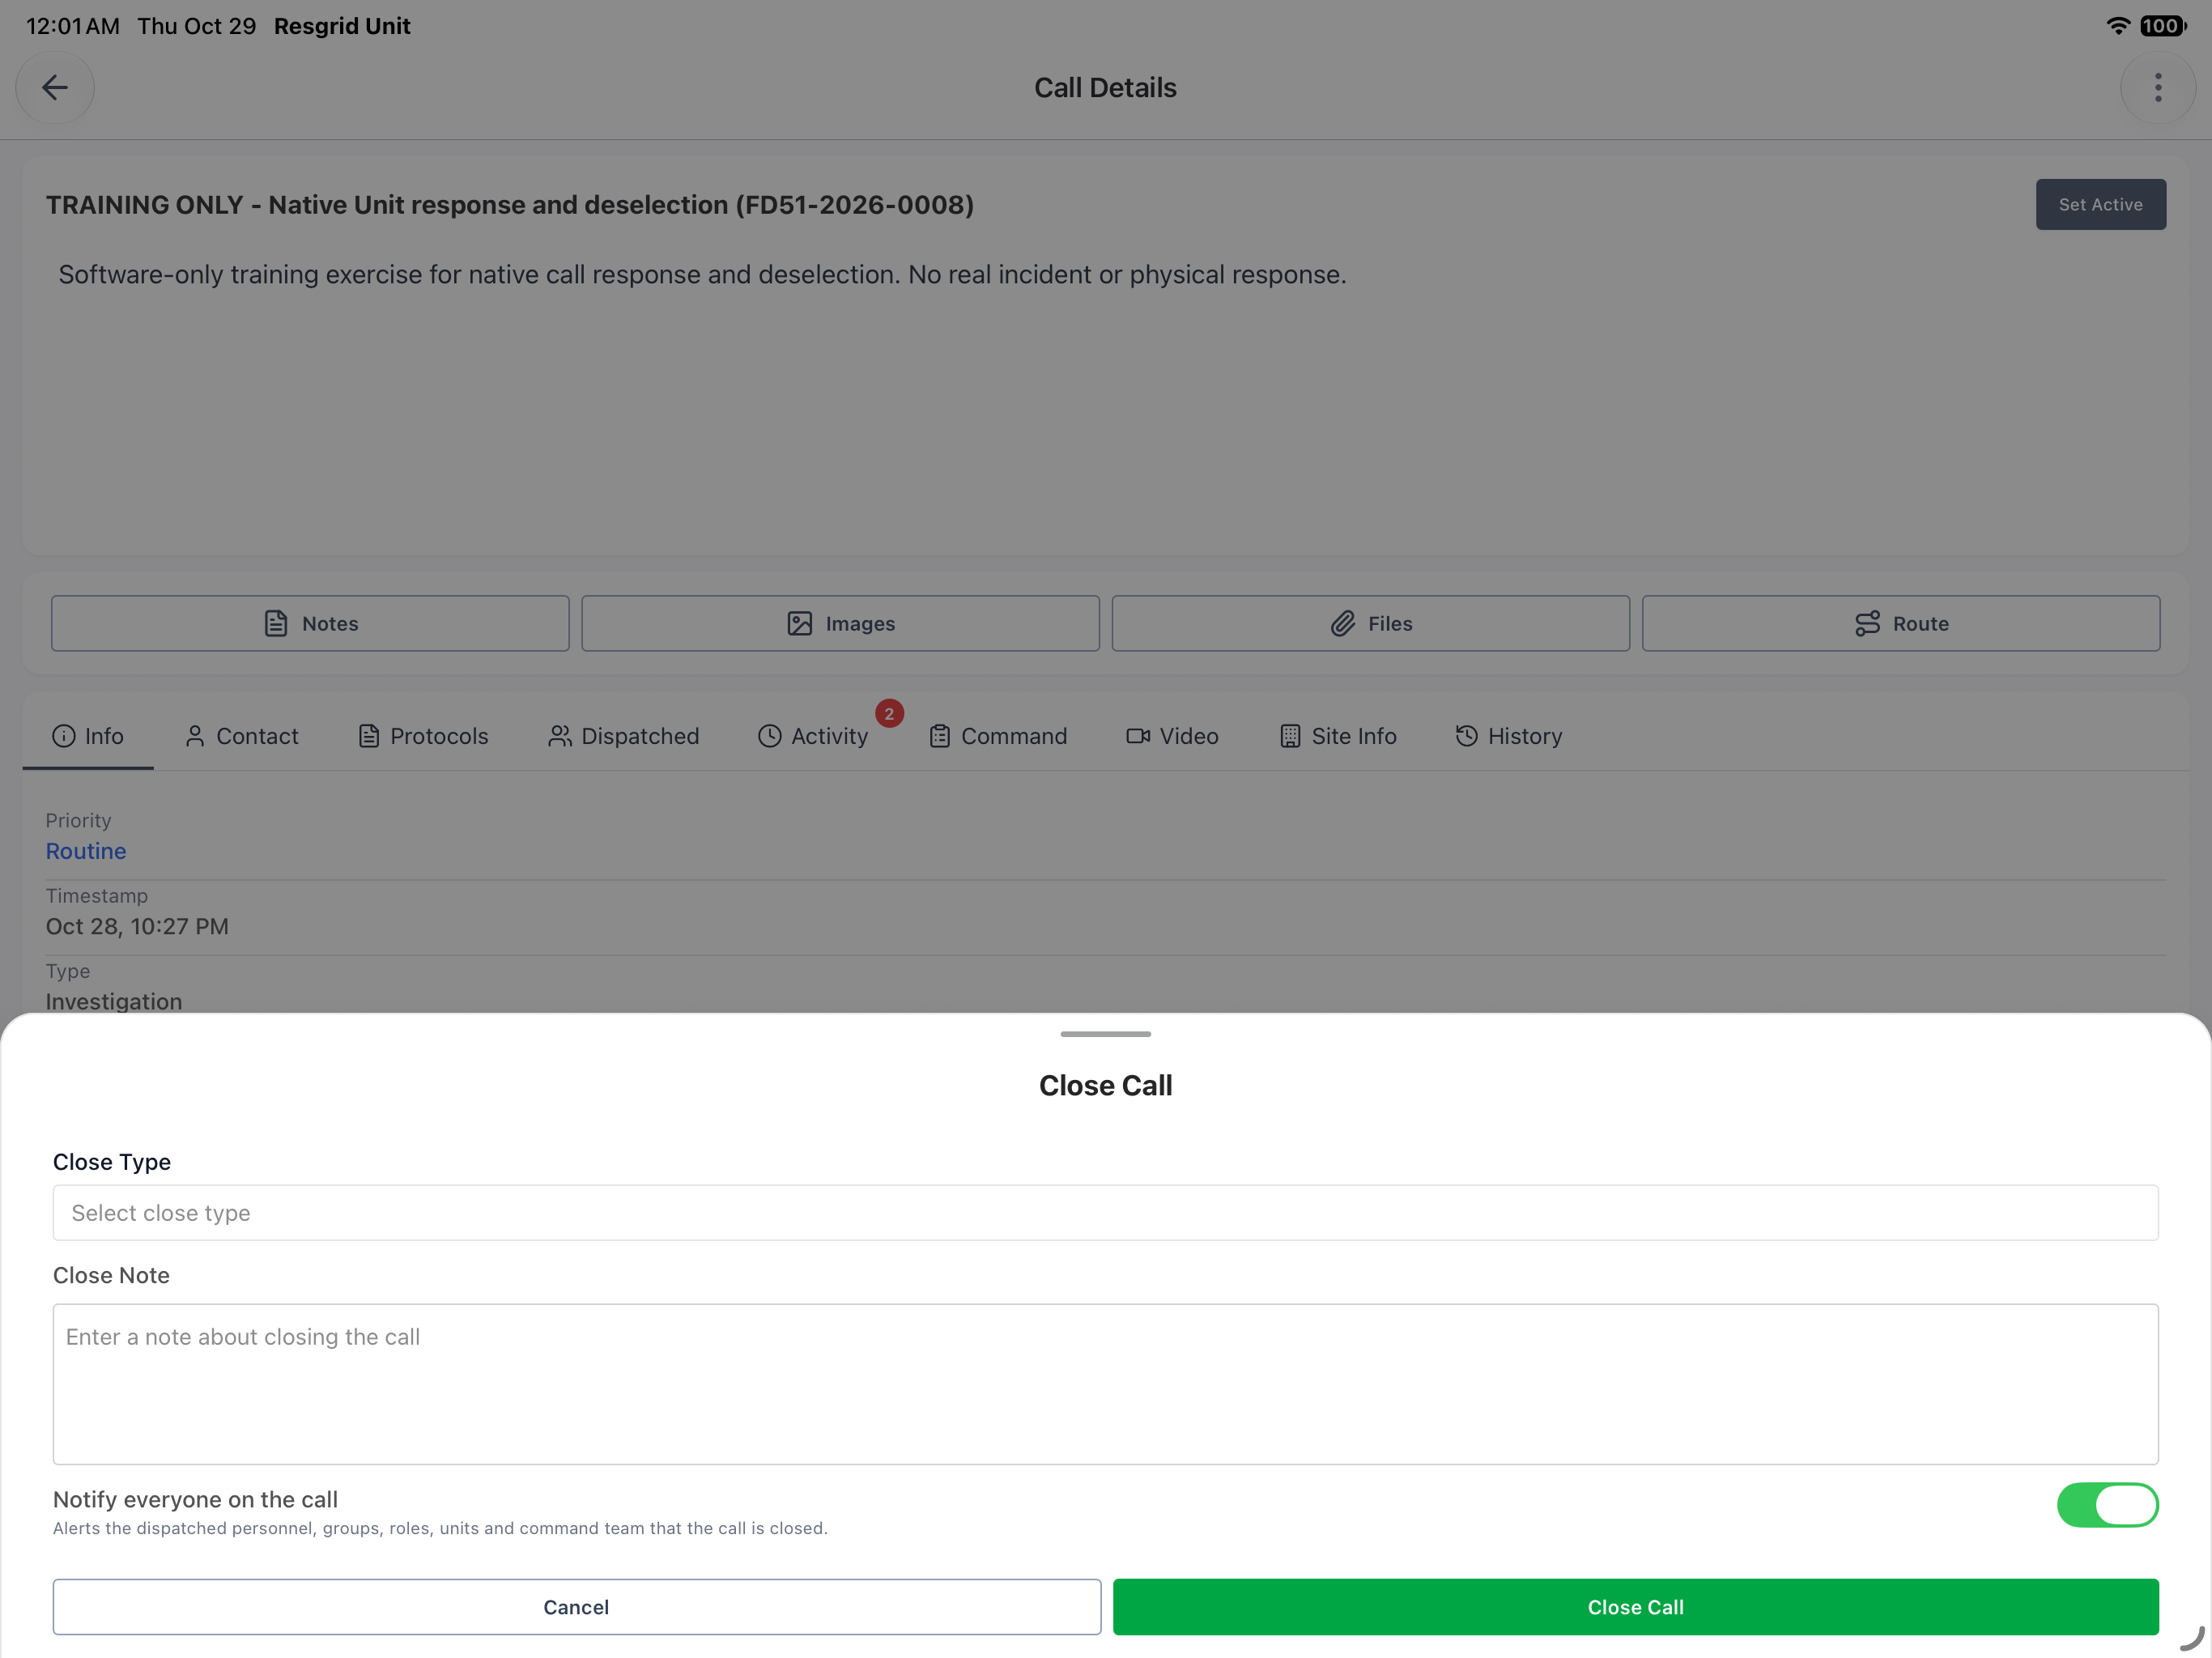
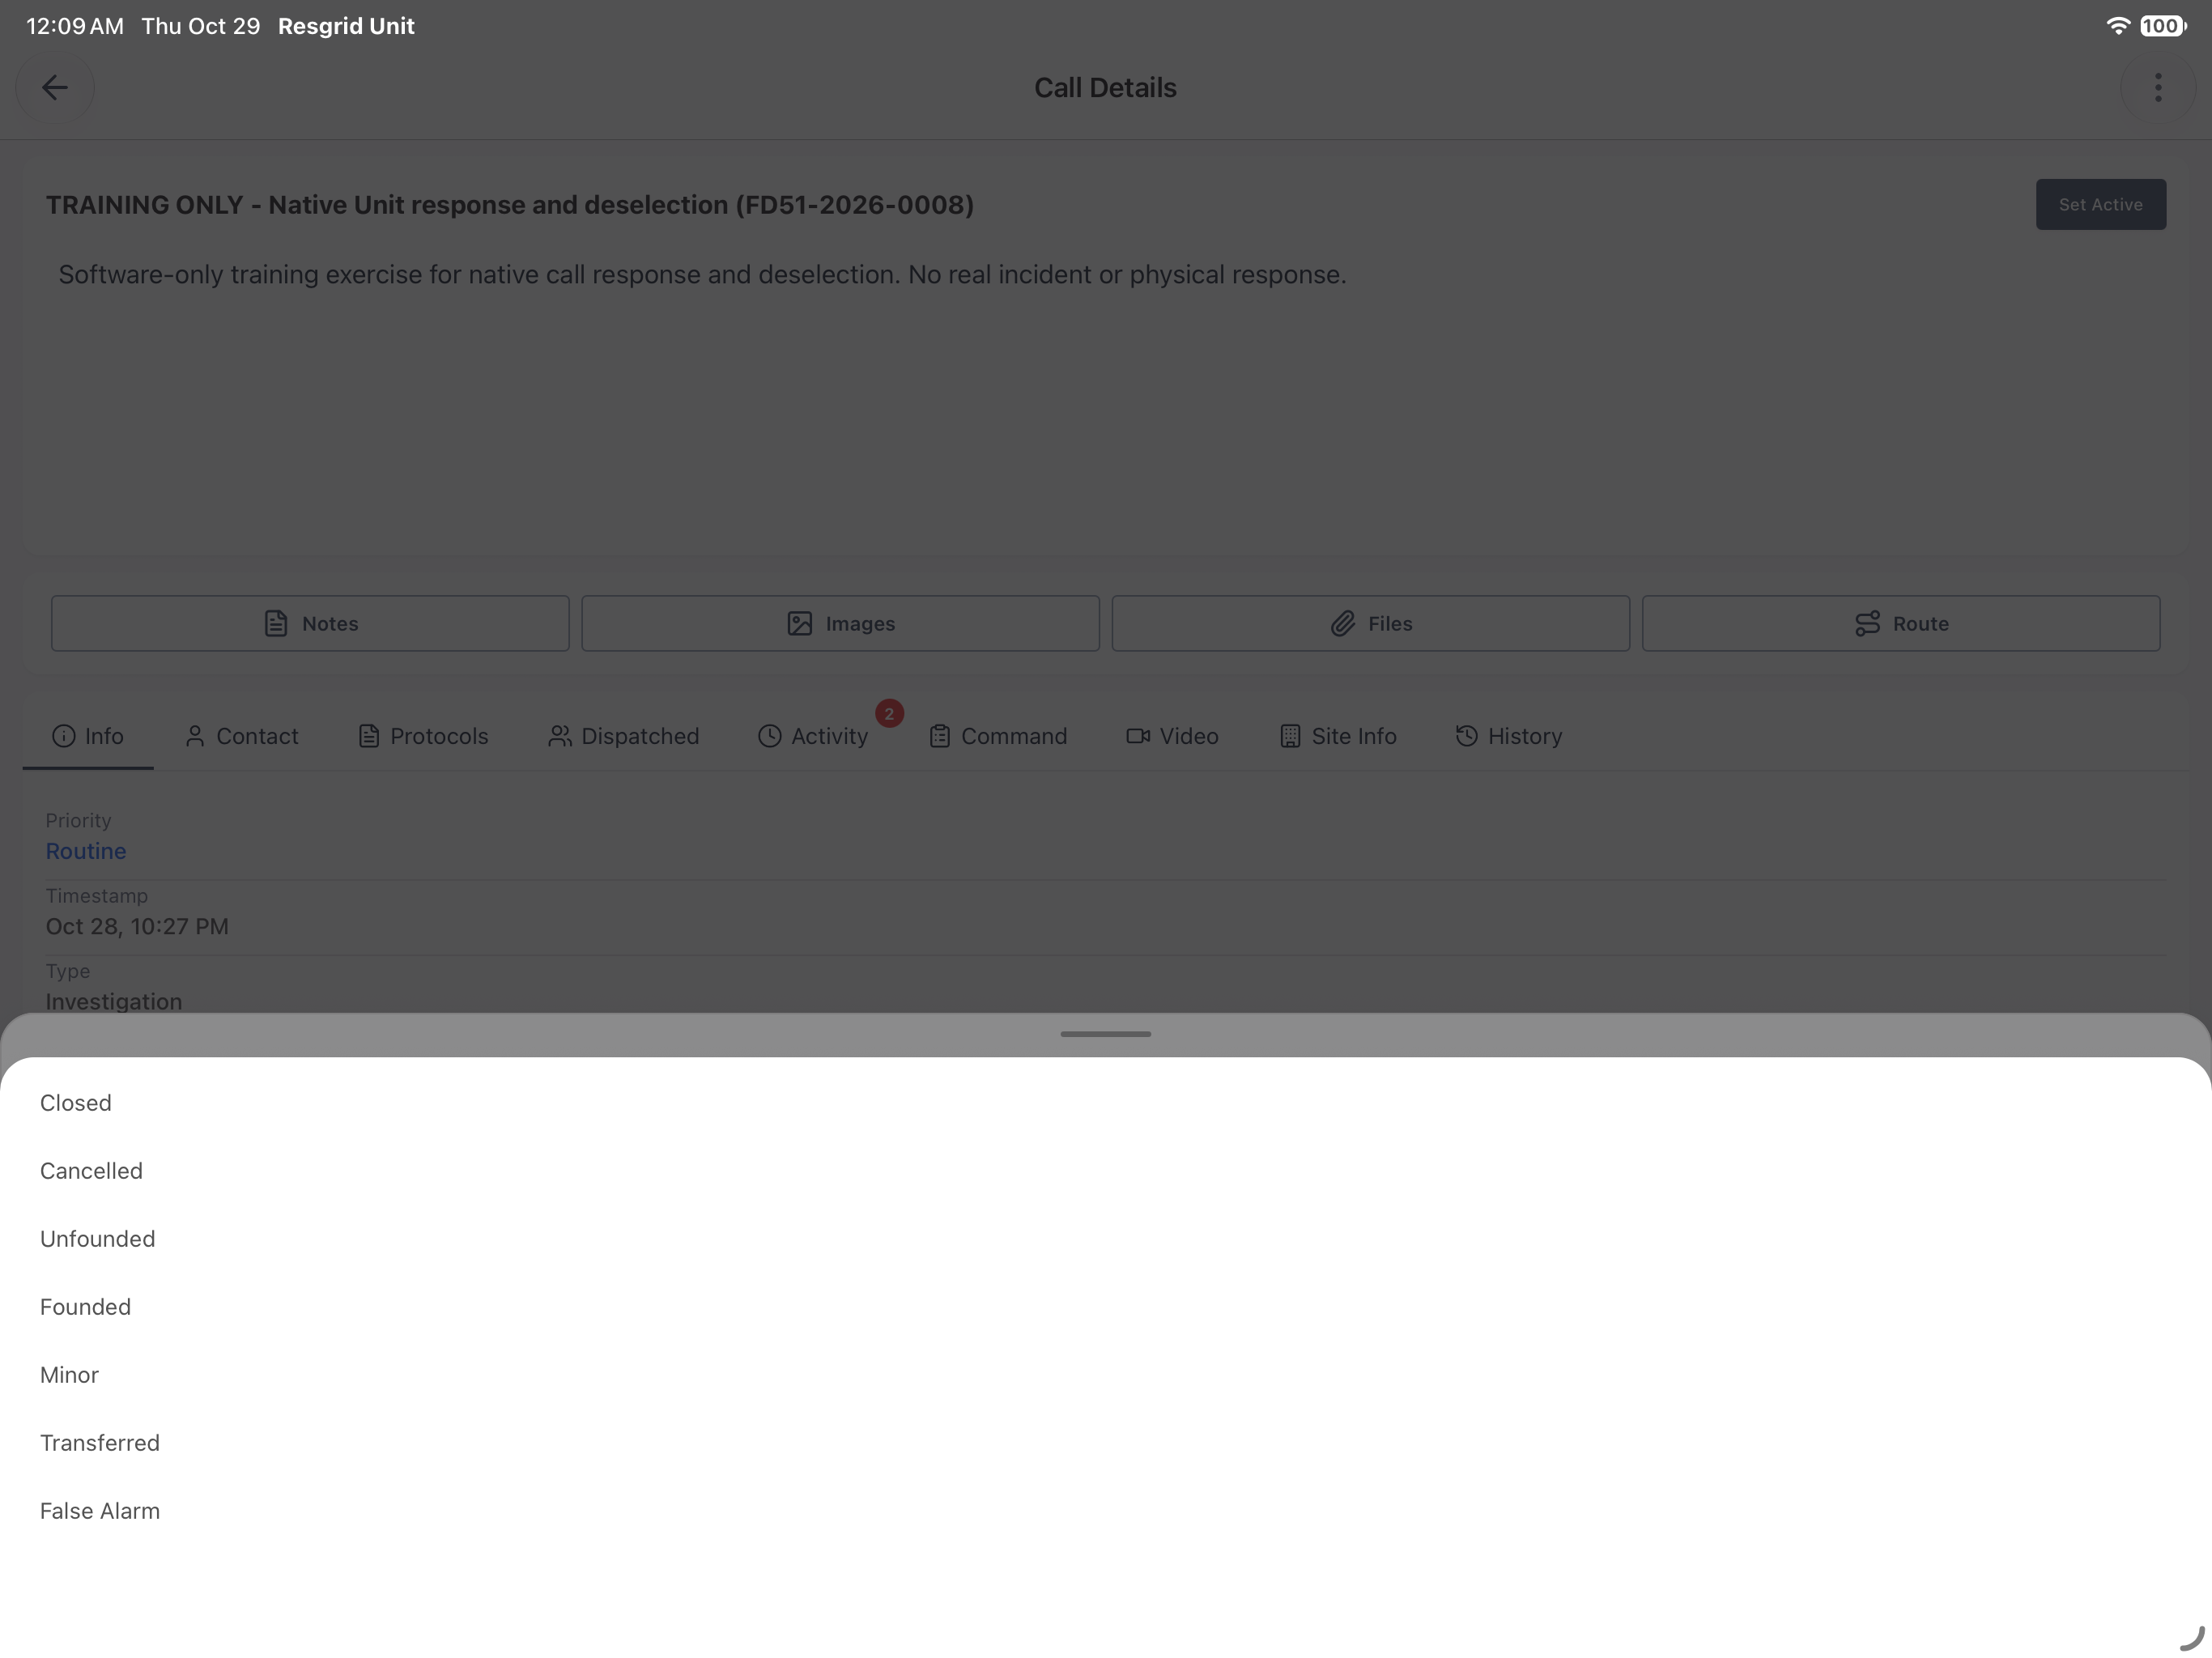
The Close Call sheet requires a Close Type and provides a Close Note. Notify everyone on the call is enabled in this recorded starting state. Review that setting explicitly because the sheet describes alerting the dispatched personnel, groups, roles, units and command team. Close Type offers Closed, Cancelled, Unfounded, Founded, Minor, Transferred and False Alarm.
Practice
Read the closeout defaults, available close types and notification audience before preparing the final action.
Step 14
Finish the practice call deliberately
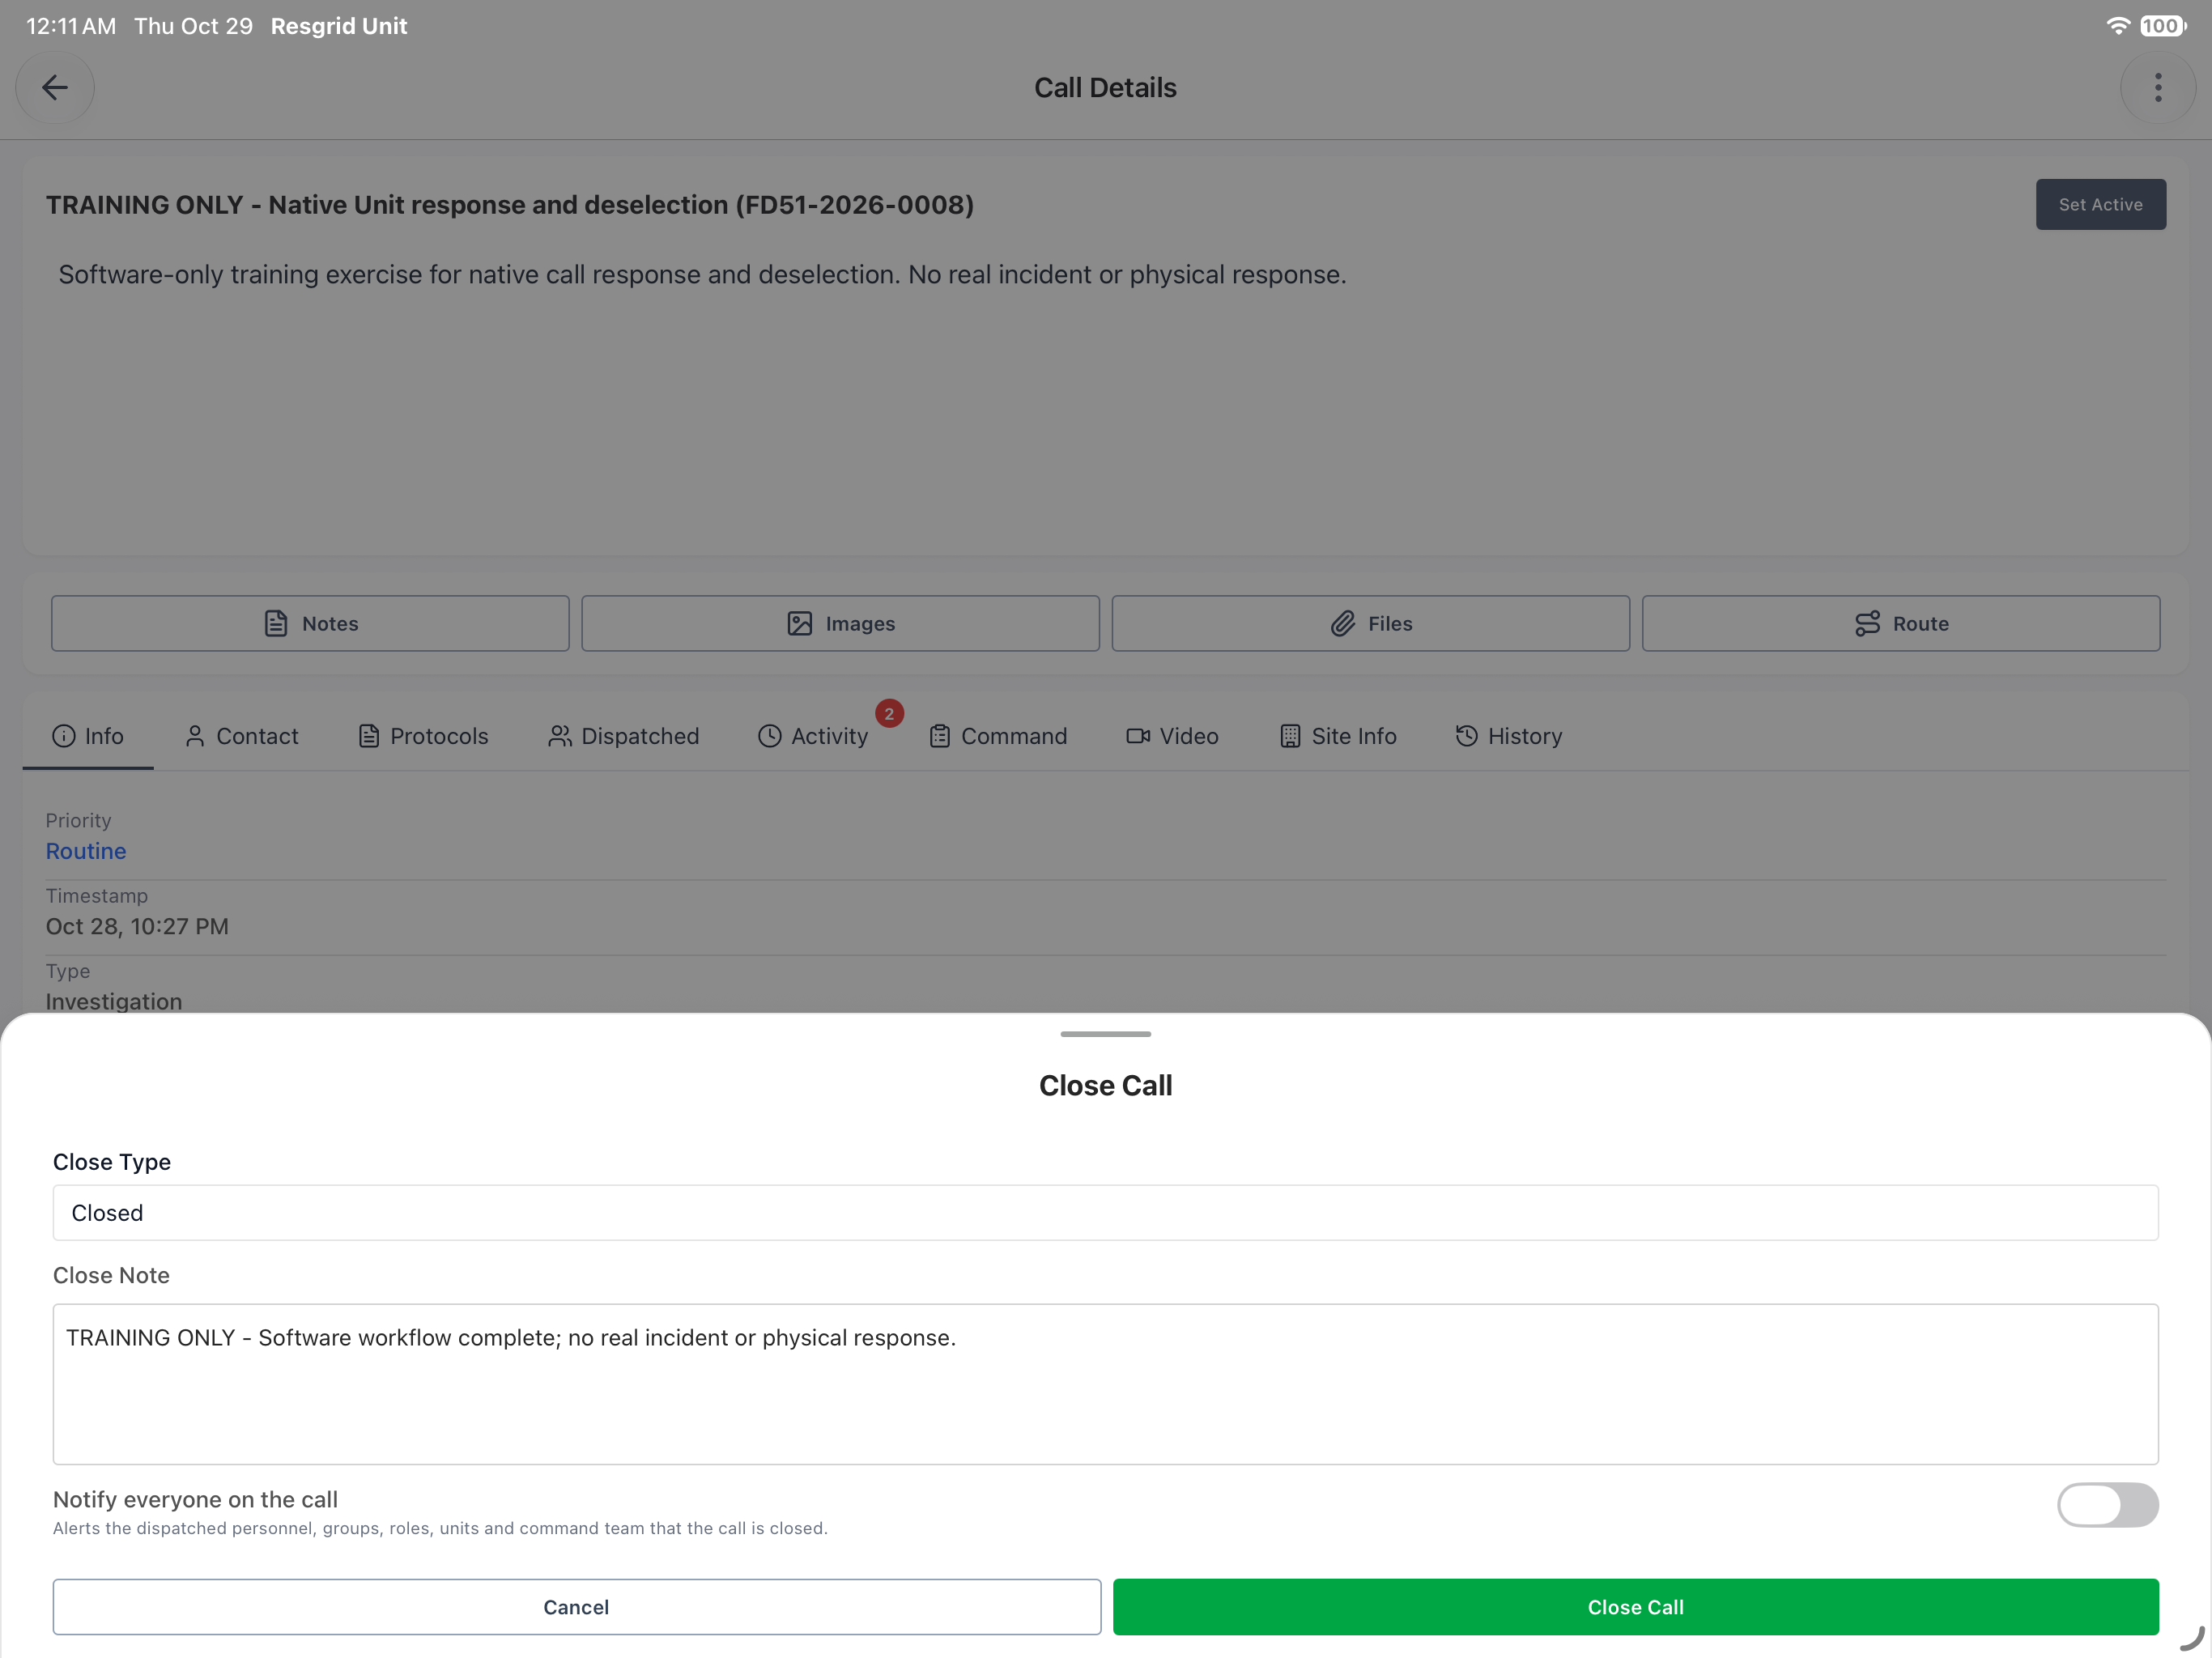
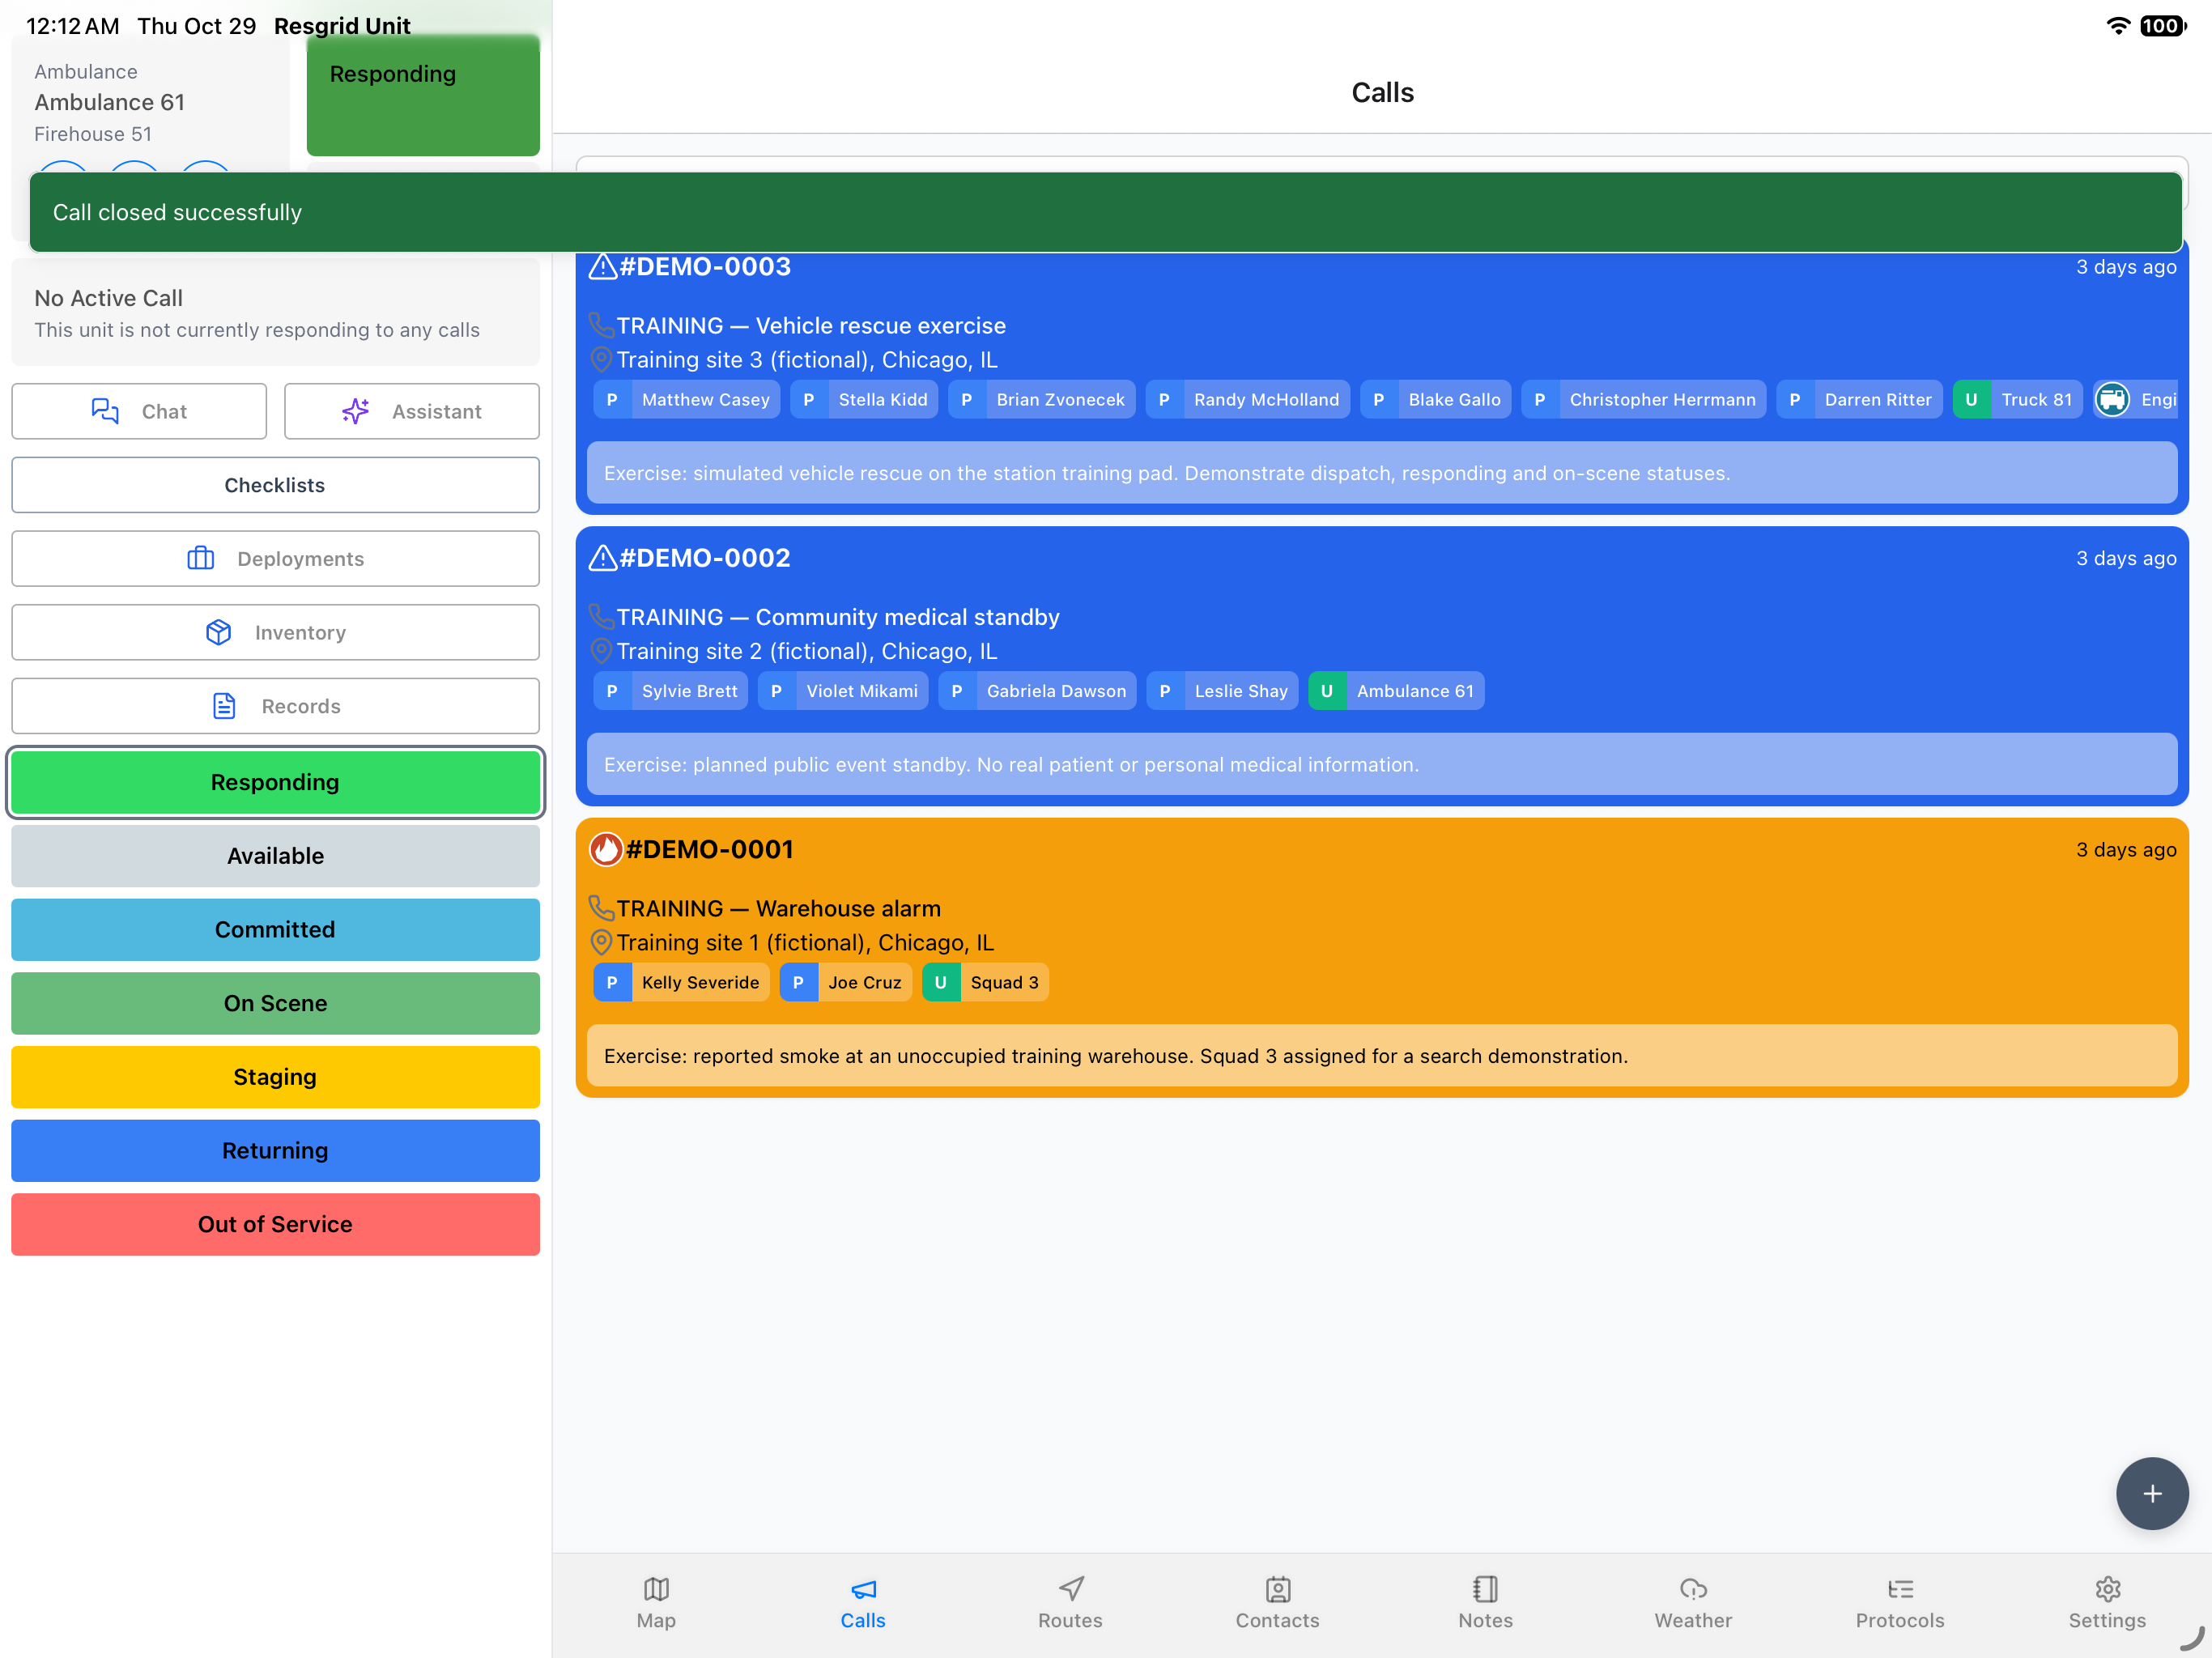
Our example selects Closed and enters a Close Note explaining that the software workflow is complete. Notify everyone on the call is off for this local exercise. Check the call identity and closeout information, then use the green Close Call button once. The app returns Call closed successfully and shows No Active Call. The three earlier training calls remain listed, and this immediate view still shows the cached Responding status.
Practice
For the permitted training incident, choose Closed, explain the practice closeout, review the notification switch and inspect the returned close result.
Step 15
Verify the final state and apply the workflow
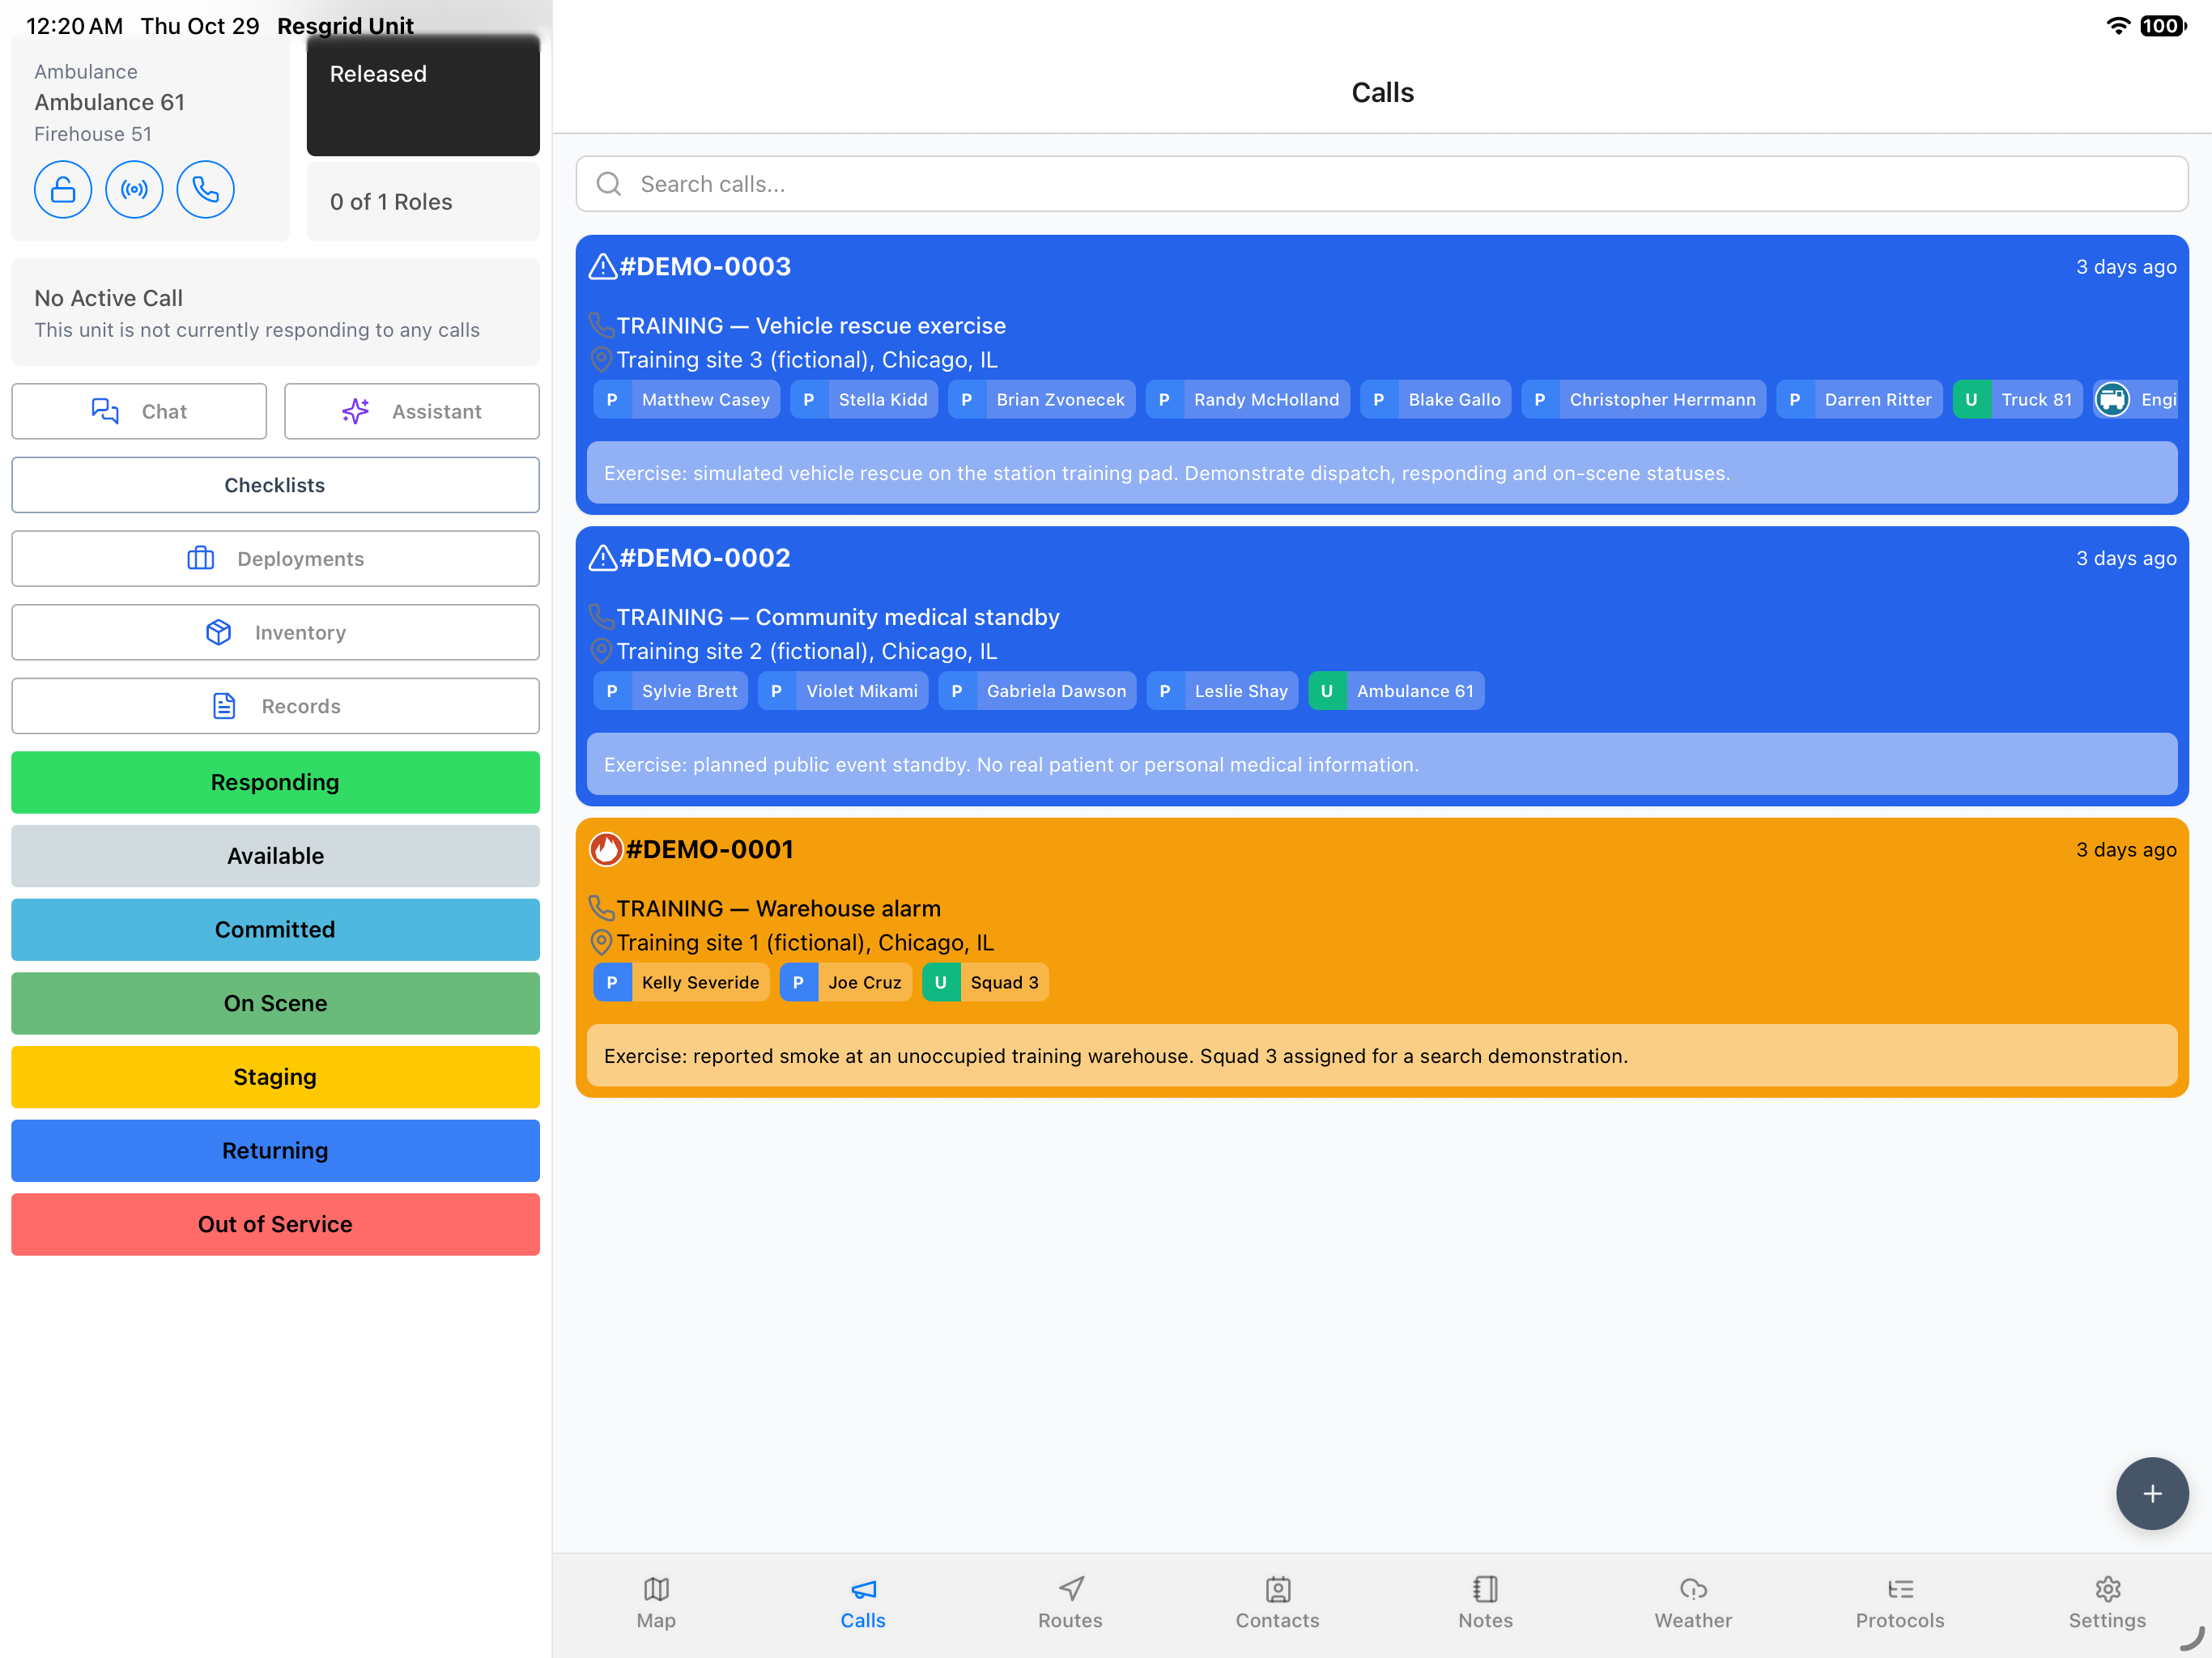
A fresh app readback shows Released, No Active Call and the original three training incidents. Released is the observed final status here; it should not be described as an Available selection or evidence of physical readiness. Use these same identity, selection and closeout checks for a community paramedicine car, a mental health response team, a search and rescue vehicle, a security patrol, a wildland crew or an industrial response unit. The names in this example are fictional training data; choose the statuses, audience and incident details that fit your department.
Practice
Read the fresh unit status, active-call selection and remaining incidents. Distinguish the observed Released state from an Available choice or physical readiness.
Examples for your department
- Fire / EMS
- An apparatus operator checks the incident identity, saves an appropriate training response status and distinguishes unit selection from department incident closure.
- Community response
- A community paramedicine vehicle or mental health response team confirms its intended assignment, audience and status while protecting actual client information under department procedures.
- Search and rescue
- A search vehicle checks the incident and selected destination before reporting a status, then separates leaving its active selection from closing the operation.
- Security
- A security company patrol reviews the requested response and dispatch audience, keeps its selected assignment distinct from its vehicle status and uses incident closeout only with authority.
- Wildland
- A wildland contractor vehicle or crew verifies the incident, chosen status and response destination, then reviews the closeout audience under its contracting and command procedures.
- Industrial
- An industrial emergency response unit confirms the correct training incident and dispatch audience, records a software status update and verifies the resulting incident and unit states.
Transcript
Download transcriptRead the complete transcript
Unit: create, select, respond to and close a call
Audience: Unit operators, Field supervisors, Department trainers

Confirm the unit and open a new call
The Unit app keeps a vehicle or operational team in view while you work its calls. Here, the Calls screen shows Ambulance Sixty-one and No Active Call. The roles card reads zero of one, so this recording does not establish a staffed crew. Use the circular plus button at the lower right to open a new call when your department permits you to create one.
Practice: Confirm your selected training unit, active-call state and crew display, then open the plus control for a permitted new training call.

Give the call a useful identity
In New Call, enter a clear Name and a useful Nature description. Our example is explicitly labeled training only and describes a software exercise. Review Priority and Type; this practice call uses Routine and Investigation. Use Note for additional context that belongs with the call. Choose names and classifications that make sense to your own operation rather than copying a firehouse example into live work.
Practice: Enter a useful training name and nature, then check the department priority, call type and supporting note before continuing.

Review location inputs
Call Location provides Address, GPS Coordinates, what3words and Plus Code fields, along with Select Location on Map. Destination POI is a separate choice and currently reads No destination selected. This software-only exercise leaves the location and contact inputs empty; a real assignment needs the location information required by your operating procedure. A visible location field does not establish that a device has supplied GPS coordinates or that an address lookup has succeeded.
Practice: Identify each location and contact input. For a real assignment, follow your department location procedure; this exercise does not demonstrate a successful lookup or device GPS.

Check the actual dispatch audience
In Select Dispatch Recipients, review individual users as well as the broad Everyone option. Wallace Boden is checked here, while Everyone remains unchecked. In the Units section, Ambulance Sixty-one is also selected, bringing this exercise to two selected recipients. Confirm retains that reviewed audience; it does not demonstrate that a recipient has received a notification.
Practice: Review the actual checked users and units. Confirm the intended audience instead of assuming Everyone is selected or a notification was received.

Create once and inspect the returned call
Back on New Call, verify Dispatch To and its two selected recipients. Dispatch Time is blank in this exercise; no future schedule is entered. After reviewing the form, use Create once. The Calls list now contains the new training exercise with Boden and Ambulance Sixty-one shown on its card.
Practice: Check Dispatch To and Dispatch Time, create the reviewed training call once, and identify its returned card in Calls.

Read details before selecting the call
Open the training call and check its identity in Call Details. This saved exercise has a department call number ending in eight, and its Info view retains Routine, Investigation and the original note. Choose Set Active for the incident you intend to work. The app reports Call set as active and opens Select Status.
Practice: Read the saved call title and number, priority, type and note before choosing Set Active for the intended incident.

Choose the intended response status
Select Status is the first of three steps. The configured choices include Responding, Available, Committed, On Scene, Staging, Returning and Out of Service. Here, Responding is selected; use Next to review its destination.
Practice: Read the configured status choices, select the intended training status and use Next to inspect its destination.

Associate the update with the right destination
Select Destination for Responding distinguishes Calls, Stations and POIs from No Destination. The selected row is our new training incident, ending in eight. Check that identity before using Next, so the status update is associated with the intended call.
Practice: Compare the selected destination call with the incident you intend to work, then continue only when the identity matches.

Review the note and submit the status
Add Note shows the selected Responding status and the training call together. The optional note makes clear that this is a software exercise. Review the summary, then use Submit to save the update. Status saved successfully is the returned result from that submission.
Practice: Review the selected status and incident together, enter an appropriate optional note, submit once and inspect the returned save result.

Read unit status and active selection separately
Back in Calls, the sidebar now shows Responding and the selected training call. Keep the unit identity, its status and the active call in view when changing tasks. The circle with an X below the active-call card is the Deselect control.
Practice: Locate the unit status and active-call card separately. Identify the circle-X control beneath the selected call.

Confirm deselection
Deselect Active Call asks whether to deselect the current active call. Use Cancel to keep the selection or Confirm to clear it. After Confirm, the sidebar reads No Active Call, while the incident remains in Calls and the unit still reads Responding. Clearing your active selection and closing the department incident are separate operations.
Practice: Read the Deselect Active Call confirmation, choose the appropriate action, and verify that clearing the selection leaves the incident open in Calls.

Open the incident closeout action
Reopen the same training incident from Calls and confirm its title in Call Details. The three-dot menu at the upper right opens the available incident actions. Edit Call and Close Call are separate choices. Choose Close Call only when you have the authority and the incident is ready for closeout.
Practice: Reopen the intended incident, verify its title and use the three-dot menu to distinguish Edit Call from Close Call.

Read closeout defaults before submitting
The Close Call sheet requires a Close Type and provides a Close Note. Notify everyone on the call is enabled in this recorded starting state. Review that setting explicitly because the sheet describes alerting the dispatched personnel, groups, roles, units and command team. Close Type offers Closed, Cancelled, Unfounded, Founded, Minor, Transferred and False Alarm.
Practice: Read the closeout defaults, available close types and notification audience before preparing the final action.

Finish the practice call deliberately
Our example selects Closed and enters a Close Note explaining that the software workflow is complete. Notify everyone on the call is off for this local exercise. Check the call identity and closeout information, then use the green Close Call button once. The app returns Call closed successfully and shows No Active Call. The three earlier training calls remain listed, and this immediate view still shows the cached Responding status.
Practice: For the permitted training incident, choose Closed, explain the practice closeout, review the notification switch and inspect the returned close result.

Verify the final state and apply the workflow
A fresh app readback shows Released, No Active Call and the original three training incidents. Released is the observed final status here; it should not be described as an Available selection or evidence of physical readiness. Use these same identity, selection and closeout checks for a community paramedicine car, a mental health response team, a search and rescue vehicle, a security patrol, a wildland crew or an industrial response unit. The names in this example are fictional training data; choose the statuses, audience and incident details that fit your department.
Practice: Read the fresh unit status, active-call selection and remaining incidents. Distinguish the observed Released state from an Available choice or physical readiness.

Examples for your department
Fire / EMS: An apparatus operator checks the incident identity, saves an appropriate training response status and distinguishes unit selection from department incident closure.
Community response: A community paramedicine vehicle or mental health response team confirms its intended assignment, audience and status while protecting actual client information under department procedures.
Search and rescue: A search vehicle checks the incident and selected destination before reporting a status, then separates leaving its active selection from closing the operation.
Security: A security company patrol reviews the requested response and dispatch audience, keeps its selected assignment distinct from its vehicle status and uses incident closeout only with authority.
Wildland: A wildland contractor vehicle or crew verifies the incident, chosen status and response destination, then reviews the closeout audience under its contracting and command procedures.
Industrial: An industrial emergency response unit confirms the correct training incident and dispatch audience, records a software status update and verifies the resulting incident and unit states.