
IC · Video walkthrough
IC: review incident context, unit readiness and check-in status
Identify the right incident, review its stored location, and compare unit readiness evidence with the call check-in timer state before a handover.
Before you begin
- An authorized signed-in IC session with permission to view the intended incident.
- A fictional training incident for practice and your department's handover process.
Chapters
Watch the walkthrough
Step 1
Identify the incident in Calls
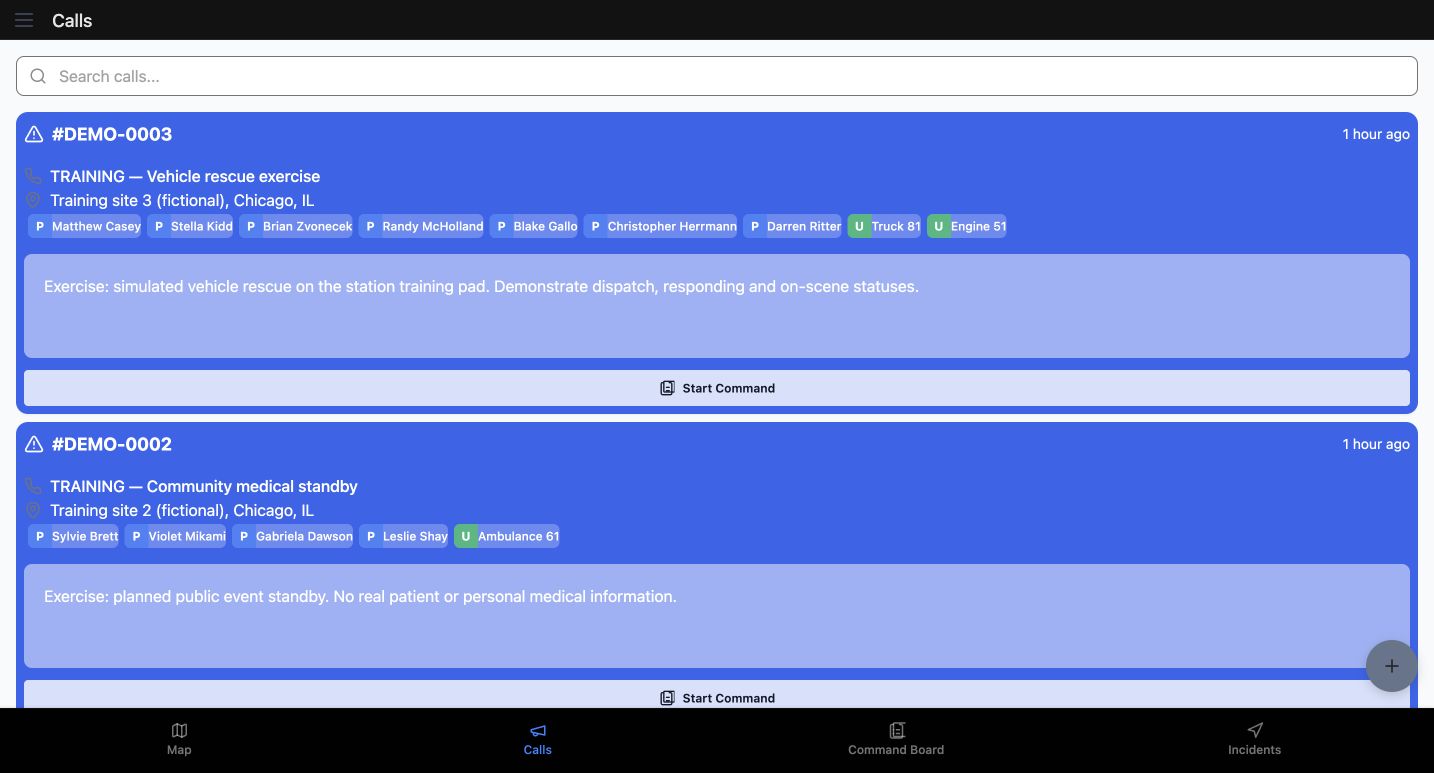
IC gives incident commanders, command aides and supervisors a shared place to review an incident. Begin in Calls. The visible cards identify the Vehicle rescue exercise as DEMO zero zero zero three, and the Community medical standby as DEMO zero zero zero two. Each card brings together its name, location and assigned resources. Read those details together before selecting the incident you intend to review. Search calls is above the list when you need to locate another incident.
Practice
Locate the Calls list and Search calls, then compare the number, name and resource tags on a fictional incident card.
Step 2
Confirm the selected call and command context
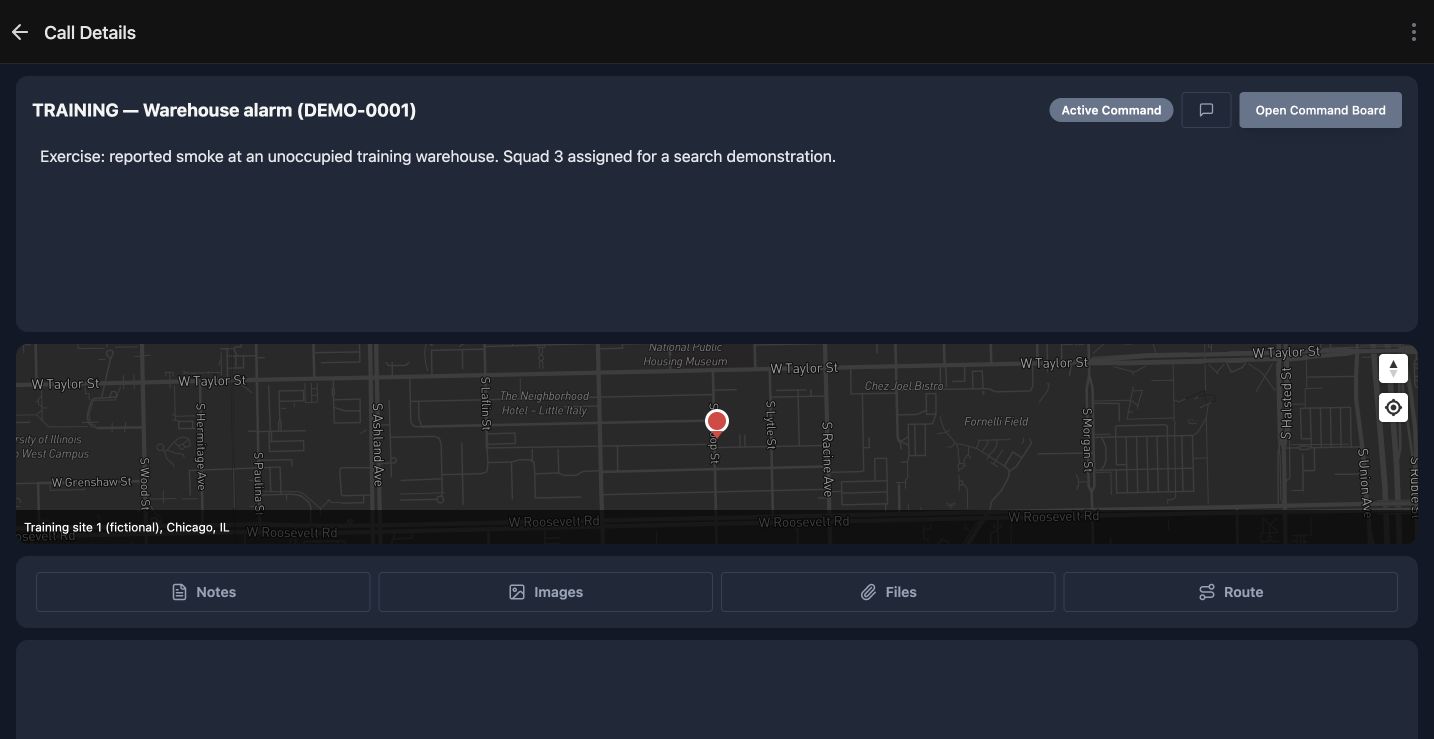
For the detailed review, we use the separate Warehouse alarm exercise, DEMO zero zero zero one. Call Details shows that name and number at the top. Its description says reported smoke at an unoccupied training warehouse, with Squad Three assigned for a search demonstration. Active Command and Open Command Board are visible on the right. Confirm the selected incident before carrying information into a command board; a similar exercise name in the list can refer to a different call.
Practice
Confirm the selected incident number and read the exercise description before identifying Open Command Board.
Step 3
Check the stored incident location and reference tools
Immediately below the incident description, the map shows the training incident pin in Chicago. The location label reads Training site one, fictional, Chicago, Illinois. Compare that stored location with the incident you are reviewing. It is incident context; it is not evidence of a responder arriving there. Notes, Images, Files and Route sit together below the map. Identify these entry points so you know where to look for supporting information when coordinating with another operator.
Practice
Match the incident pin and location label, then locate Notes, Images, Files and Route without treating the pin as a crew position.
Step 4
Read the complete Readiness result
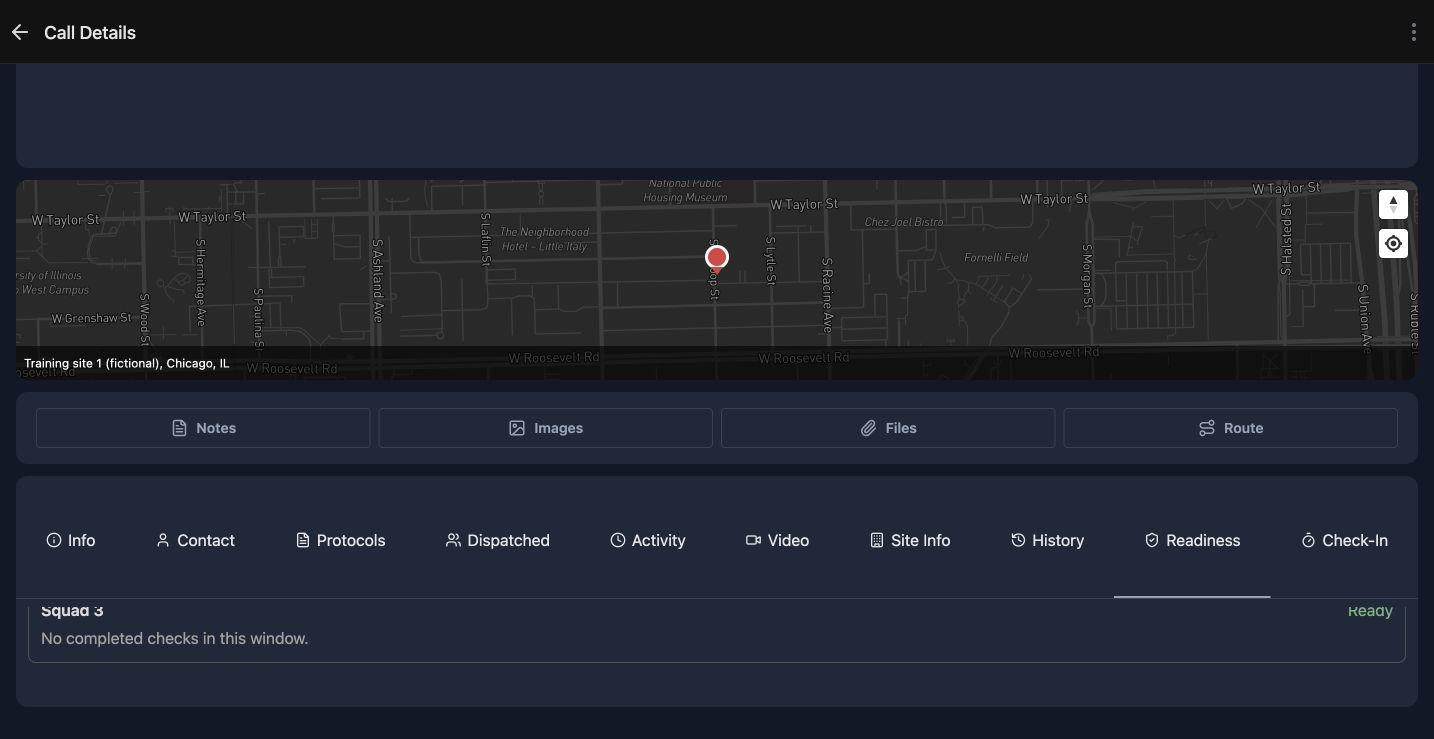
Scroll to the call tabs and choose Readiness. The selected tab is underlined. In this exercise, the unit row names Squad Three and shows Ready on the right. Read the next line as well: No completed checks in this window. Those two messages are visible together. The Ready label alone does not establish that someone completed an apparatus checklist. During a handover, report the unit name, the displayed status and the evidence message together. That helps the next operator identify what still needs confirmation.
Practice
Read Squad 3, Ready and the completed-checks message together. Explain why the status label alone is not proof of a completed checklist.
Step 5
Inspect the Check-In tab independently
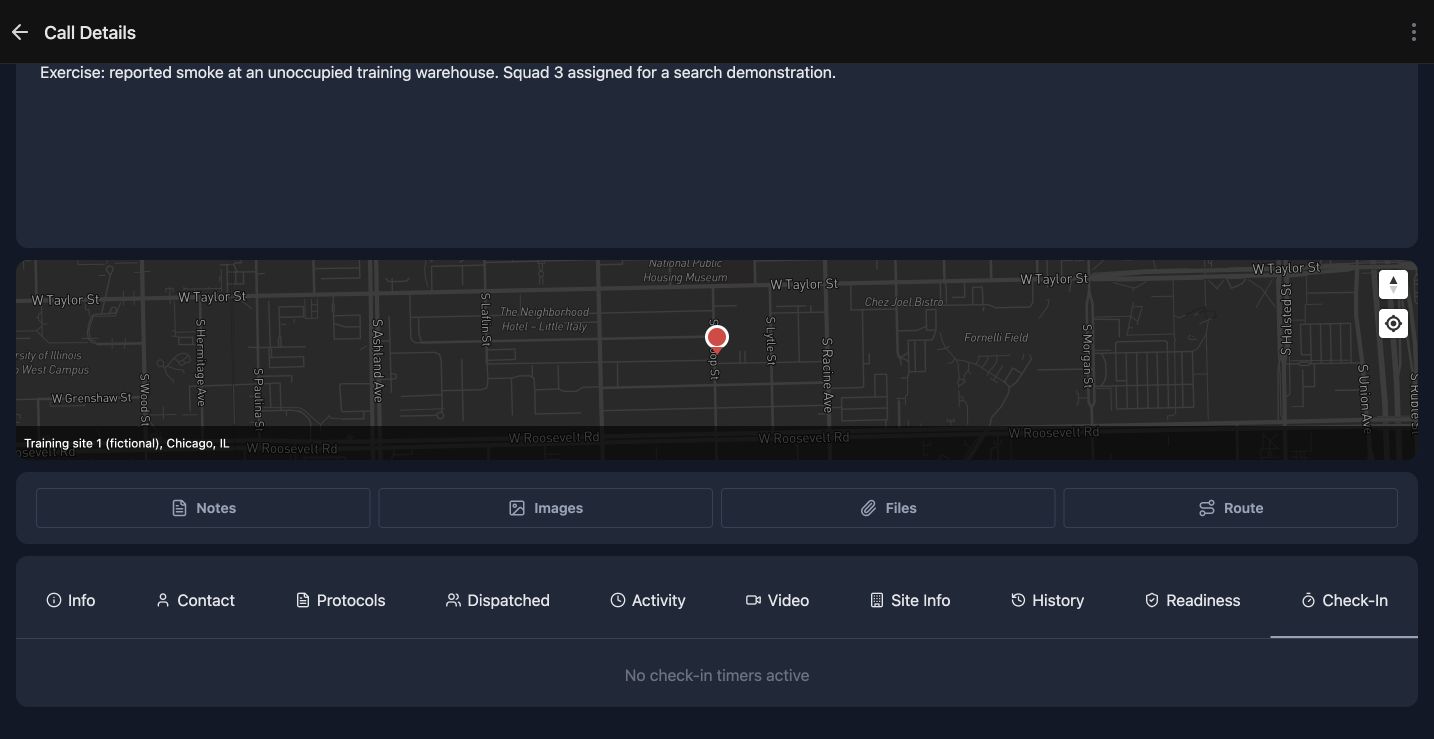
Choose Check-In at the right end of the same tab row. In this exercise, the selected tab says No check-in timers active. That is the current result for this call. It does not show a completed personnel check-in or an accountability result. Keep this observation separate from the unit readiness summary. An operator who only reports Ready has omitted the fact that this call view currently has no active check-in timers.
Practice
Locate Check-In and read its actual result. Distinguish an inactive timer view from a completed check-in.
Step 6
Compare both views before a handover
Compare the two tabs before briefing a relief operator. Readiness shows Squad Three as Ready, with no completed checks in this window. Check-In shows no active timers. A useful handover preserves both statements, instead of turning either one into a blanket assurance about the crew. Resolve missing operational information through your department's coordination process. In practice, read each tab aloud and have a colleague identify which facts were actually displayed.
Practice
Give a short handover that includes both exact results and keeps missing information explicit.
Step 7
Carry the verified context into command coordination
Return to the call heading to confirm the incident identity again before moving on to Open Command Board. The same review pattern helps a fire or E M S command aide, a community paramedicine or mental health coordinator, a search-and-rescue lead, a security supervisor, a wildland contractor or an industrial response team. Names and assignments will differ, but the task is the same: identify the incident, read the actual status and evidence messages, then pass on a precise account of what the screens show.
Practice
Summarize the incident identity, stored location, readiness evidence and timer state for another authorized operator.
Examples for your department
- Fire / EMS
- A command aide reports the incident identity and both readiness and timer messages during relief.
- Community response
- A community paramedicine or mental health coordinator confirms the selected operational incident and identifies missing readiness evidence.
- Search and rescue
- A search coordinator distinguishes a stored mission location from proof of a team arriving there.
- Security
- An event supervisor compares readiness and check-in views before handing a coordination workstation to a colleague.
- Wildland
- A contractor reports actual crew-unit status and evidence messages without treating an incident pin as a crew position.
- Industrial
- An exercise coordinator gives a precise briefing from the selected incident and its two status tabs.
Transcript
Download transcriptRead the complete transcript
IC: review incident context, unit readiness and check-in status
Audience: Incident commanders, Command aides, Department supervisors

Identify the incident in Calls
IC gives incident commanders, command aides and supervisors a shared place to review an incident. Begin in Calls. The visible cards identify the Vehicle rescue exercise as DEMO zero zero zero three, and the Community medical standby as DEMO zero zero zero two. Each card brings together its name, location and assigned resources. Read those details together before selecting the incident you intend to review. Search calls is above the list when you need to locate another incident.
Practice: Locate the Calls list and Search calls, then compare the number, name and resource tags on a fictional incident card.

Confirm the selected call and command context
For the detailed review, we use the separate Warehouse alarm exercise, DEMO zero zero zero one. Call Details shows that name and number at the top. Its description says reported smoke at an unoccupied training warehouse, with Squad Three assigned for a search demonstration. Active Command and Open Command Board are visible on the right. Confirm the selected incident before carrying information into a command board; a similar exercise name in the list can refer to a different call.
Practice: Confirm the selected incident number and read the exercise description before identifying Open Command Board.

Check the stored incident location and reference tools
Immediately below the incident description, the map shows the training incident pin in Chicago. The location label reads Training site one, fictional, Chicago, Illinois. Compare that stored location with the incident you are reviewing. It is incident context; it is not evidence of a responder arriving there. Notes, Images, Files and Route sit together below the map. Identify these entry points so you know where to look for supporting information when coordinating with another operator.
Practice: Match the incident pin and location label, then locate Notes, Images, Files and Route without treating the pin as a crew position.

Read the complete Readiness result
Scroll to the call tabs and choose Readiness. The selected tab is underlined. In this exercise, the unit row names Squad Three and shows Ready on the right. Read the next line as well: No completed checks in this window. Those two messages are visible together. The Ready label alone does not establish that someone completed an apparatus checklist. During a handover, report the unit name, the displayed status and the evidence message together. That helps the next operator identify what still needs confirmation.
Practice: Read Squad 3, Ready and the completed-checks message together. Explain why the status label alone is not proof of a completed checklist.

Inspect the Check-In tab independently
Choose Check-In at the right end of the same tab row. In this exercise, the selected tab says No check-in timers active. That is the current result for this call. It does not show a completed personnel check-in or an accountability result. Keep this observation separate from the unit readiness summary. An operator who only reports Ready has omitted the fact that this call view currently has no active check-in timers.
Practice: Locate Check-In and read its actual result. Distinguish an inactive timer view from a completed check-in.

Compare both views before a handover
Compare the two tabs before briefing a relief operator. Readiness shows Squad Three as Ready, with no completed checks in this window. Check-In shows no active timers. A useful handover preserves both statements, instead of turning either one into a blanket assurance about the crew. Resolve missing operational information through your department's coordination process. In practice, read each tab aloud and have a colleague identify which facts were actually displayed.
Practice: Give a short handover that includes both exact results and keeps missing information explicit.

Carry the verified context into command coordination
Return to the call heading to confirm the incident identity again before moving on to Open Command Board. The same review pattern helps a fire or E M S command aide, a community paramedicine or mental health coordinator, a search-and-rescue lead, a security supervisor, a wildland contractor or an industrial response team. Names and assignments will differ, but the task is the same: identify the incident, read the actual status and evidence messages, then pass on a precise account of what the screens show.
Practice: Summarize the incident identity, stored location, readiness evidence and timer state for another authorized operator.

Examples for your department
Fire / EMS: A command aide reports the incident identity and both readiness and timer messages during relief.
Community response: A community paramedicine or mental health coordinator confirms the selected operational incident and identifies missing readiness evidence.
Search and rescue: A search coordinator distinguishes a stored mission location from proof of a team arriving there.
Security: An event supervisor compares readiness and check-in views before handing a coordination workstation to a colleague.
Wildland: A contractor reports actual crew-unit status and evidence messages without treating an incident pin as a crew position.
Industrial: An exercise coordinator gives a precise briefing from the selected incident and its two status tabs.